02、Kubernetes - 实战:在Kubernetes使用kubevirt运行管理Ubuntu/Windows桌面操作系统
一、前言
在容器化部署的云原生环境中,我们还是在某些情况下需要虚拟机来解决一些特殊的问题,最为直接的例子就是需要Desktop来运行一些带GUI的程序。这里尝试在Kubernetes运行Ubuntu和Windows Desktop,并且在里面运行浏览器,这可以满足某些研发或者测试人员在内部安全的测试一些系统的浏览器效果。
虚拟机的运行时还是使用qemu/kvm,而管理虚拟机的运行时使用kubevirt,它的安装方法请参见《十九:配置kubernetes使用kubevirt管理虚拟机》。当然,一般的公有云供应商在虚拟机环境是不支持嵌套虚拟化的,所以也没法使用kubevirt,所以这个方案是在自建机房基于物理机集群的Kubernetes上部署实施的。
在使用Kubernetes管理虚拟机的时候,需要先制作虚拟机镜像,然后使用Kubernetes节点的本地存储或者网络存储来存储镜像。
二、使用Kubernetes部署管理Ubuntu桌面系统
2.1 制作镜像
首先使用Virtualbox安装一个Ubuntu桌面系统,随后开机安装openssh-server和remote-viewer。关机之后找到镜像ububtu.vdi,上传到某个Kubernetes节点,并且使用qemu-img将vdi格式转成raw格式且赋予把owner权限给qemu(107) user和group:
qemu-img convert -f vdi -O raw ubuntu.vdi ubuntu.img
mv ubuntu.img disk.img; chown 107.107 disk.img
mkdir /home/img; mv disk.img /home/img
更多选择可以参考kubevirt的这个手册。
2.2 创建host PV和PVC
local-volumes.yaml
apiVersion: v1
kind: PersistentVolume
metadata:
  name: ubuntu
  labels:
    type: local
    app: ubuntu
spec:
  capacity:
    storage: 100Gi
  accessModes:
    - ReadWriteOnce
  hostPath:
    path: /home/ubuntu-img
  persistentVolumeReclaimPolicy: Recycle
pvc.yaml
kind: PersistentVolumeClaim
apiVersion: v1
metadata:
  name: ubuntu
  namespace: vm
  annotations:
    volume.beta.kubernetes.io/storage-class: ""
spec:
  accessModes:
    - ReadWriteOnce
  resources:
    requests:
      storage: 100Gi
kubectl get pv | grep ubuntu
ubuntu 100Gi RWO Recycle Bound default/ubuntu 2h
kubectl get pvc -n vm
NAME STATUS VOLUME CAPACITY ACCESS MODES STORAGECLASS AGE
ubuntu Bound ubuntu 100Gi RWO 2s
2.3 部署VMI
使用nodeSelector选择PV所在的节点部署VMI,PV也可以使用网络共享存储如NFS或者ceph来作为系统的镜像盘存放地址,这样的话在任何一个集群节点都可以运行虚拟机实例。
vm-ubuntu.yaml
metadata:
  name: ubuntu
  namespace: vm
apiVersion: kubevirt.io/v1alpha2
kind: VirtualMachineInstance
spec:
  nodeSelector:
    kubernetes.io/hostname: k8s-node-01
  domain:
    resources:
      requests:
        memory: 2Gi
        cpu: 2
    devices:
      disks:
      - name: ubuntudisk
        volumeName: ubuntu
  volumes:
    - name: ubuntu
      persistentVolumeClaim:
        claimName: ubuntu
2.4 ssh进入虚拟机查看
kubectl get vmis -n vm
NAME      AGE
ubuntu    55s

#在k8s node查看虚拟机运行情况
[root@ubuntu /]# ps -ef | grep qemu
root          1      0  0 05:08 ?        00:00:00 /bin/bash /usr/share/kubevirt/virt-launcher/entrypoint.sh --qemu-timeout 5m --name ubuntu --uid 205f551f-d1cb-11e8-9a48-fa163ebda1b8 --namespace vm --kubevirt-share-dir /var/run/kubevirt --readiness-file /tmp/healthy --grace-period-seconds 45 --hook-sidecars 0
root          9      1  0 05:08 ?        00:00:00 virt-launcher --qemu-timeout 5m --name ubuntu --uid 205f551f-d1cb-11e8-9a48-fa163ebda1b8 --namespace vm --kubevirt-share-dir /var/run/kubevirt --readiness-file /tmp/healthy --grace-period-seconds 45 --hook-sidecars 0
qemu        214      1 39 05:08 ?        00:00:35 /usr/bin/qemu-system-x86_64 -machine accel=kvm -name guest=vm_ubuntu,debug-threads=on -S -object secret,id=masterKey0,format=raw,file=/var/lib/libvirt/qemu/domain-1-vm_ubuntu/master-key.aes -machine pc-q35-2.12,accel=kvm,usb=off,dump-guest-core=off -cpu Haswell-noTSX,vme=on,ss=on,f16c=on,rdrand=on,hypervisor=on,arat=on,tsc_adjust=on,xsaveopt=on,pdpe1gb=on,abm=on -m 2048 -realtime mlock=off -smp 1,sockets=1,cores=1,threads=1 -uuid 0d1f2051-ad1e-467f-b69e-c844f04edf88 -no-user-config -nodefaults -chardev socket,id=charmonitor,path=/var/lib/libvirt/qemu/domain-1-vm_ubuntu/monitor.sock,server,nowait -mon chardev=charmonitor,id=monitor,mode=control -rtc base=utc -no-shutdown -boot strict=on -device pcie-root-port,port=0x10,chassis=1,id=pci.1,bus=pcie.0,multifunction=on,addr=0x2 -device pcie-root-port,port=0x11,chassis=2,id=pci.2,bus=pcie.0,addr=0x2.0x1 -drive file=/var/run/kubevirt-private/vmi-disks/ubuntu/disk.img,format=raw,if=none,id=drive-ua-ubuntudisk -device ide-hd,bus=ide.0,drive=drive-ua-ubuntudisk,id=ua-ubuntudisk,bootindex=1 -netdev tap,fd=23,id=hostua-default -device virtio-net-pci,netdev=hostua-default,id=ua-default,mac=1e:3c:9a:25:33:7e,bus=pci.1,addr=0x0 -chardev socket,id=charserial0,path=/var/run/kubevirt-private/205f551f-d1cb-11e8-9a48-fa163ebda1b8/virt-serial0,server,nowait -device isa-serial,chardev=charserial0,id=serial0 -vnc vnc=unix:/var/run/kubevirt-private/205f551f-d1cb-11e8-9a48-fa163ebda1b8/virt-vnc -device VGA,id=video0,vgamem_mb=16,bus=pcie.0,addr=0x1 -msg timestamp=on

[root@k8s-master-01 kubevirt]# kubectl get pod -n vm -o wide
NAME                         READY     STATUS    RESTARTS   AGE       IP               NODE          NOMINATED NODE
virt-launcher-ubuntu-kl7pt   1/1       Running   0          24s       10.244.154.251   k8s-node-01   <none>
#登陆进入虚拟机
[root@k8s-master-01 kubevirt]# ssh me@10.244.154.251
me@10.244.154.251's password:
Welcome to Ubuntu 18.04.1 LTS (GNU/Linux 4.15.0-29-generic x86_64)
 * Documentation:  https://help.ubuntu.com
 * Management:     https://landscape.canonical.com
 * Support:        https://ubuntu.com/advantage
 * Canonical Livepatch is available for installation.
   - Reduce system reboots and improve kernel security. Activate at:
     https://ubuntu.com/livepatch
209 packages can be updated.
83 updates are security updates.
Last login: Wed Oct 17 13:09:08 2018 from 172.2.1.100
me@me-VirtualBox:~$ ip a
1: lo: <LOOPBACK,UP,LOWER_UP> mtu 65536 qdisc noqueue state UNKNOWN group default qlen 1000
    link/loopback 00:00:00:00:00:00 brd 00:00:00:00:00:00
    inet 127.0.0.1/8 scope host lo
       valid_lft forever preferred_lft forever
    inet6 ::1/128 scope host
       valid_lft forever preferred_lft forever
2: enp1s0: <BROADCAST,MULTICAST,UP,LOWER_UP> mtu 1500 qdisc fq_codel state UP group default qlen 1000
    link/ether 1e:3c:9a:25:33:7e brd ff:ff:ff:ff:ff:ff
    inet 10.244.154.251/32 brd 10.244.154.251 scope global dynamic noprefixroute enp1s0
       valid_lft 86313563sec preferred_lft 86313563sec
    inet6 fe80::e6f1:6fdd:2036:aa83/64 scope link noprefixroute
       valid_lft forever preferred_lft forever
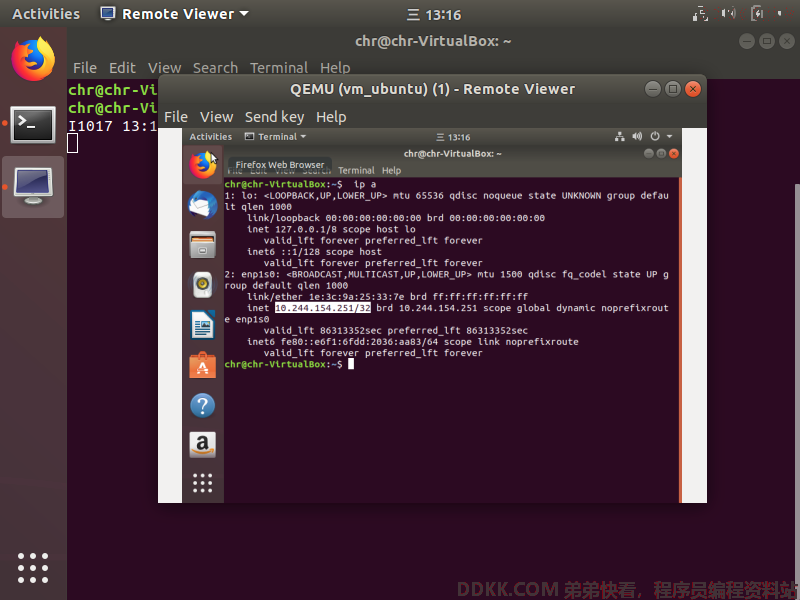
2.5 访问虚拟机VNC
./virtctl vnc --kubeconfig=./kubeconfig ubuntu -n vm
三、使用Kubernetes部署管理Windows桌面系统
3.1 制作镜像
使用虚拟机安装Windows镜像,并且安装virtio的驱动:
https://fedorapeople.org/groups/virt/virtio-win/direct-downloads/archive-virtio/
然后向Ubuntu镜像部署流程一样,上传到Kubernetes节点、转成raw格式并且将owner设置为qemu:
Upload the image to k8s-node-01 and convert to raw format
qemu-img convert -f vdi -O raw windows.vdi windows.img
mv ubuntu.img windows.img
chown 107.107 windows.img
3.2 创建host PV和PVC
---
apiVersion: v1
kind: PersistentVolume
metadata:
  name: windows
  labels:
    type: local
    app: windows
spec:
  capacity:
    storage: 100Gi
  accessModes:
    - ReadWriteOnce
  hostPath:
    path: /home/windows-img
  persistentVolumeReclaimPolicy: Recycle

---
kind: PersistentVolumeClaim
apiVersion: v1
metadata:
  name: windows
  namespace: vm
  annotations:
    volume.beta.kubernetes.io/storage-class: ""
spec:
  accessModes:
    - ReadWriteOnce
  resources:
    requests:
      storage: 100Gi
3.3 创建k8s管理的虚拟机实例
vm-windows.yaml,也使用nodeSelector选择节点
metadata:
  name: windows
  namespace: vm
apiVersion: kubevirt.io/v1alpha2
kind: VirtualMachineInstance
spec:
  nodeSelector:
    kubernetes.io/hostname: k8s-node-01
  domain:
    resources:
      requests:
        memory: 8Gi
        cpu: 4
    devices:
      disks:
      - name: windowsdisk
        volumeName: windows
  volumes:
    - name: windows
      persistentVolumeClaim:
        claimName: windows
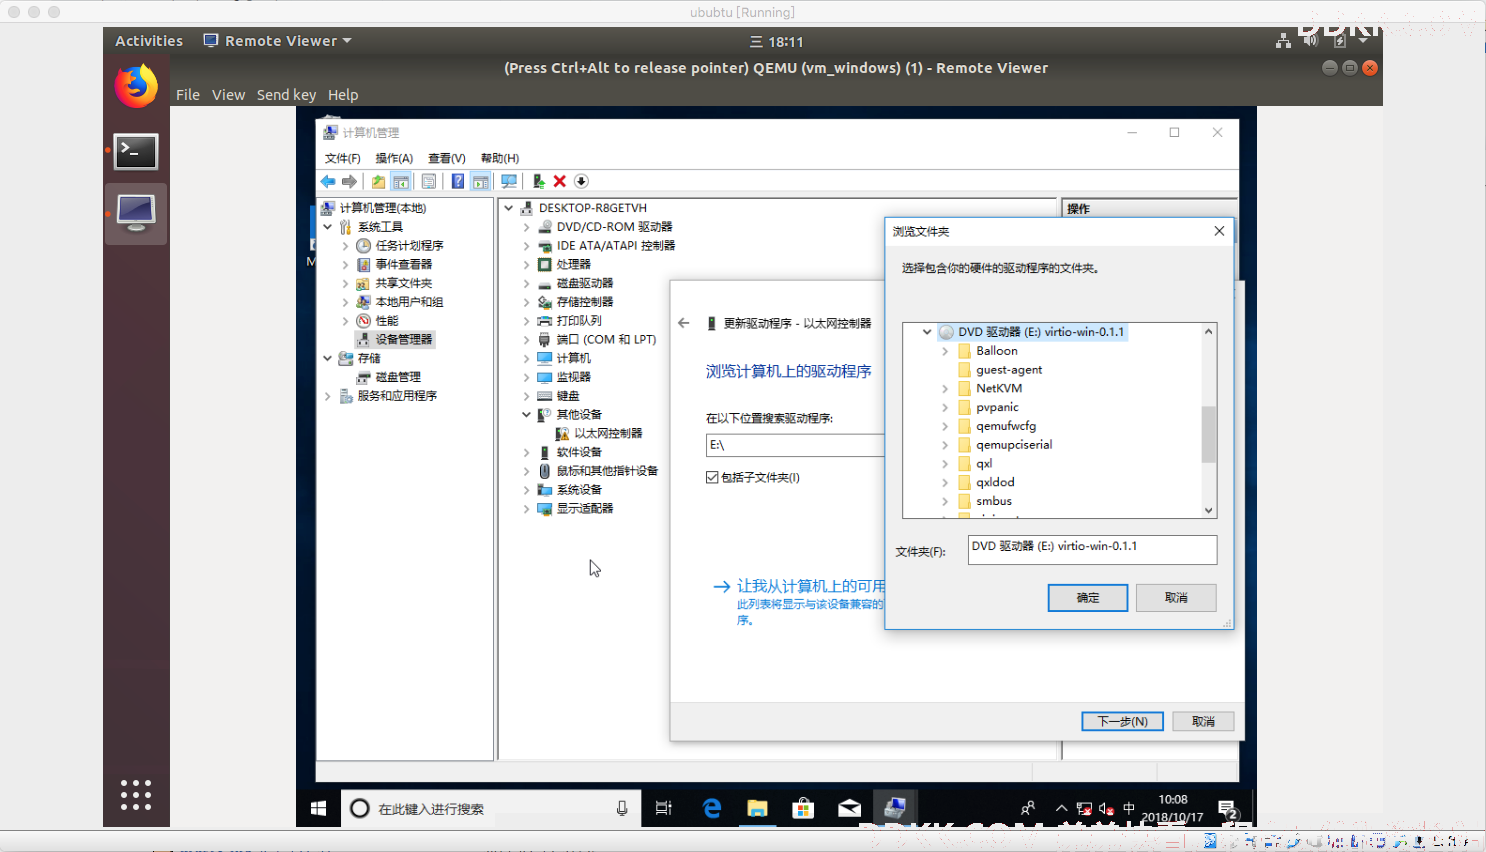
然后就可以通过vnc访问windows了
./virtctl vnc --kubeconfig=./kubeconfig windows -n vm
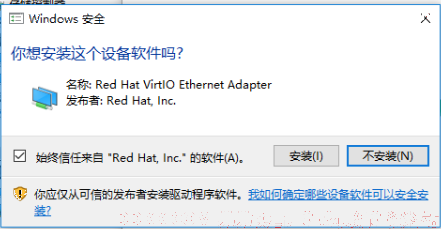
进去之后需要安装virtio网络驱动才可以访问外网
四、通过virtctl访问VMI的VNC
在MAC上可以参照这个文档进行:
#Install brew and kubectl

/usr/bin/ruby -e "$(curl -fsSL https://raw.githubusercontent.com/Homebrew/install/master/install)”
brew install kubernetes-cli
#Download Chicken and install

https://sourceforge.net/projects/chicken/
#Download virtctl and install
#https://github.com/kubevirt/kubevirt/releases/
sudo mv ~/Downloads/virtctl-v0.8.0-darwin-amd64 /usr/local/bin/virtctl
chmod a+x /usr/local/bin/virtctl

#Edit remote-viewer file

/usr/local/bin/remote-viewer
#!/bin/bash
HOSTPORT=${1//vnc:\/\/}
/Applications/Chicken.app/Contents/MacOS/Chicken $HOSTPORT

chmod a+x  /usr/local/bin/remote-viewer
获取VMI信息并且连接:
#Get VM info
kubectl get pod -n vm
NAME                          READY   STATUS    RESTARTS   AGE
virt-launcher-ubuntu-7n46t    1/1     Running   0          1h
virt-launcher-windows-wzcsb   1/1     Running   0          1h

kubectl get vmis -n vm
NAME      AGE
ubuntu    1h
windows   1h

#Connect
virtctl vnc ubuntu -n vm
virtctl vnc windows -n vm