23、Spring Security 速成 - OAuth2:使用JWT和加密签名(上)对称密钥加密
一、前言
最近阳了所以一直都在休整,大家一定要注意身体,能不阳就不阳,如果阳康后还是一直咳嗽,最好是能去医院看看,这绝对不是专家口中所说的新冠感冒那么简单,也绝对不是什么80%的无症状,大家不要放松警惕,仅以我个人观点发声,身体才是最重要的。好了,接下来步入正题,终于,我们也迎来了Spring Security的尾声,学习完jwtTokenStore之后,Spring Security的主要内容学习就告一段落,之后我可能还会更新一些这方面的拓展,例如全局方法安全性,但这些都是后话了。然后是本章的代码仍然是以前面学习过的代码为基础的情况下继续修改开发,所以大家需要先去学习之前的再来学习本章效果才会更好。之后我打算开始一个新的技术栈—》elasticSearch,并且学习gitee的一个项目打造一个基于springboot的elasticsearch java客户端调用封装工具。希望大家也能跟着我一起坚持学习。
本章将讨论如何将JSON Web Token(JWT)用于令牌实现。
使用加密签名验证令牌的优点是允许资源服务器验证令牌,而不需要直接调用授权服务器,也不需要共享数据库。这种实现令牌验证的方法通常用于使用OAuth2实现身份验证和授权的系统。出于这个原因,我们需要了解这一实现令牌验证的方式。
二、使用JWT以及对称秘钥签名的令牌
用于令牌签名的最简单的方法是使用对称秘钥。在这种方法中,使用相同的密钥,既可以签署一个令牌,又可以验证它的签名。使用对称秘钥对令牌进行签名的优点是,它比将在本章后面内容讨论的其他方法更简单,而且速度更快。然后,正如将介绍的,它也有缺点,不能总是与身份验证过程中涉及的所有应用程序共享用于签名令牌的密钥。
2.1、使用JWT
JWT是一个令牌实现。令牌由三部分组成:头信息、主体和签名。头信息和主体中的详情用JSON表示,并且它们是Base64编码的,第三部分是签名,这是使用一种加密算法生成的,该算法使用头信息和主体作为其输入。密码算法还意味着需要密钥。密钥就像一个密码,拥有正确密钥的所有者可以签署令牌或验证签名的真实性。如果令牌上的签名是真实的,就可以确保在签名之后没有人修改令牌。
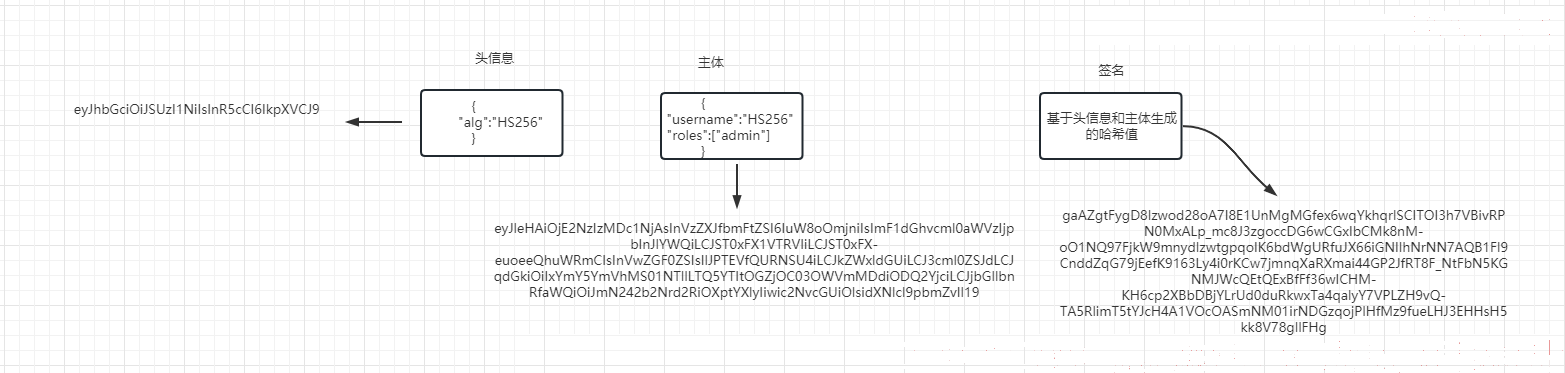
当JWT被签名时,我们也称它为JWS(JSON Web Token Signed)。通常,应用加密算法对令牌进行签名就足够了,但有时可以选择对令牌进行加密,如果对令牌进行了签名,就可以在没有任何密钥或密码的情况下查看其内容。但是,即使黑客看到了令牌的内容,他们也不能更改令牌的内容,因为如果他们这么做了,签名就会无效。要让签名有效,签名必须
- 是使用正确密钥生成的
- 匹配签名过的内容
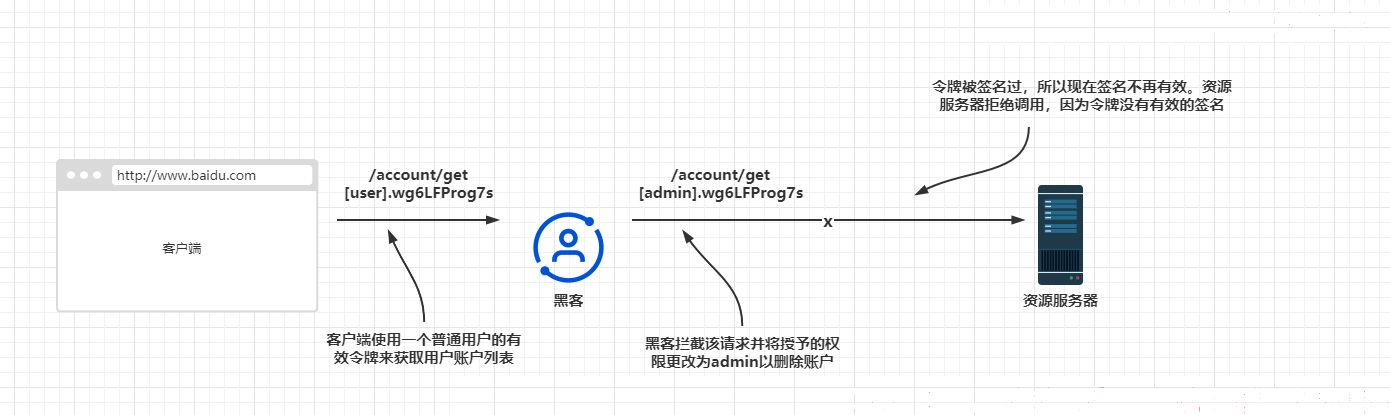
如果令牌被加密了,则还会将其称为JWE(JSON Web Token Encrypted)。没有有效密钥,则无法看到已加密令牌的内容。
2.2、使用授权服务器以颁发JWT
本家将实现一个授权服务器,该服务器会向客户端颁发JWT以进行授权。我们之前说过管理令牌的组件是TokenStore。本节要做的是使用Spring Security提供的TokenStore的另一种实现。这里要使用的实现的名称是JwtTokenStore,它会管理JWT。本节还将测试授权服务器。而关于资源服务器,我们暂时不会进行特定实现,之后会解析原因。
- 如果使用相同的密钥对令牌进行签名和验证签名,就可以说该密钥是对称的。
- 如果使用一个密钥签名令牌,但使用另一个密钥验证签名,则可以说使用的是一个非对称密钥对。
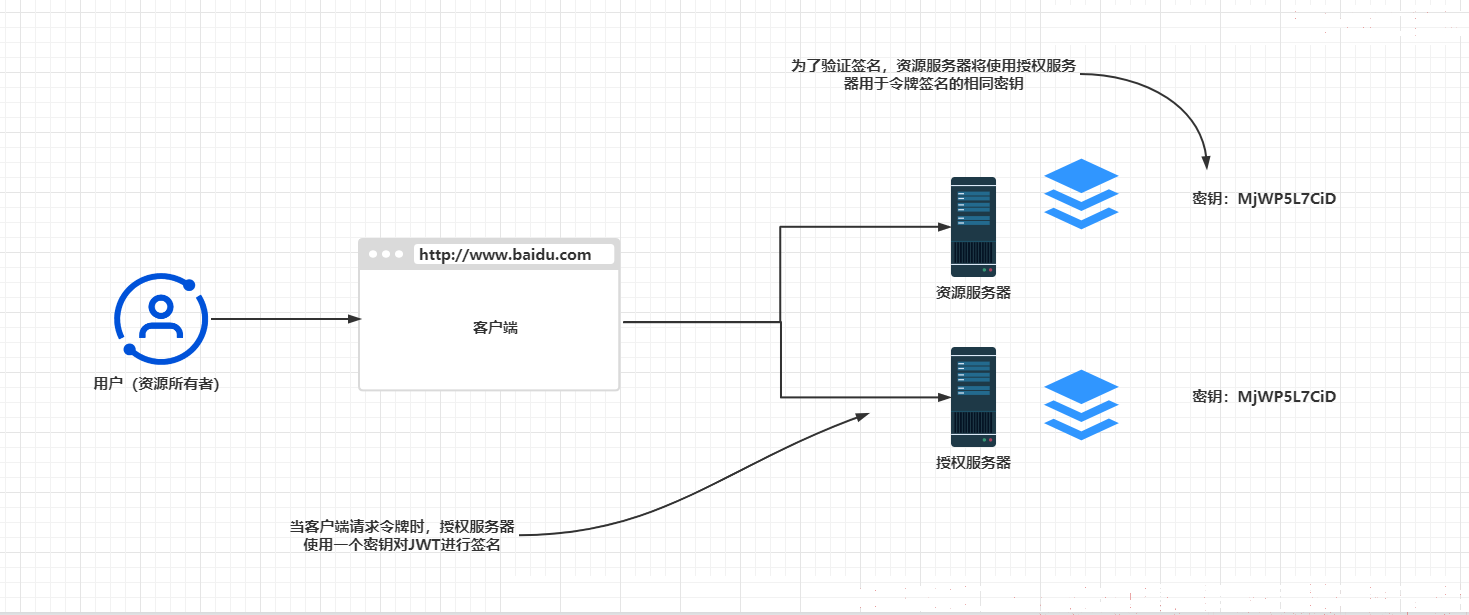
这个示例将使用对称密钥实现签名。这种方法意味着授权服务器和资源服务器都知道并使用相同的密钥。授权服务器使用密钥对令牌进行签名,资源服务器使用相同的密钥验证签名。
那么依赖仍然使用我们之前学习搭建项目使用的依赖即可。
这里为JdbcTokenStore配置JwtTokenStore的方式与 第14章相同。此外,还需要定义一个JwtAccessTokenConverter类型的对象。使用JwtAccessTokenConverter,就可以配置授权服务器验证令牌的方式;在这个示例中,将使用对称密钥。下面代码展示了如何在授权服务器配置类中配置JwtTokenStore:
import com.mbw.security.service.ClientDetailsServiceImpl;
import com.mbw.security.service.UserDetailsServiceImpl;
import com.mbw.security.token.JsonRedisTokenStore;
import com.mbw.security.token.enhancer.CustomTokenEnhancer;
import org.springframework.beans.factory.annotation.Autowired;
import org.springframework.beans.factory.annotation.Value;
import org.springframework.context.annotation.Bean;
import org.springframework.context.annotation.Configuration;
import org.springframework.security.authentication.AuthenticationManager;
import org.springframework.security.oauth2.config.annotation.configurers.ClientDetailsServiceConfigurer;
import org.springframework.security.oauth2.config.annotation.web.configuration.AuthorizationServerConfigurerAdapter;
import org.springframework.security.oauth2.config.annotation.web.configuration.EnableAuthorizationServer;
import org.springframework.security.oauth2.config.annotation.web.configurers.AuthorizationServerEndpointsConfigurer;
import org.springframework.security.oauth2.config.annotation.web.configurers.AuthorizationServerSecurityConfigurer;
import org.springframework.security.oauth2.provider.token.DefaultTokenServices;
import org.springframework.security.oauth2.provider.token.TokenEnhancer;
import org.springframework.security.oauth2.provider.token.TokenEnhancerChain;
import org.springframework.security.oauth2.provider.token.TokenStore;
import org.springframework.security.oauth2.provider.token.store.JwtAccessTokenConverter;
import org.springframework.security.oauth2.provider.token.store.JwtTokenStore;

import java.util.ArrayList;
import java.util.List;
@Configuration
@EnableAuthorizationServer
public class AuthServerConfig extends AuthorizationServerConfigurerAdapter {


	@Autowired
	private AuthenticationManager authenticationManager;
	@Autowired
	private ClientDetailsServiceImpl clientDetailsServiceImpl;
	@Autowired
	private UserDetailsServiceImpl userDetailsServiceImpl;
	@Autowired
	private CustomTokenEnhancer customTokenEnhancer;
	@Autowired
	private JsonRedisTokenStore jsonRedisTokenStore;

	@Value("${jwt.key}")
	private String jwtKey;  //从application.yaml文件中获取对称密钥的值

	@Override
	public void configure(AuthorizationServerEndpointsConfigurer endpoints) throws Exception {


		endpoints.authenticationManager(authenticationManager)
				.userDetailsService(userDetailsServiceImpl)
				.accessTokenConverter(jwtAccessTokenConverter()) //配置访问令牌转换器对象
				.tokenStore(tokenStore());    //配置令牌存储对象
		DefaultTokenServices tokenService = getTokenStore(endpoints);
		endpoints.tokenServices(tokenService);
	}

	//配置TokenService参数
	private DefaultTokenServices getTokenStore(AuthorizationServerEndpointsConfigurer endpoints) {


		DefaultTokenServices tokenService = new DefaultTokenServices();
		tokenService.setTokenStore(endpoints.getTokenStore());
		tokenService.setSupportRefreshToken(true);
		tokenService.setClientDetailsService(endpoints.getClientDetailsService());
		tokenService.setTokenEnhancer(endpoints.getTokenEnhancer());
		//token有效期 1小时
		tokenService.setAccessTokenValiditySeconds(3600);
		//token刷新有效期 15天
		tokenService.setRefreshTokenValiditySeconds(3600 * 12 * 15);
		tokenService.setReuseRefreshToken(false);
		return tokenService;
	}

	@Override
	public void configure(ClientDetailsServiceConfigurer clients) throws Exception {


		clients.withClientDetails(clientDetailsServiceImpl);
	}

	/**
	 * 解决访问/oauth/check_token 403的问题
	 *
	 * @param security
	 * @throws Exception
	 */
	@Override
	public void configure(AuthorizationServerSecurityConfigurer security) throws Exception {


		// 允许表单认证
		security
				.tokenKeyAccess("permitAll()")
				.checkTokenAccess("permitAll()")
				.allowFormAuthenticationForClients();

	}

	@Bean
	public TokenStore tokenStore(){


		return new JwtTokenStore(jwtAccessTokenConverter());  //创建带有与之关联的访问令牌转换器的令牌存储
	}

	@Bean
	public JwtAccessTokenConverter jwtAccessTokenConverter(){


		JwtAccessTokenConverter jwtAccessTokenConverter = new JwtAccessTokenConverter();
		jwtAccessTokenConverter.setSigningKey(jwtKey); //设置访问令牌转换器对象的对称密钥的值
		return jwtAccessTokenConverter;
	}
}
这里在application.yaml文件中存储了这个示例的对称密钥的值,如下面的代码片段所示。但是,不要忘记签名密钥是敏感数据,在现实场景中将其存储在密钥库中!
jwt:
  key: MjWP5L7CiD
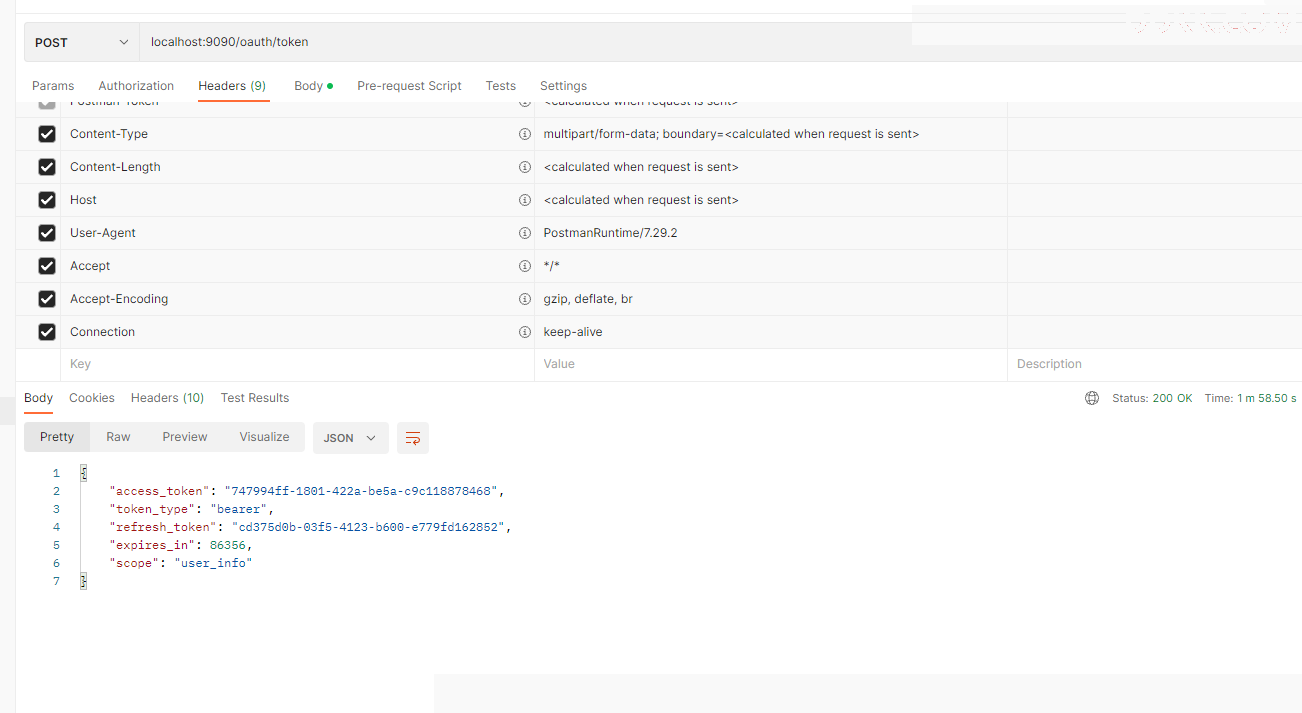
接下来可以启动授权服务器并调用/oauth/token端点来获取访问令牌。下面的代码片段展示了用于调用/oauth/token端点的postman调用展示:
调用后,首先在DefaultTokenService建立原始的refreshToken和accessToken,此时它们还不是JWT

然后放行,你会发现程序直接结束了,出来的token不是jwt,这是为什么呢?
经过我初步查资料,首先我们回归到创建token的代码----DefaultTokenServices
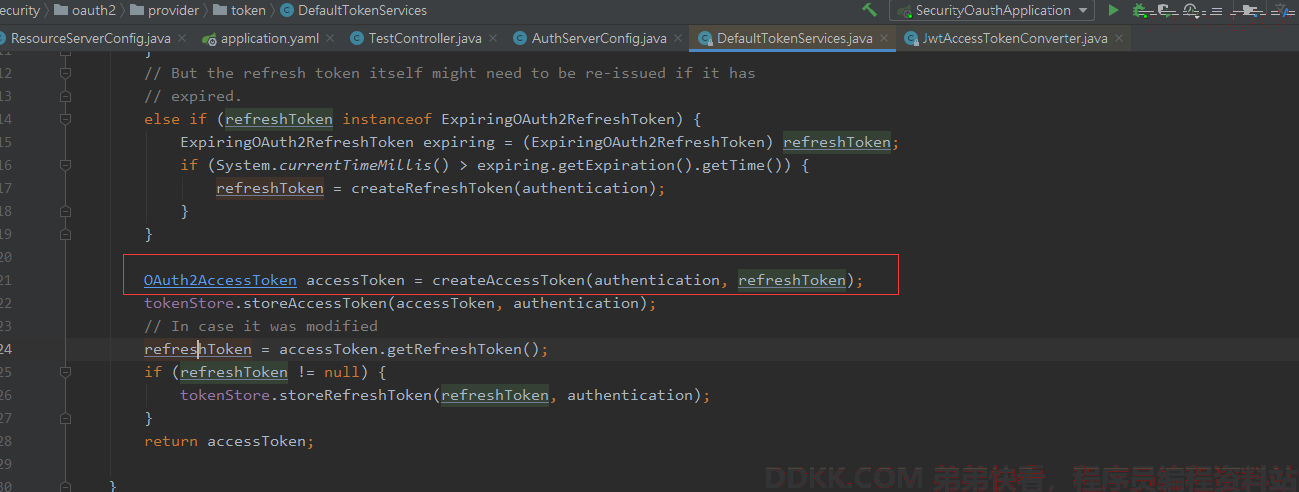
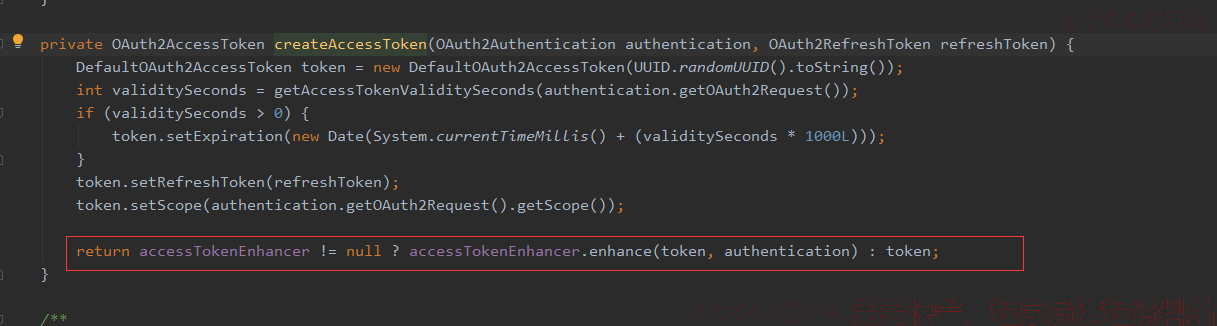
我们点进createAccessToken的方法,看到最后一行代码,如果accessTokenEnhancer存在,则做token增强,如果不存在,则返回普通token。回到问题之初,正是返回了普通token,所以,最大的可能便是此处的accessTokenEnhancer为空。
那我们debug看一下原因是否是这个:
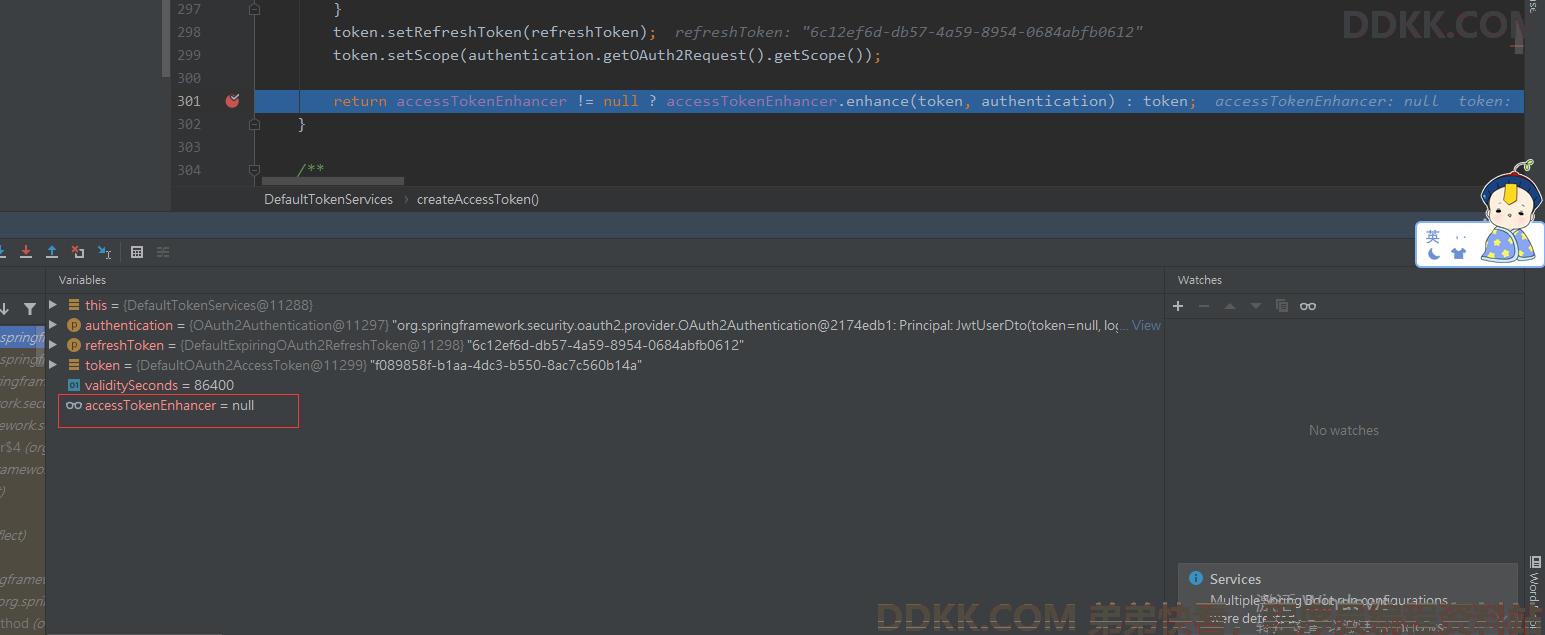
果然是空,所以我们的配置类根本没有设置这个accessTokenEnhancer
我们来到配置DefaultTokenServices的地方–AuthorizationServerEndpointsConfigurer:
private DefaultTokenServices createDefaultTokenServices() {


		DefaultTokenServices tokenServices = new DefaultTokenServices();
		tokenServices.setTokenStore(tokenStore());
		tokenServices.setSupportRefreshToken(true);
		tokenServices.setReuseRefreshToken(reuseRefreshToken);
		tokenServices.setClientDetailsService(clientDetailsService());
		tokenServices.setTokenEnhancer(tokenEnhancer());
		addUserDetailsService(tokenServices, this.userDetailsService);
		return tokenServices;
	}

	private TokenEnhancer tokenEnhancer() {


		if (this.tokenEnhancer == null && accessTokenConverter() instanceof JwtAccessTokenConverter) {


			tokenEnhancer = (TokenEnhancer) accessTokenConverter;
		}
		return this.tokenEnhancer;
	}
逻辑比较明显,如果tokenEnhancer为空,同时,此时的accessTokenConverter为JwtAccessTokenConverter时,tokenEnhancer便赋值为accessTokenConverter,即JwtAccessTokenConverter。但是此时,我们并没有配置accessTokenConverter。所以tokenEnhancer便为空。从而造成DefaultTokenServices中的token返回便会直接普通token。
那你可能会有疑问,刚刚那段代码我们不是配置了accessTokenConverter吗,为什么没生效呢,原因就在于我们自己配置的DefaultTokenServices修改了配置类获取tokenEnhancer的逻辑:
//配置TokenService参数
	private DefaultTokenServices getTokenStore(AuthorizationServerEndpointsConfigurer endpoints) {


		DefaultTokenServices tokenService = new DefaultTokenServices();
		tokenService.setTokenStore(endpoints.getTokenStore());
		tokenService.setSupportRefreshToken(true);
		tokenService.setClientDetailsService(endpoints.getClientDetailsService());
		tokenService.setTokenEnhancer(endpoints.getTokenEnhancer());
		//token有效期 1小时
		tokenService.setAccessTokenValiditySeconds(3600);
		//token刷新有效期 15天
		tokenService.setRefreshTokenValiditySeconds(3600 * 12 * 15);
		tokenService.setReuseRefreshToken(false);
		return tokenService;
	}
看到我们这边调用的tokenEnhancer使用的是endpoints.getTokenEnhancer,点进这个方法可以看到它使用的是源码中获取tokenEnhancer的代码,也就是我们如果没有做额外配置,它直接取的是你一开始的属性,也就是空,也就是没有走我们刚刚看到的处理enhancer的逻辑,那么就算我们设置了tokenConverter也是无济于事的:

那么我们唯一想到的办法就是给endPoints(AuthorizationServerEndpointsConfigurer)配置上我们的tokenEnhancer,你可能会想,我不额外配置DefaultTokenServices就好了,让它使用默认的,但现在假设我们需要额外设置token的有效时间这些属性,那我们不得不重写tokenServices这个类,那么方法就只有对endPoints中的tokenEnhancer下手,这里呢我们可以直接写一个方法配置tokenEnhancer:
import com.mbw.security.service.ClientDetailsServiceImpl;
import com.mbw.security.service.UserDetailsServiceImpl;
import com.mbw.security.token.JsonRedisTokenStore;
import com.mbw.security.token.enhancer.CustomTokenEnhancer;
import org.springframework.beans.factory.annotation.Autowired;
import org.springframework.beans.factory.annotation.Value;
import org.springframework.context.annotation.Bean;
import org.springframework.context.annotation.Configuration;
import org.springframework.security.authentication.AuthenticationManager;
import org.springframework.security.oauth2.config.annotation.configurers.ClientDetailsServiceConfigurer;
import org.springframework.security.oauth2.config.annotation.web.configuration.AuthorizationServerConfigurerAdapter;
import org.springframework.security.oauth2.config.annotation.web.configuration.EnableAuthorizationServer;
import org.springframework.security.oauth2.config.annotation.web.configurers.AuthorizationServerEndpointsConfigurer;
import org.springframework.security.oauth2.config.annotation.web.configurers.AuthorizationServerSecurityConfigurer;
import org.springframework.security.oauth2.provider.token.DefaultTokenServices;
import org.springframework.security.oauth2.provider.token.TokenEnhancer;
import org.springframework.security.oauth2.provider.token.TokenEnhancerChain;
import org.springframework.security.oauth2.provider.token.TokenStore;
import org.springframework.security.oauth2.provider.token.store.JwtAccessTokenConverter;
import org.springframework.security.oauth2.provider.token.store.JwtTokenStore;

import java.util.ArrayList;
import java.util.List;
@Configuration
@EnableAuthorizationServer
public class AuthServerConfig extends AuthorizationServerConfigurerAdapter {


	@Autowired
	private AuthenticationManager authenticationManager;
	@Autowired
	private ClientDetailsServiceImpl clientDetailsServiceImpl;
	@Autowired
	private UserDetailsServiceImpl userDetailsServiceImpl;
	@Autowired
	private CustomTokenEnhancer customTokenEnhancer;
	@Autowired
	private JsonRedisTokenStore jsonRedisTokenStore;

	@Value("${jwt.key}")
	private String jwtKey;

	@Override
	public void configure(AuthorizationServerEndpointsConfigurer endpoints) throws Exception {


		endpoints.authenticationManager(authenticationManager)
				.userDetailsService(userDetailsServiceImpl)
				.tokenEnhancer(tokenEnhancerChain())
				.tokenStore(tokenStore());
		DefaultTokenServices tokenService = getTokenStore(endpoints);
		endpoints.tokenServices(tokenService);
	}

	@Bean
	public TokenEnhancerChain tokenEnhancerChain(){


		TokenEnhancerChain enhancerChain = new TokenEnhancerChain();
		List<TokenEnhancer> enhancers = new ArrayList<>();
		enhancers.add(jwtAccessTokenConverter());
		enhancers.add(customTokenEnhancer);
		enhancerChain.setTokenEnhancers(enhancers);//将自定义Enhancer加入EnhancerChain的delegates数组中
		return enhancerChain;
	}

	//配置TokenService参数
	private DefaultTokenServices getTokenStore(AuthorizationServerEndpointsConfigurer endpoints) {


		DefaultTokenServices tokenService = new DefaultTokenServices();
		tokenService.setTokenStore(endpoints.getTokenStore());
		tokenService.setSupportRefreshToken(true);
		tokenService.setClientDetailsService(endpoints.getClientDetailsService());
		tokenService.setTokenEnhancer(endpoints.getTokenEnhancer());
		//token有效期 1小时
		tokenService.setAccessTokenValiditySeconds(3600);
		//token刷新有效期 15天
		tokenService.setRefreshTokenValiditySeconds(3600 * 12 * 15);
		tokenService.setReuseRefreshToken(false);
		return tokenService;
	}

	@Override
	public void configure(ClientDetailsServiceConfigurer clients) throws Exception {


		clients.withClientDetails(clientDetailsServiceImpl);
	}

	/**
	 * 解决访问/oauth/check_token 403的问题
	 *
	 * @param security
	 * @throws Exception
	 */
	@Override
	public void configure(AuthorizationServerSecurityConfigurer security) throws Exception {


		// 允许表单认证
		security
				.tokenKeyAccess("permitAll()")
				.checkTokenAccess("permitAll()")
				.allowFormAuthenticationForClients();

	}

	@Bean
	public TokenStore tokenStore(){


		return new JwtTokenStore(jwtAccessTokenConverter());
	}

	@Bean
	public JwtAccessTokenConverter jwtAccessTokenConverter(){


		JwtAccessTokenConverter jwtAccessTokenConverter = new JwtAccessTokenConverter();
		jwtAccessTokenConverter.setSigningKey(jwtKey);
		return jwtAccessTokenConverter;
	}
}
如上所示,配置自定义令牌增强器有点复杂,假设我现在需要额外配置一个自定义的令牌增强对象customTokenEnhancer,对我的令牌做一个增强,又想让其包含jwtTokenConverter的功能怎么办呢?
package com.mbw.security.token.enhancer;

import org.springframework.security.oauth2.common.DefaultOAuth2AccessToken;
import org.springframework.security.oauth2.common.OAuth2AccessToken;
import org.springframework.security.oauth2.provider.OAuth2Authentication;
import org.springframework.security.oauth2.provider.token.TokenEnhancer;
import org.springframework.stereotype.Component;

import java.util.Date;
import java.util.HashMap;

@Component
public class CustomTokenEnhancer implements TokenEnhancer {


	@Override
	public OAuth2AccessToken enhance(OAuth2AccessToken accessToken, OAuth2Authentication authentication) {


		DefaultOAuth2AccessToken token = new DefaultOAuth2AccessToken(accessToken);
		HashMap<String, Object> stringObjectHashMap = new HashMap<>();
		stringObjectHashMap.put("loginTime",new Date());
		token.setAdditionalInformation(stringObjectHashMap);
		return token;
	}
}
如上代码,既然提到了令牌增强,我就多提一嘴,有时候我们需要向令牌添加自定义的信息,比如上面代码中的loginTime,那么我们就需要创建一个TokenEnhancer类型的对象去实现TokenEnhancer接口,实现它的enhance()方法,enhance()方法会接收要增强的令牌作为参数,并返回该增强后的令牌,其中包含额外的详细信息。
那么我们必须创建一个令牌增强器链TokenEnhancerChain,并设置整个链,而不是只设置一个对象,因为访问令牌转换器对象也是一个令牌增强器。如果只配置自定义令牌增强器,则要重写访问令牌转换器的行为。我们转而要将两者都添加到职责链中,并配置包含这两个对象的链。
现在我们可以启动我们的授权服务器,并且调用/oauth/token接口了,大家也可以看到接口返回的信息多出了我们刚刚自定义的loginTIme
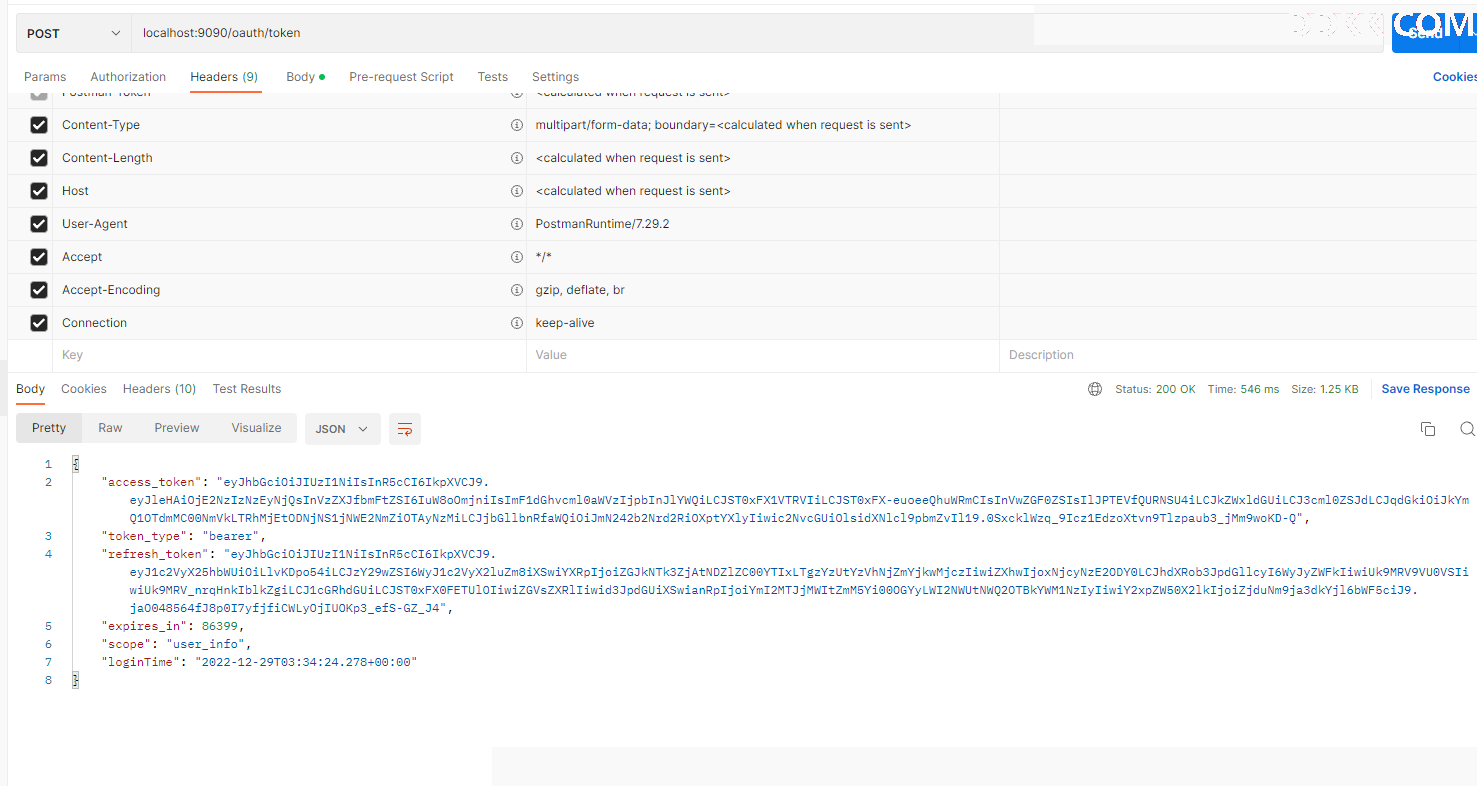
可以在响应中观察到,访问和刷新令牌现在都是JWT。在下面代码片段中,可以找到令牌主体的解码(JSON)形式,那么这个呢是通过一个在线解析jwt获取的,点击这个链接即可
{


  "exp": 1672371264,
  "user_name": "张飞",
  "authorities": [
    "read",
    "ROLE_USER",
    "ROLE_管理员",
    "update",
    "ROLE_ADMIN",
    "delete",
    "write"
  ],
  "jti": "dbd597f0-46ed-4a21-83c5-c5a66fb90273",
  "client_id": "f7n6ockwdb9zmayr",
  "scope": [
    "user_info"
  ]
}
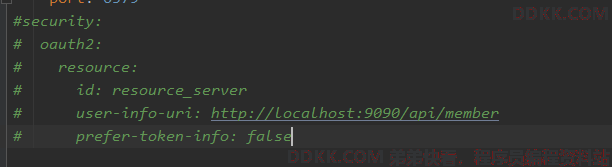
那么下一步我们实现资源服务器,我们来到我们之前搭建的另一个服务–spring_security_resource_server,首先我们将我们配置类之前在yaml配置的用来同步授权服务器那个服务中的资源服务器这部分配置代码先注释,这个是为了能更好的带大家体验jwtTokenStore
然后在yaml配置和授权服务器相同的对称密钥:
jwt:
  key: MjWP5L7CiD
然后在资源服务器中配置tokenStore,这个你会发现要比redisTokenStore好配置很多,之前我们配置redisTokenStore的做法是在授权服务器中暴露一个获取角色资源的端点,然后用授权服务器的同一个服务中的资源服务器去保护这个端点,这样就避免了在其他资源服务器服务中引入过多依赖,尤其是对userDetails还做了定制的服务。
但是jwtTokenStore不同,这个不需要我们引入过多依赖,所以我们可以试着通过在资源服务器中配置我们的jwtTokenStore。那么当时在授权服务器配置的资源服务器就没什么用了。那么回到正题,使用对称加密最重要的方式是确保密钥使用相同的值。资源服务器需要该密钥用来验证令牌的签名:
import org.springframework.beans.factory.annotation.Value;
import org.springframework.context.annotation.Bean;
import org.springframework.context.annotation.Configuration;
import org.springframework.security.config.annotation.web.builders.HttpSecurity;
import org.springframework.security.oauth2.config.annotation.web.configuration.EnableResourceServer;
import org.springframework.security.oauth2.config.annotation.web.configuration.ResourceServerConfigurerAdapter;
import org.springframework.security.oauth2.config.annotation.web.configurers.ResourceServerSecurityConfigurer;
import org.springframework.security.oauth2.provider.token.TokenStore;
import org.springframework.security.oauth2.provider.token.store.JwtAccessTokenConverter;
import org.springframework.security.oauth2.provider.token.store.JwtTokenStore;

import javax.servlet.http.HttpServletResponse;
@Configuration
@EnableResourceServer
public class ResourceServerConfig extends ResourceServerConfigurerAdapter {


	@Value("${jwt.key}")
	private String jwtKey;

	@Override
	public void configure(ResourceServerSecurityConfigurer resources) throws Exception {


		resources.tokenStore(tokenStore());
	}

	@Override
	public void configure(HttpSecurity http) throws Exception {


		http
				.csrf().disable()
				.exceptionHandling()
				.authenticationEntryPoint((request, response, authException) -> response.sendError(HttpServletResponse.SC_UNAUTHORIZED))
				.and()
				.authorizeRequests()
				.antMatchers("/test/**").authenticated()
				.and()
				.httpBasic();
	}
	@Bean
	public TokenStore tokenStore(){


		return new JwtTokenStore(jwtAccessTokenConverter());
	}

	@Bean
	public JwtAccessTokenConverter jwtAccessTokenConverter(){


		JwtAccessTokenConverter jwtAccessTokenConverter = new JwtAccessTokenConverter();
		jwtAccessTokenConverter.setSigningKey(jwtKey);
		return jwtAccessTokenConverter;
	}
}
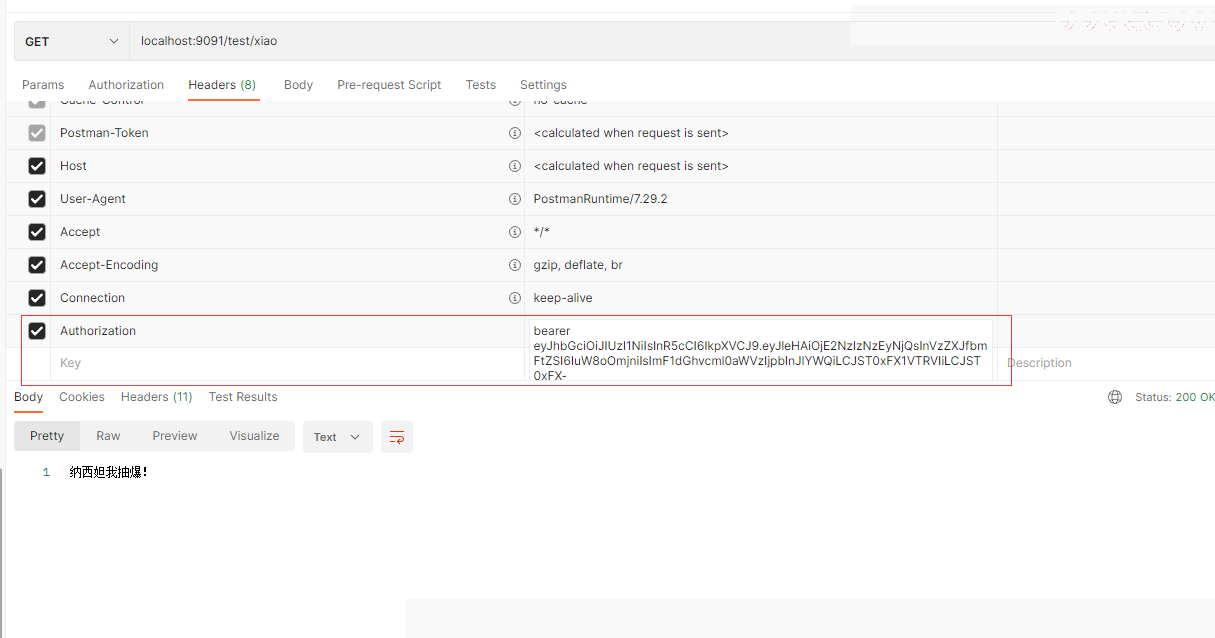
现在可以启动资源服务器,并使用前面从授权服务器获得的有效JWT调用我们保护的资源。在这个示例中,必须将令牌添加到以"Bearer"为前缀的请求的Authorization HTTP头信息中:
那么已上就是对称密钥对令牌进行签名和验证。