14、Spring Security 速成 - 实现过滤器(下)整合短信认证
一、前言
学习完Spring Security中的过滤器后,我们就可以整合新的认证方式并且让Spring Security帮我们完成认证的整个过程,那么这一章我们将通过加入短信验证码认证的例子带大家巩固之前的学习。
当然由于本人并没有开通短信业务,所以这里通过生成4位随机数并配合redis完成相关业务,大家如果集成了想尝试完全可以平替,主要学习的是原理和流程。
二、流程讲解
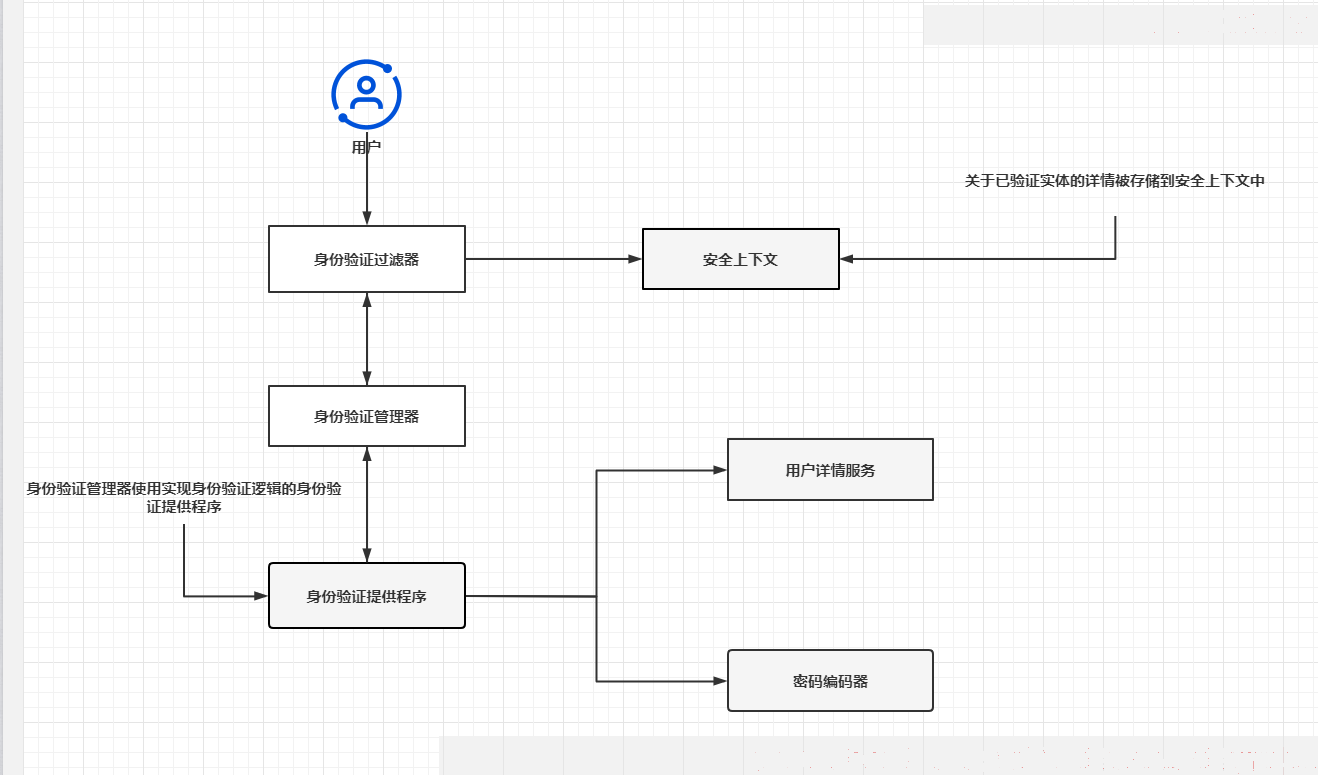
首先我们需要了解spring security的基本工作流程
-
当登录请求进来时,会在UsernamePasswordAuthenticationFilter 里构建一个没有权限的
Authentication -
然后把Authentication 交给 AuthenticationManager 进行身份验证管理
-
而AuthenticationManager 本身不做验证 ,会交给 AuthenticationProvider 进行验证
-
AuthenticationProvider 会调用 UserDetailsService 对用户信息进行校验
-
我们可以自定义自己的类来 实现UserDetailsService 接口
-
就可以根据自己的业务需要进行验证用户信息 , 可以从数据库进行用户账号密码校验
-
也可以 在redis 中用手机号和code 进行校验
-
UserDetailsService 校验成功后 会返回 UserDetails类,里面存放着用户祥细信息
-
一般我们会重新写一个自定义的类来继承 UserDetails ,方便数据转换。
-
验证成功后 会重新构造 Authentication 把 UserDetails 传进去,并把认证 改为 true super.setAuthenticated(true)
-
验证成功后来到 AuthenticationSuccessHandler 验证成功处理器 ,在里面可以返回数据给前端
之后我们就可以模仿上面的密码登录流程完成短信验证认证方法,流程如下:
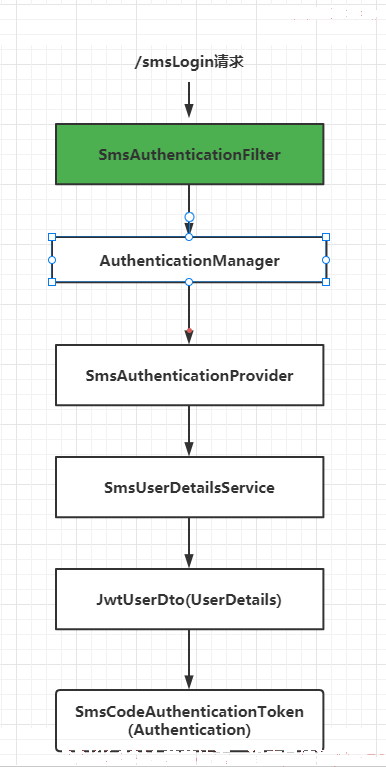
根据上图 我们要重写 SmsAuthenticationFilter、SmsAuthenticationProvider、UserDetailsService、UserDetails,来模拟用户密码登录,其中UserDetails可以用之前代码中的JwtUserDto,之后还需要重写Authentication对象—SmsCodeAuthenticationToken
在写一些配置类来启用我们的短信业务流程 SmsSecurityConfigurerAdapter SecurityConfig extends WebSecurityConfigurerAdapter
三、代码实现
首先由于我们涉及到redis,依赖中需要加入redis依赖:
<!--redis-->
<dependency>
    <groupId>org.springframework.boot</groupId>
    <artifactId>spring-boot-starter-data-redis</artifactId>
</dependency>
之后在yaml中加入redis相关配置
spring:
  redis配置
  redis:
    host: 127.0.0.1
    password: 123456
    port: 6379
  security:
    loginType: json
RedisConfig.class
@EnableCaching
@Configuration
public class RedisConfig {


    private static final int CACHE_EXPIRE = 60;

    @Bean
    @ConditionalOnMissingBean(RedisTemplate.class)
    public RedisTemplate redisTemplate(RedisConnectionFactory factory) {


        RedisTemplate template = new RedisTemplate();
        template.setConnectionFactory(factory);
        template.setKeySerializer(new StringRedisSerializer());
        template.setValueSerializer(new FastJson2JsonRedisSerializer(Object.class));
        template.afterPropertiesSet();
        return template;
    }
}
其中对Redis的序列化和反序列化运用fastJson重写
FastJson2JsonRedisSerializer.class
import com.alibaba.fastjson.JSON;
import com.alibaba.fastjson.parser.ParserConfig;
import com.alibaba.fastjson.serializer.SerializerFeature;
import org.springframework.data.redis.serializer.RedisSerializer;
import org.springframework.lang.Nullable;

import java.nio.charset.Charset;
import java.nio.charset.StandardCharsets;

/**
 * 使用fastjson重写redis序列化和反序列化
 */
public class FastJson2JsonRedisSerializer<T> implements RedisSerializer<T> {


    public static final Charset DEFAULT_CHARSET;

    private Class<T> clazz;

    static {


        DEFAULT_CHARSET = StandardCharsets.UTF_8;
        /**
         * 开启fastjson autotype功能(不开启,造成EntityWrapper<T>中的T无法正常解析)
         */
        ParserConfig.getGlobalInstance().setAutoTypeSupport(true);
    }

    public FastJson2JsonRedisSerializer(Class<T> clazz) {


        super();
        this.clazz = clazz;
    }

    /**
     * 反序列化
     */
    @Override
    public T deserialize(@Nullable byte[] bytes) {


        if (bytes == null || bytes.length == 0) {


            return null;
        }
        String str = new String(bytes, DEFAULT_CHARSET);
        return JSON.parseObject(str, clazz);
    }

    /**
     * 序列化
     */
    @Override
    public byte[] serialize(@Nullable Object t) {


        if (t == null) {


            return new byte[0];
        }
        /**
         * SerializerFeature.WriteClassName 这个很关键,
         * 这样序列化后的json中就会包含这个类的全称 ==> "@type": "com.mbw.security.dto.JwtUserDto",
         * 在反序列化的时候,就可以直接转换成JwtUserDto对象了
         */
        return JSON.toJSONString(t, SerializerFeature.WriteClassName).getBytes(DEFAULT_CHARSET);
    }
}
然后就是获取验证码接口
我们先在service写一个类似方法通过RandomUtil生成一个四位数的验证码,然后将验证码存入redis,并设置5分钟的过期时间,但是此时按照正常开发是应该将这个验证码通过短信形式发送给请求者手机上的,但是由于本人没有申请手机短信业务,这里就通过日志的形式代替这一步:
SmsCodeSendService.class
import com.mbw.common.utils.UserConstants;
import lombok.extern.slf4j.Slf4j;
import org.springframework.beans.factory.annotation.Autowired;
import org.springframework.data.redis.core.StringRedisTemplate;
import org.springframework.stereotype.Service;

import java.time.Duration;

@Service
@Slf4j
public class SmsCodeSendService {


	@Autowired
	private StringRedisTemplate stringRedisTemplate;
	public boolean sendSmsCode(String mobile, String code) {


		//因为这里是示例所以就没有真正的使用第三方发送短信平台。
		String sendCode = String.format("你好你的验证码%s,请勿泄露他人。", code);
		log.info("向手机号" + mobile + "发送的短信为:" + sendCode);
		//存入redis,以手机号_SMS_key为key,值是验证码,5分钟过期
		stringRedisTemplate.opsForValue().set(mobile + "_" + UserConstants.SMS_REDIS_KEY, code, Duration.ofMinutes(5));
		return true;
	}
}
然后controller调用service发送验证码的服务
package com.mbw.controller;

import cn.hutool.core.util.RandomUtil;
import com.mbw.common.utils.Result;
import com.mbw.mapper.UserMapper;
import com.mbw.pojo.User;
import com.mbw.service.SmsCodeSendService;
import lombok.extern.slf4j.Slf4j;
import org.springframework.web.bind.annotation.RequestMapping;
import org.springframework.web.bind.annotation.RequestParam;
import org.springframework.web.bind.annotation.RestController;

import javax.annotation.Resource;

@Slf4j
@RestController
public class SmsController {


    @Resource
    private UserMapper userDetailsMapper;
    @Resource
    private SmsCodeSendService smsCodeSendService;

    @RequestMapping("/smsCode")
    public Result getSmsCaptcha(@RequestParam String mobile) {


        User user = userDetailsMapper.findByMobile(mobile);
        if (user == null) {


            return Result.error().message("你输入的手机号未注册");
        }
       smsCodeSendService.sendSmsCode(mobile, RandomUtil.randomNumbers(4));
        return Result.ok().message("发送验证码成功");
    }
}
然后就是认证相关业务的实现
首先是自定义的验证码验证过滤器
想象一下,前端调用获取验证码接口,然后输入获取的验证码,点击登陆后,我们最应该做的是什么,是不是应该验证你的验证码的正确性,然后再做其他认证步骤。如果验证码都错了,就应该给它立即返回认证异常,所以关于验证这个逻辑,我们将它抽取成一个过滤器实现,并将它放在认证服务过滤器之前。即在认证之前先验证手机验证码的正确性:
SmsCodeValidateFilter.class
package com.mbw.security.filter;

import cn.hutool.core.text.CharSequenceUtil;
import cn.hutool.core.util.ObjectUtil;
import cn.hutool.core.util.StrUtil;
import com.mbw.common.utils.UserConstants;
import com.mbw.handler.CommonLoginFailureHandler;
import com.mbw.mapper.UserMapper;
import com.mbw.pojo.User;
import org.springframework.data.redis.core.StringRedisTemplate;
import org.springframework.security.web.authentication.session.SessionAuthenticationException;
import org.springframework.stereotype.Component;
import org.springframework.web.context.request.ServletWebRequest;
import org.springframework.web.filter.OncePerRequestFilter;

import javax.annotation.Resource;
import javax.servlet.FilterChain;
import javax.servlet.ServletException;
import javax.servlet.http.HttpServletRequest;
import javax.servlet.http.HttpServletResponse;
import java.io.IOException;

@Component
public class SmsCodeValidateFilter extends OncePerRequestFilter {


	@Resource
	private StringRedisTemplate stringRedisTemplate;
	@Resource
	private CommonLoginFailureHandler commonLoginFailureHandler;
	@Resource
	private UserMapper userMapper;

	@Override
	protected void doFilterInternal(HttpServletRequest httpServletRequest, HttpServletResponse httpServletResponse, FilterChain filterChain) throws ServletException, IOException {


		if (CharSequenceUtil.equals("/smslogin", httpServletRequest.getRequestURI()) &&
				CharSequenceUtil.equalsIgnoreCase("post", httpServletRequest.getMethod())) {


			try {


				validated(new ServletWebRequest(httpServletRequest));
			} catch (SessionAuthenticationException e) {


			    //直接抛出相关异常
				commonLoginFailureHandler.onAuthenticationFailure(httpServletRequest, httpServletResponse, e);
			}
		}
		filterChain.doFilter(httpServletRequest, httpServletResponse);
	}

	private void validated(ServletWebRequest request) {


		String code = request.getRequest().getParameter("smsCode");
		String mobile = request.getRequest().getParameter("mobile");
		String smsCode = stringRedisTemplate.opsForValue().get(mobile + "_" + UserConstants.SMS_REDIS_KEY);
		if (StrUtil.isEmpty(code)) {


			throw new SessionAuthenticationException("验证码不能为空");
		}

		if (StrUtil.isEmpty(mobile)) {


			throw new SessionAuthenticationException("手机号不能为空");
		}

		if (StrUtil.isEmpty(smsCode)) {


			throw new SessionAuthenticationException("验证码不存在");
		}
		Long expire = stringRedisTemplate.getExpire(mobile + "_" + UserConstants.SMS_REDIS_KEY);
		if (expire <= 0) {


			//如果已过期,redis会删除key,此时getExpire返回-2,key已自动被redis删除
			throw new SessionAuthenticationException("验证码已过期");
		}
		if (!StrUtil.equals(code, smsCode)) {


			throw new SessionAuthenticationException("验证码不匹配");
		}
		User user = userMapper.findByMobile(mobile);
		if (ObjectUtil.isNull(user)) {


			throw new SessionAuthenticationException("该手机号未注册");
		}
		//验证完成后redis内部将Key删除
		stringRedisTemplate.delete(mobile + "_" + UserConstants.SMS_REDIS_KEY);

	}
}
那么对于上面过滤器,拦截的登陆路径是由前后端沟通好,比如这里专门用于手机短信验证码登陆的/smslogin.我们这里是将手机短信登陆全权交给SpringSecurity去管理,所以采用的流程均和Spring Security有关;你也可以通过写controller接口的形式并且和SpringSecurity适配后让前端调用controller的接口,都是可以的。
然后就是我们的Authentication对象,我们这边给它命名为SmsCodeAuthenticationToken,主要就是模仿UsernamePasswordAuthenticationToken去写。这个对象的Principal之前说过存放的是认证信息,但是对于Authentication对象来说,它是存在两种状态分别对应一个参数的构造和3个参数的构造,这两个状态就是认证前和认证后。要记住认证前存放的是凭证,例如我是那用户名密码登录,那Principal就是用户名,我拿手机号验证码登陆,那Principal存放的就是手机号。而认证后存放的就是认证的相关信息。
package com.mbw.security.authentication;

import org.springframework.security.authentication.AbstractAuthenticationToken;
import org.springframework.security.core.GrantedAuthority;
import org.springframework.security.core.SpringSecurityCoreVersion;

import java.util.Collection;

//仿造UsernamePasswordAuthenticationToken写一个手机验证码登陆的Token
public class SmsCodeAuthenticationToken extends AbstractAuthenticationToken {


	private static final long serialVersionUID = SpringSecurityCoreVersion.SERIAL_VERSION_UID;
	//存放认证信息,认证前存放的是手机号,认证之后UserDetails
	private final Object principal;

	//认证前
	public SmsCodeAuthenticationToken(Object principal) {


		super((Collection) null);
		this.principal = principal;
		this.setAuthenticated(false);
	}

	//认证后
	public SmsCodeAuthenticationToken(Object principal, Collection<? extends GrantedAuthority> authorities) {


		super(authorities);
		this.principal = principal;
		super.setAuthenticated(true);
	}

	@Override
	public Object getCredentials() {


		return null;
	}

	@Override
	public Object getPrincipal() {


		return this.principal;
	}

	public void setAuthenticated(boolean isAuthenticated) throws IllegalArgumentException {


		if (isAuthenticated) {


			throw new IllegalArgumentException("Cannot set this token to trusted - use constructor which takes a GrantedAuthority list instead");
		} else {


			super.setAuthenticated(false);
		}
	}

	public void eraseCredentials() {


		super.eraseCredentials();
	}
}
写完Authentication对象后,接着就是提供认证服务的AuthenticationProvider,我们知道它是将认证委托给UserDetailsService(这里并没有用到PasswordEncoder),但是相关的逻辑我们仍然需要重写,我们将这个类命名为SmsCodeAuthenticationProvider。之后我们配置这个类的时候会将它的userDetailsService设置为我们重写的userDetailsService.
通过该类,我们也可以看出认证前先取出AuthenticationToken的Principal(由于还没认证此时是手机号),将其作为参数委托给userDetailsService做相关认证。认证如果失败抛出异常,成功则调用AuthenticationToken的三个参数的方法,将userDetails作为Principal还有authorities等注入进AuthenticationToken并且返回。
SmsCodeAuthenticationProvider.class
import com.mbw.security.authentication.SmsCodeAuthenticationToken;
import org.springframework.security.authentication.AuthenticationProvider;
import org.springframework.security.authentication.InternalAuthenticationServiceException;
import org.springframework.security.core.Authentication;
import org.springframework.security.core.AuthenticationException;
import org.springframework.security.core.userdetails.UserDetails;
import org.springframework.security.core.userdetails.UserDetailsService;

public class SmsCodeAuthenticationProvider implements AuthenticationProvider {


	private UserDetailsService userDetailsService;

	public UserDetailsService getUserDetailsService() {


		return userDetailsService;
	}

	public void setUserDetailsService(UserDetailsService userDetailsService) {


		this.userDetailsService = userDetailsService;
	}

	//重写两个方法--authenticate()和supports()
	@Override
	public Authentication authenticate(Authentication authentication) throws AuthenticationException {


		//认证之前
		SmsCodeAuthenticationToken token = (SmsCodeAuthenticationToken) authentication;
		//认证之前Principal存放的是手机号
		UserDetails userDetails = userDetailsService.loadUserByUsername((String) token.getPrincipal());
		if (userDetails==null){


			throw new InternalAuthenticationServiceException("无法根据手机号获取用户信息");
		}
		//认证之后,此时将获取的userDetails存放进Principal
		SmsCodeAuthenticationToken smsCodeAuthenticationToken = new SmsCodeAuthenticationToken(userDetails, userDetails.getAuthorities());
		smsCodeAuthenticationToken.setDetails(token.getDetails());
		return smsCodeAuthenticationToken;
	}

	@Override
	public boolean supports(Class<?> authentication) {


		return SmsCodeAuthenticationToken.class.isAssignableFrom(authentication);
	}
}
然后就是执行认证业务的核心类–UserDetailsService,我们需要和之前重写的隔离开,重新写一个SmsUserDetailsService专门供给我们之前重写的SmsCodeAuthenticationProvider使用
SmsUserDetailsService逻辑还是类似,就是重写loadUserByUsername(),只是这里的username不再是username,而是mobile,而类里的其中getUserByMobile()这里就不做过多展示,就是通过mobile找用户的sql。
SmsUserDetailsService.class
import cn.hutool.core.util.StrUtil;
import com.mbw.mapper.AuthorityMapper;
import com.mbw.pojo.Authority;
import com.mbw.pojo.Role;
import com.mbw.pojo.User;
import com.mbw.security.dto.JwtUserDto;
import com.mbw.service.RoleService;
import com.mbw.service.UserService;
import org.springframework.beans.factory.annotation.Autowired;
import org.springframework.security.core.userdetails.UserDetails;
import org.springframework.security.core.userdetails.UserDetailsService;
import org.springframework.security.core.userdetails.UsernameNotFoundException;
import org.springframework.stereotype.Service;

import java.util.HashSet;
import java.util.List;
import java.util.Set;
import java.util.stream.Collectors;

@Service
public class SmsUserDetailsService implements UserDetailsService {


	@Autowired
	private UserService userService;

	@Autowired
	private RoleService roleService;

	@Autowired
	private AuthorityMapper authorityMapper;
	@Override
	public UserDetails loadUserByUsername(String mobile) throws UsernameNotFoundException {


		// 根据手机号获取用户
		User user = userService.getUserByMobile(mobile);
		if (user == null){


			throw new UsernameNotFoundException("该手机号对应的用户不存在");
		}
		List<Role> roles = roleService.loadRolesByUsername(user.getUsername());
		Set<String> roleInfos = roles.stream().map(Role::getRoleName).collect(Collectors.toSet());
		List<Authority> authorities = authorityMapper.loadPermissionByRoleCode(roleInfos);
		List<String> authorityNames = authorities.stream().map(Authority::getAuthorityName).filter(StrUtil::isNotEmpty).collect(Collectors.toList());
		authorityNames.addAll(roleInfos.stream().map(roleName->"ROLE_"+roleName).collect(Collectors.toList()));
		return new JwtUserDto(user, new HashSet<>(roles), authorityNames);
	}
}
然后就是我们的短信认证过滤器SmsCodeAuthenticationFilter。这里我们仿造UsernamePasswordAuthenticationFilter写一个就好。
首先是构造方法一定要有,我们在构造方法规定只对/smslogin这个post请求才会生效。而逻辑简单来说就是从request中获取手机号然后调用AuthenticationToken中的一个参数的方法构造出,并将其委托给AuthenticationProvider完成相关认证业务:
SmsCodeAuthenticationFilter.class
import com.mbw.security.authentication.SmsCodeAuthenticationToken;
import org.springframework.lang.Nullable;
import org.springframework.security.authentication.AuthenticationServiceException;
import org.springframework.security.core.Authentication;
import org.springframework.security.core.AuthenticationException;
import org.springframework.security.web.authentication.AbstractAuthenticationProcessingFilter;
import org.springframework.security.web.util.matcher.AntPathRequestMatcher;

import javax.servlet.http.HttpServletRequest;
import javax.servlet.http.HttpServletResponse;

//仿造UsernamePasswordAuthenticationFilter写一个专门为手机短信验证登陆的过滤器
public class SmsCodeAuthenticationFilter extends AbstractAuthenticationProcessingFilter {


	//报错:参数错误
	public static final String SPRING_SECURITY_FORM_MOBILE_KEY = "mobile";
	private String mobileParameter = SPRING_SECURITY_FORM_MOBILE_KEY;
	private boolean postOnly = true;

	//必须要构造器,构造器参数为请求路径和请求方法
	public SmsCodeAuthenticationFilter() {


		super(new AntPathRequestMatcher("/smslogin", "POST"));
	}

	public Authentication attemptAuthentication(HttpServletRequest request, HttpServletResponse response) throws AuthenticationException {


		if (this.postOnly && !request.getMethod().equals("POST")) {


			throw new AuthenticationServiceException("Authentication method not supported: " + request.getMethod());
		} else {


			//从request中获取Mobile
			String mobile = this.obtainMobile(request);
			if (mobile == null) {


				mobile = "";
			}
			mobile = mobile.trim();
			//此时调用的是第一个参数的authentication,即认证前,principal存放的是mobile
			SmsCodeAuthenticationToken authentication = new SmsCodeAuthenticationToken(mobile);
			setDetails(request, authentication);
			//认证
			return this.getAuthenticationManager().authenticate(authentication);
		}
	}

	//获取参数
	@Nullable
	protected String obtainMobile(HttpServletRequest request) {


		return request.getParameter(this.mobileParameter);
	}
	protected void setDetails(HttpServletRequest request, SmsCodeAuthenticationToken authRequest) {


		authRequest.setDetails(this.authenticationDetailsSource.buildDetails(request));
	}
}
然后我们专门写一个配置类用来配置短信业务相关的认证业务,这里就涉及到过滤器的顺序,以及组件之间的关系,如果大家对一开始讲的流程熟悉的话,想必理解这个配置类不难,其中successHandler和failtureHandler大家用之前写的就好,或者自己随便写些啥业务也是可以的。
SmsCodeSecurityConfig.class
import com.mbw.handler.CommonLoginFailureHandler;
import com.mbw.handler.CommonLoginSuccessHandler;
import com.mbw.security.filter.SmsCodeAuthenticationFilter;
import com.mbw.security.filter.SmsCodeValidateFilter;
import com.mbw.security.service.SmsCodeAuthenticationProvider;
import com.mbw.security.service.SmsUserDetailsService;
import org.springframework.beans.factory.annotation.Autowired;
import org.springframework.security.authentication.AuthenticationManager;
import org.springframework.security.config.annotation.SecurityConfigurerAdapter;
import org.springframework.security.config.annotation.web.builders.HttpSecurity;
import org.springframework.security.web.DefaultSecurityFilterChain;
import org.springframework.security.web.authentication.UsernamePasswordAuthenticationFilter;
import org.springframework.stereotype.Component;

import javax.annotation.Resource;

@Component
public class SmsCodeSecurityConfig
		extends SecurityConfigurerAdapter<DefaultSecurityFilterChain, HttpSecurity> {


	@Autowired
	private SmsUserDetailsService userDetailsService;
	@Autowired
	private CommonLoginSuccessHandler successHandler;
	@Autowired
	private CommonLoginFailureHandler failureHandler;
	@Resource
	private SmsCodeValidateFilter smsCodeValidateFilter;
	@Override
	public void configure(HttpSecurity http) {


		SmsCodeAuthenticationFilter smsCodeAuthenticationFilter = new SmsCodeAuthenticationFilter();
		smsCodeAuthenticationFilter.setAuthenticationManager(http.getSharedObject(AuthenticationManager.class));
		smsCodeAuthenticationFilter.setAuthenticationSuccessHandler(successHandler);
		smsCodeAuthenticationFilter.setAuthenticationFailureHandler(failureHandler);
		SmsCodeAuthenticationProvider smsCodeAuthenticationProvider = new SmsCodeAuthenticationProvider();
		smsCodeAuthenticationProvider.setUserDetailsService(userDetailsService);
		http.addFilterBefore(smsCodeValidateFilter, UsernamePasswordAuthenticationFilter.class);
		http.authenticationProvider(smsCodeAuthenticationProvider).
				addFilterAfter(smsCodeAuthenticationFilter, UsernamePasswordAuthenticationFilter.class);
	}
}
但是这个配置类我们还没有配置进我们的主配置类,我们可以通过http.apply(C configurer)解决该问题,配置如下:
我们可以看到这样就可以完美地将手机验证和用户名密码完美地结合。其中这个captchaCodeFilter这个是图形验证码过滤器,因为我的代码密码登录还需要输入个验证码,所以需要加入相关业务,没有的朋友可以直接不加,我们这次主要业务是将短信业务融入进来。
import com.mbw.handler.CommonLoginFailureHandler;
import com.mbw.handler.CommonLoginSuccessHandler;
import com.mbw.handler.MyLogoutSuccessHandler;
import com.mbw.security.filter.CaptchaCodeFilter;
import com.mbw.security.service.UserDetailsServiceImpl;
import org.springframework.beans.factory.annotation.Autowired;
import org.springframework.context.annotation.Bean;
import org.springframework.context.annotation.Configuration;
import org.springframework.security.config.annotation.authentication.builders.AuthenticationManagerBuilder;
import org.springframework.security.config.annotation.web.builders.HttpSecurity;
import org.springframework.security.config.annotation.web.builders.WebSecurity;
import org.springframework.security.config.annotation.web.configuration.WebSecurityConfigurerAdapter;
import org.springframework.security.config.http.SessionCreationPolicy;
import org.springframework.security.crypto.bcrypt.BCryptPasswordEncoder;
import org.springframework.security.crypto.password.DelegatingPasswordEncoder;
import org.springframework.security.crypto.password.NoOpPasswordEncoder;
import org.springframework.security.crypto.password.PasswordEncoder;
import org.springframework.security.crypto.scrypt.SCryptPasswordEncoder;
import org.springframework.security.web.authentication.UsernamePasswordAuthenticationFilter;
import org.springframework.web.cors.CorsConfiguration;
import org.springframework.web.cors.CorsConfigurationSource;
import org.springframework.web.cors.UrlBasedCorsConfigurationSource;

import javax.annotation.Resource;
import java.util.HashMap;

@Configuration
public class SpringSecurityConfig extends WebSecurityConfigurerAdapter {


	@Autowired
	private UserDetailsServiceImpl commonUserDetailServiceImpl;
	@Autowired
	private CommonLoginSuccessHandler successHandler;
	@Autowired
	private CommonLoginFailureHandler failureHandler;
	@Autowired
	private MyLogoutSuccessHandler logoutSuccessHandler;
	@Autowired
	private CaptchaCodeFilter captchaCodeFilter;
	@Resource
	private SmsCodeSecurityConfig smsCodeSecurityConfig;

	@Override
	protected void configure(HttpSecurity http) throws Exception {


		http.cors().and()
				.addFilterBefore(captchaCodeFilter, UsernamePasswordAuthenticationFilter.class)
				.logout()
				.logoutSuccessHandler(logoutSuccessHandler)
				.and()
				.rememberMe()
				//默认都为remember-me
				.rememberMeParameter("remeber-me")
				//cookieName一般设置复杂一些,迷惑别人(不容易看出)
				.rememberMeCookieName("remeber-me")
				//过期时间
				.tokenValiditySeconds(24 * 60 * 60 * 2)
				.and()
				.csrf().disable()
				.formLogin()
				.loginPage("/toLogin") //用户没有权限就跳转到这个页面
				.loginProcessingUrl("/login")//登录跳转页面,表单中的action
				.usernameParameter("uname")
				.passwordParameter("upassword")//传递的属性
				.successHandler(successHandler)
				.failureHandler(failureHandler)
				.and()
				.apply(smsCodeSecurityConfig)
				.and().httpBasic().and()
				.authorizeRequests()
				.mvcMatchers("/home","/toLogin","/login", "/user/create", "/kaptcha", "/smsCode", "/smslogin").permitAll()
				.mvcMatchers("/test/a/*").permitAll()
				.anyRequest().authenticated()
				.and()
				.sessionManagement()
				.sessionCreationPolicy(SessionCreationPolicy.IF_REQUIRED)
				.sessionFixation().migrateSession()
				.maximumSessions(1).
				maxSessionsPreventsLogin(false)
				.expiredSessionStrategy(new CustomExpiredSessionStrategy());
	}

	@Override
	protected void configure(AuthenticationManagerBuilder auth) throws Exception {


		auth.userDetailsService(commonUserDetailServiceImpl)
				.passwordEncoder(passwordEncoder());
	}

	@Bean
	public PasswordEncoder passwordEncoder() {


		HashMap<String, PasswordEncoder> encoders = new HashMap<>();
		encoders.put("noop", NoOpPasswordEncoder.getInstance());
		encoders.put("bcrypt", new BCryptPasswordEncoder());
		encoders.put("scrypt", new SCryptPasswordEncoder());
		return new DelegatingPasswordEncoder("bcrypt", encoders);
	}

	//跨域配置
	@Bean
	CorsConfigurationSource corsConfigurationSource() {


		CorsConfiguration configuration = new CorsConfiguration();
		configuration.addAllowedOrigin("*");
		configuration.addAllowedMethod("*");
		configuration.addAllowedHeader("*");
		configuration.applyPermitDefaultValues();
		configuration.setAllowCredentials(true);
		UrlBasedCorsConfigurationSource source = new UrlBasedCorsConfigurationSource();
		source.registerCorsConfiguration("/**", configuration);
		return source;
	}

	@Override
	public void configure(WebSecurity web) {


		//将项目中的静态资源路径开放出来
		//为什么要抽出来?上面的规则都需要通过过滤器校验,这个不需要
		web.ignoring().antMatchers("/css/**", "/fonts/**", "/js/**", "/templates/**", "/static/**");
	}
关于loginPage的配置我是专门写了一个接口去跳转到Login页面,由于笔者用了thymeleaf,只能通过接口访问templates下的静态文件,我也不知道为什么放在static下面打不开,明明开放了。。。。
前端页面–login.html
<!DOCTYPE html>
<html lang="en" xmlns="http://www.w3.org/1999/html">
<head>
    <meta charset="UTF-8">
    <title>登录</title>
    <script src="https://code.jquery.com/jquery-3.4.1.min.js"></script>
</head>
<script>
    function flushCode() {


        // 每次刷新的时候获取当前时间,防止浏览器缓存刷新失败
        var time = new Date();
        document.getElementById("kaptcha").src = "/kaptcha?time=" + time;
    }
</script>
<body>
<h1>图片验证码登录</h1>
<form  method="post" >
    <span>用户名</span><input type="text" name="username" id="username"/> <br>
    <span>密码</span><input type="password" name="password" id="password"/> <br>
    <span>验证码</span><input type="text" name="captchaCode" id="captchaCode"/> <br>
    <img alt="验证码" id="kaptcha" name="kaptcha" src="/kaptcha" >
    <a href="#" onclick="flushCode();">看不清?</a></br>
    <label><input type="checkbox" id="remeber-me">记住我</label>
    <input type="button" onclick="login()" value="登陆">
</form>
<script type="text/javascript">
        function login() {


            var name=$("#username").val();
            var password=$("#password").val();
            var kaptcha=$("#captchaCode").val();
            var remeberme=$("#remeber-me").is(":checked");
            if (name===""||password===""){


                alert("用户密码不能为空");
                return;
            }
            $.ajax({


                type: "POST",
                url: "/login",
                data:{


                    "uname": name,
                    "upassword": password,
                    "kaptcha":kaptcha,
                    "remeber-me":remeberme
                },
                success: function (json) {


                        if (json.success){


                            location.href='/user/hello';
                        }else {


                            alert(json.msg);
                            location.href='/login.html';
                        }
                },
                error:function () {


                }
            });
        }
</script>
<h1>短信登录</h1>
<form  method="post" action="/smslogin">
    <span>电话号码</span><input type="text" name="mobile" id="mobile"/> <br>
    <span>验证码</span><input type="text" name="smsCode" id="smsCode"/>
    <input type="button" onclick="getSmsCode()" value="获取"></br>
    <input type="button" onclick="smslogin()" value="登陆">
</form>
<script type="text/javascript">
    function smslogin() {


        var smsCode=$("#smsCode").val();
        var mobile=$("#mobile").val();
        $.ajax({


            type: "POST",
            url: "/smslogin",
            data:{


                "smsCode": smsCode,
                "mobile":mobile
            },
            success: function (json) {


                if (json.success){


                    alert(json.msg);
                    location.href='/user/hello';
                }else {


                    alert(json.msg);
                    location.href='/login.html';
                }
            },
            error:function () {


            }
        });
    }
    function getSmsCode() {


        var mobile=$("#mobile").val();
        $.ajax({


            type: "get",
            url: "/smsCode",
            data:{


                "mobile": mobile
            },
            success: function (json) {


                alert(json.msg);
            },
            error: function (json) {


                alert(json.msg);
            }
        });
    }
</script>
</body>
</html>
演示:
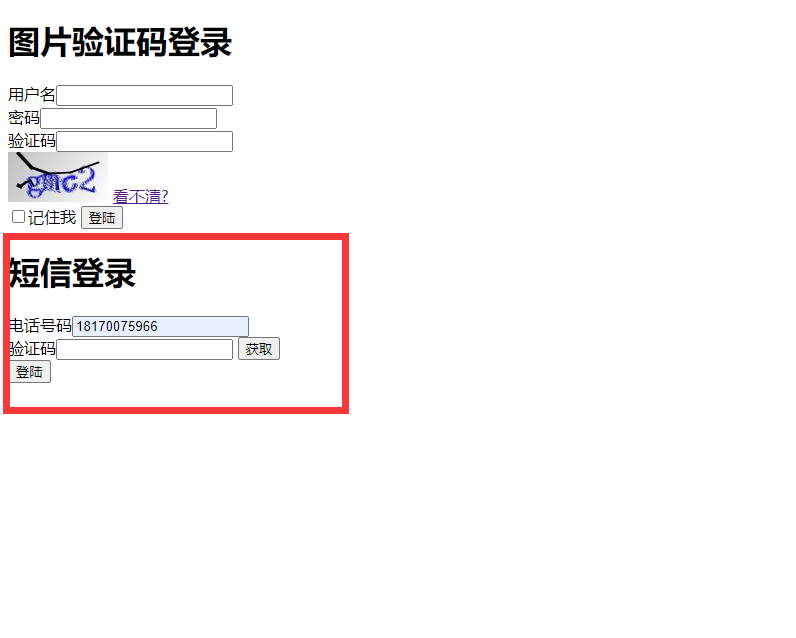
点击获取,就可以在后台控制台和redis钟看到验证码:


输验证码点击登陆:
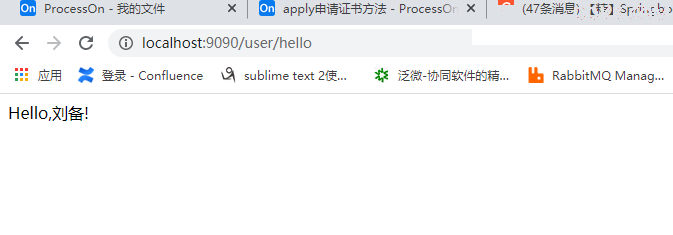
这样就完成短信验证认证服务