21、Spring Security 速成 - OAuth2:实现资源服务器(中)实现带有JdbcTokenStore的黑板模式
一、前言
本章将实现授权服务器和资源服务器使用共享数据库的应用程序。这一架构方式被称为黑板模式。这一架构方式被称为黑板模式。为什么叫黑板模式呢?因为可以将其视为使用黑板管理令牌的授权服务器和资源服务器。这种颁发和验证令牌的方法的优点是消除了资源服务器和授权服务器之间的直接通信。但是,这意味着要添加一个共享数据库,而这可能会成为瓶颈。与任何架构一样,实际上它适用于各种情况。例如,如果各服务已经共享了一个数据库,那么对访问令牌也使用这种方法可能也是合理的。出于这个原因,了解如何实现这个方法对你来说可能是很重要的。
并且学习该章的前提需要把前面的授权,资源服务器的搭建先给整完,否则会很懵,不知道这块儿代码哪来的这种情况。
二、实现黑板模式
我们将继续之前的项目基础上进行修改。首先解释一下黑板模式的架构:当授权服务器颁发令牌时,它也会将令牌存储在与资源服务器共享的数据库中
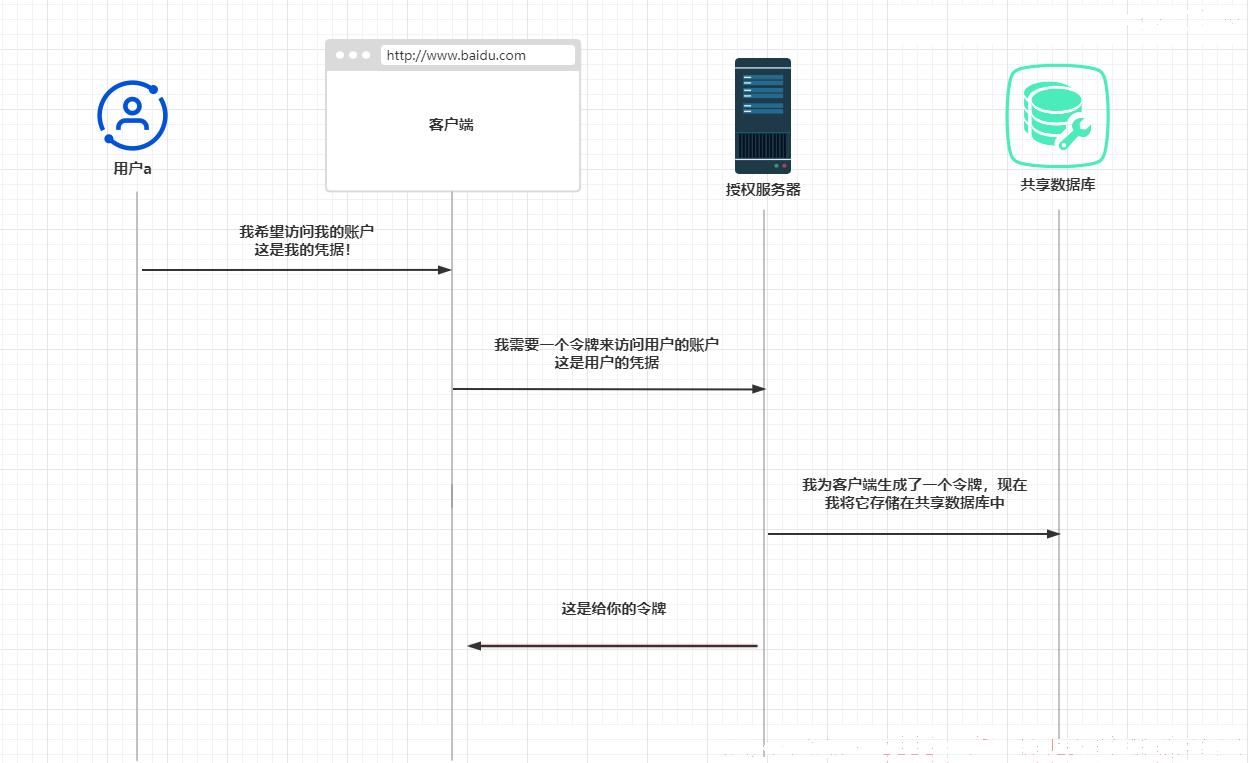
它还意味着资源服务器在需要验证令牌时将访问该数据库.

如上图,资源服务器在共享数据库中搜索令牌。如果令牌存在,则资源服务器将在数据库中找到与它相关的详细信息,包括用户名及其权限。有了这些详细信息,资源服务器就可以对请求进行授权。
在授权服务器和资源服务器上,代表在Spring Security中管理令牌的对象的契约是TokenStore。对于授权服务器,可以把它想象成在我们以前使用SecurityContext的身份验证架构中的位置,身份验证完成后,授权服务器会使用TokenStore生成一个令牌

对于资源服务器。身份验证过滤器要使用TokenStore验证令牌并查找稍后用于授权的用户详细信息。然后资源服务器会将用户的详细信息存储在安全上下文中。

ps:授权服务器和资源服务器实现了两种不同的职责,但这些职责不一定必须由两个独立的应用程序执行。不过在大多数真实的实现中,我们都会在不同的应用程序中开发它们,但是,也可以选择在同一个应用程序实现这两者。在这种情况下,就不需要建立任何调用或使用一个共享数据库。但是,如果在同一个应用程序中实现这两种职责,授权服务器和资源服务器就都可以访问相同的bean.因此,它们可以使用相同的令牌存储,而不需要进行网络调用或访问数据库。请大家记住这句结论,这个我们后面搭建redisTokenStore会用到这个结论。
SpringSecurity为TokenStore接口提供了各种实现,在大多数情况下,我们都不需要编写自己的实现。例如,对于前面的所有授权服务器实现,我们都没有指定TokenStore实现。SpringSecurity提供了一个InMemoryTokenStore类型的默认令牌存储。可以想见,在所有这些情况下,令牌都会存储在应用程序的内存中。它们没有被持久化!如果重启授权服务器,那么启动前颁发的令牌将不再生效。
为了使用黑板模式实现令牌管理,Spring Security提供了JdbcTokenStore实现。顾名思义,这个令牌存储直接通过JDBC与数据库一起工作。它的工作原理类似于之前讨论的JdbcUserDetailsManager,但与用户管理不同的是,JdbcTokenStore管理的是令牌。
ps:我们只是在这一章中选择了JdbcTokenStore实现黑板模式,但是也可以选择使用TokenStore持久化令牌,甚至你可以自己重写你自己的tokenStore以达到你的理想的持久化的方式,例如下一章会说到的重写一个TokenStore以达到redis存储令牌,并且将相关数据放进本地缓存caffeine.那么本章我们还是以JdbcTokenStore为例子进行讲解。
JdbcTokenStore期望数据库中有两个表。它会使用一个表存储访问令牌(该表的名称默认规定为oauth_access_token)和一个表存储刷新令牌(该表的名称默认规定为oauth_refresh_token)。用于存储令牌的表将同时持久化刷新令牌。
ps:注意如果我们不对JdbcTokenStore进行重写的话,表名和表的结构都是默认规定好的,不去重写是不能任意去更改表名表的结构等。
如下图,JdbcTokenStore默认已经封装了很多的SQL语句,这也证明你不能在不重写JdbcTokenStore的情况下去更改表的结构。
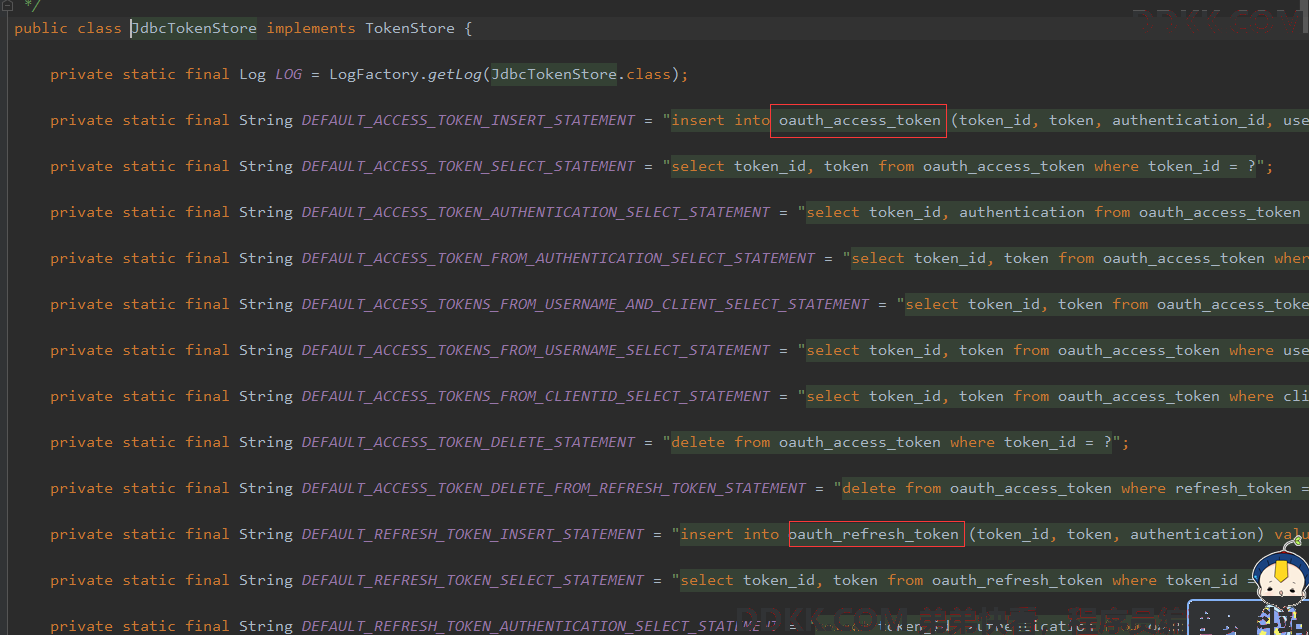
但是,如果你想使用其他表或者其他列甚至是属性结构,SpringSecurity也允许你去自定义JdbcTokenStore,当然你必须重写它用来检索或存储令牌的所有相关SQL。那这里我们就不对JdbcTokenStore进行重写,采取默认结构去进行讲解:
同样的,既然和sql挂钩,我们就得从表结构开始说起,以下两张表结构已经固定好了。大家直接copy就行:
DROP TABLE IF EXISTS oauth_access_token;
CREATE TABLE oauth_access_token  (
  token_id varchar(256) CHARACTER SET utf8 COLLATE utf8_general_ci NULL DEFAULT NULL COMMENT 'MD5加密的access_token的值',
  token blob NULL COMMENT 'OAuth2AccessToken.java对象序列化后的二进制数据',
  authentication_id varchar(256) CHARACTER SET utf8 COLLATE utf8_general_ci NOT NULL COMMENT 'MD5加密过的username,client_id,scope',
  user_name varchar(256) CHARACTER SET utf8 COLLATE utf8_general_ci NULL DEFAULT NULL COMMENT '登录的用户名',
  client_id varchar(256) CHARACTER SET utf8 COLLATE utf8_general_ci NULL DEFAULT NULL COMMENT '客户端ID',
  authentication blob NULL COMMENT 'OAuth2Authentication.java对象序列化后的二进制数据',
  refresh_token varchar(256) CHARACTER SET utf8 COLLATE utf8_general_ci NULL DEFAULT NULL COMMENT 'MD5加密后的refresh_token的值',
  PRIMARY KEY (authentication_id) USING BTREE
) ENGINE = InnoDB CHARACTER SET = utf8 COLLATE = utf8_general_ci COMMENT = '访问令牌' ROW_FORMAT = Dynamic;
DROP TABLE IF EXISTS oauth_refresh_token;
CREATE TABLE oauth_refresh_token  (
  token_id varchar(256) CHARACTER SET utf8 COLLATE utf8_general_ci NULL DEFAULT NULL COMMENT 'MD5加密过的refresh_token的值',
  token blob NULL COMMENT 'OAuth2RefreshToken.java对象序列化后的二进制数据',
  authentication blob NULL COMMENT 'OAuth2Authentication.java对象序列化后的二进制数据'
) ENGINE = InnoDB CHARACTER SET = utf8 COLLATE = utf8_general_ci COMMENT = '更新令牌' ROW_FORMAT = Dynamic;
然后授权服务器和资源服务器均加入Mybatis和mysq-javal相关依赖:
        <dependency>
            <groupId>com.baomidou</groupId>
            <artifactId>mybatis-plus-boot-starter</artifactId>
        </dependency>
        <dependency>
            <groupId>mysql</groupId>
            <artifactId>mysql-connector-java</artifactId>
        </dependency>
在application.yaml文件中,需要添加数据源的定义。以下代码片段提供了该定义:
spring:
  datasource:
    driver-class-name: com.mysql.jdbc.Driver
    username: root
    password: 123456
    url: jdbc:mysql://127.0.0.1:3306/spring_security?useUnicode=true&characterEncoding=UTF-8&useSSL=false&allowPublicKeyRetrieval=true&serverTimezone=Asia/Shanghai&nullCatalogMeansCurrent=true
    initialization-mode: always
mybatis-plus:
  mapper-locations: classpath:/mapper/**/*.xml,classpath:/META-INF/modeler-mybatis-mappings/*.xml
  typeAliasesPackage: com.mbw.pojo
  global-config:
    banner: false
  configuration:
    map-underscore-to-camel-case: false
    cache-enabled: false
    call-setters-on-nulls: true
    jdbc-type-for-null: 'null'
    log-impl: org.apache.ibatis.logging.stdout.StdOutImpl
接下来我们需要在之前配置的授权服务器配置类AuthServerConfig中注入数据源,然后定义和配置令牌存储。下面代码显示了这一更改:
import com.mbw.security.service.ClientDetailsServiceImpl;
import com.mbw.security.service.UserDetailsServiceImpl;
import org.springframework.beans.factory.annotation.Autowired;
import org.springframework.context.annotation.Bean;
import org.springframework.context.annotation.Configuration;
import org.springframework.security.authentication.AuthenticationManager;
import org.springframework.security.oauth2.config.annotation.configurers.ClientDetailsServiceConfigurer;
import org.springframework.security.oauth2.config.annotation.web.configuration.AuthorizationServerConfigurerAdapter;
import org.springframework.security.oauth2.config.annotation.web.configuration.EnableAuthorizationServer;
import org.springframework.security.oauth2.config.annotation.web.configurers.AuthorizationServerEndpointsConfigurer;
import org.springframework.security.oauth2.config.annotation.web.configurers.AuthorizationServerSecurityConfigurer;
import org.springframework.security.oauth2.provider.token.TokenStore;
import org.springframework.security.oauth2.provider.token.store.JdbcTokenStore;

import javax.sql.DataSource;

@Configuration
@EnableAuthorizationServer
public class AuthServerConfig extends AuthorizationServerConfigurerAdapter {


	@Autowired
	private AuthenticationManager authenticationManager;
	@Autowired
	private ClientDetailsServiceImpl clientDetailsServiceImpl;
	@Autowired
	private UserDetailsServiceImpl userDetailsServiceImpl;
	//注入application.yaml文件中的数据源
	@Autowired
	private DataSource dataSource;

	@Override
	public void configure(AuthorizationServerEndpointsConfigurer endpoints) throws Exception {


		endpoints.authenticationManager(authenticationManager)
		.userDetailsService(userDetailsServiceImpl)
				.tokenStore(tokenStore());
	}

	@Override
	public void configure(ClientDetailsServiceConfigurer clients) throws Exception {


		clients.withClientDetails(clientDetailsServiceImpl);
	}

	/**
	 * 解决访问/oauth/check_token 403的问题
	 *
	 * @param security
	 * @throws Exception
	 */
	@Override
	public void configure(AuthorizationServerSecurityConfigurer security) throws Exception {


		// 允许表单认证
		security
				.tokenKeyAccess("permitAll()")
				.checkTokenAccess("permitAll()")
				.allowFormAuthenticationForClients();

	}

	@Bean
	public TokenStore tokenStore(){


		return new JdbcTokenStore(dataSource);
	}
}
并且我们可以对token本身做相关的设置,例如设置accessToken和refreshToken的有效时间,这里SpringSecurity给我们提供了TokenService类,我们可以通过配置它来对token的一些属性作设置,这里我们也在授权服务器配置类配置即可,完整的AuthServerConfig类如下:
import com.mbw.security.service.ClientDetailsServiceImpl;
import com.mbw.security.service.UserDetailsServiceImpl;
import org.springframework.beans.factory.annotation.Autowired;
import org.springframework.context.annotation.Bean;
import org.springframework.context.annotation.Configuration;
import org.springframework.security.authentication.AuthenticationManager;
import org.springframework.security.oauth2.config.annotation.configurers.ClientDetailsServiceConfigurer;
import org.springframework.security.oauth2.config.annotation.web.configuration.AuthorizationServerConfigurerAdapter;
import org.springframework.security.oauth2.config.annotation.web.configuration.EnableAuthorizationServer;
import org.springframework.security.oauth2.config.annotation.web.configurers.AuthorizationServerEndpointsConfigurer;
import org.springframework.security.oauth2.config.annotation.web.configurers.AuthorizationServerSecurityConfigurer;
import org.springframework.security.oauth2.provider.token.DefaultTokenServices;
import org.springframework.security.oauth2.provider.token.TokenStore;
import org.springframework.security.oauth2.provider.token.store.JdbcTokenStore;

import javax.sql.DataSource;

@Configuration
@EnableAuthorizationServer
public class AuthServerConfig extends AuthorizationServerConfigurerAdapter {


	@Autowired
	private AuthenticationManager authenticationManager;
	@Autowired
	private ClientDetailsServiceImpl clientDetailsServiceImpl;
	@Autowired
	private UserDetailsServiceImpl userDetailsServiceImpl;
	@Autowired
	private JsonRedisTokenStore jsonRedisTokenStore;
	//注入application.yaml文件中的数据源
	@Autowired
	private DataSource dataSource;

	@Override
	public void configure(AuthorizationServerEndpointsConfigurer endpoints) throws Exception {


		endpoints.authenticationManager(authenticationManager)
		.userDetailsService(userDetailsServiceImpl)
				.tokenStore(tokenStore());
		DefaultTokenServices tokenService = getTokenStore(endpoints);
		endpoints.tokenServices(tokenService);
	}

	//配置TokenService参数
	private DefaultTokenServices getTokenStore(AuthorizationServerEndpointsConfigurer endpoints) {


		DefaultTokenServices tokenService = new DefaultTokenServices();
		tokenService.setTokenStore(endpoints.getTokenStore());
		tokenService.setSupportRefreshToken(true);
		tokenService.setClientDetailsService(endpoints.getClientDetailsService());
		tokenService.setTokenEnhancer(endpoints.getTokenEnhancer());
		//token有效期 1小时
		tokenService.setAccessTokenValiditySeconds(3600);
		//token刷新有效期 15天
		tokenService.setRefreshTokenValiditySeconds(3600 * 12 * 15);
		tokenService.setReuseRefreshToken(false);
		return tokenService;
	}

	@Override
	public void configure(ClientDetailsServiceConfigurer clients) throws Exception {


		clients.withClientDetails(clientDetailsServiceImpl);
	}

	/**
	 * 解决访问/oauth/check_token 403的问题
	 *
	 * @param security
	 * @throws Exception
	 */
	@Override
	public void configure(AuthorizationServerSecurityConfigurer security) throws Exception {


		// 允许表单认证
		security
				.tokenKeyAccess("permitAll()")
				.checkTokenAccess("permitAll()")
				.allowFormAuthenticationForClients();

	}

	@Bean
	public TokenStore tokenStore(){


		return new JdbcTokenStore(dataSource);
	}
}
现在可以启动授权服务器并颁发令牌,这个和前面章节获取令牌是一样的,我们仍然可以采取password授权类型颁发令牌:

响应中返回的访问令牌也可以在oauth_access_token表中作为其记录而找到。由于数据库会持久化令牌,因此及时授权服务器关闭或者重新启动后,资源服务器也可以验证已颁发且未过期的令牌。

因为配置了刷新令牌授权类型,所以会接收到一个刷新令牌。出于这个原因,还可以在oauth_refresh_token表中找到刷新令牌的记录。

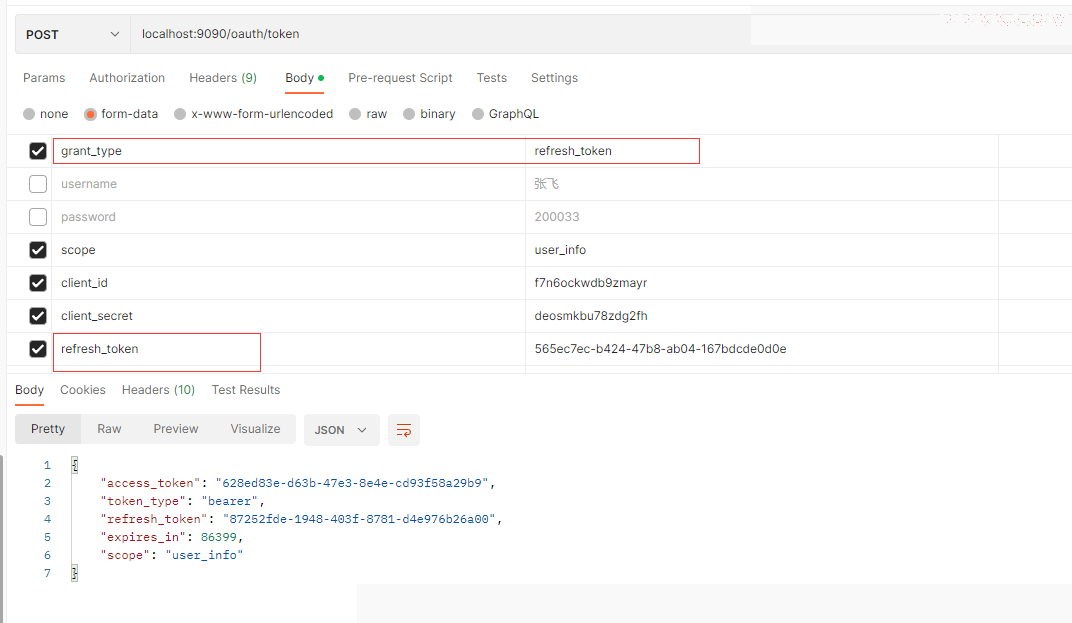
且我们还可以通过该refreshToken重新获取一个新的token和refreshToken:
现在是配置资源服务器的时候,以便它也可以使用相同的数据库。所以我们也需要在之前的资源服务器上加入和授权服务器同样的数据源相关依赖和配置,这里我就不作代码演示了,直接copy授权服务器直接写的配置和依赖即可。
然后来到资源服务器的配置类中,需要注入数据源并配置JdbcTokenStore:
@Configuration
@EnableResourceServer
public class ResourceServerConfig extends ResourceServerConfigurerAdapter {


	@Autowired
	private DataSource dataSource;

	@Override
	public void configure(ResourceServerSecurityConfigurer resources) throws Exception {


		resources.tokenStore(tokenStore());
	}

	@Bean
	public TokenStore tokenStore(){


		return new JdbcTokenStore(dataSource);
	}

}
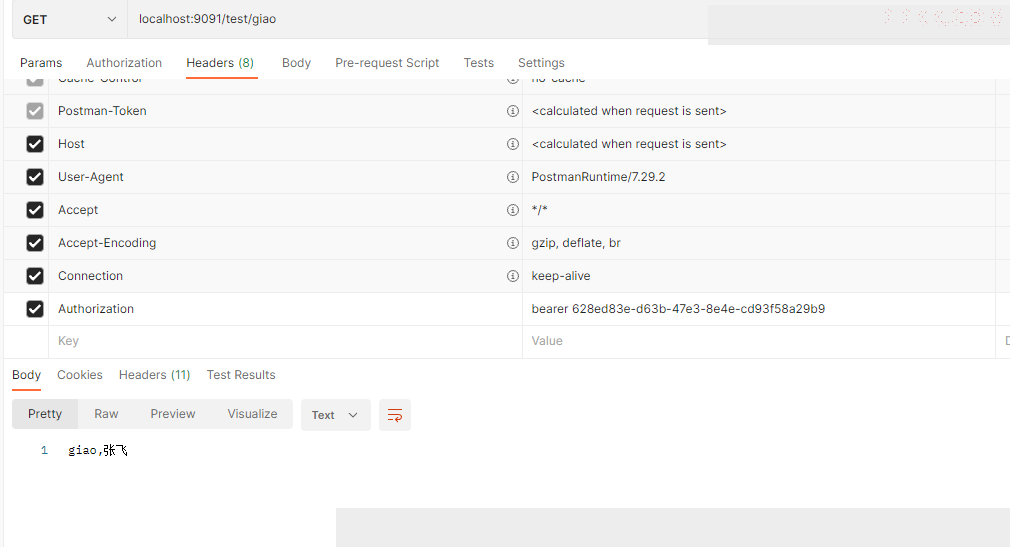
现在可以启动资源服务器,并使用之前颁发的访问令牌访问/test/yidou测试端点。
这样,我们就实现了黑板模式,用于资源服务器和授权服务器之间的通信。其中使用了一个名为JdbcTokenStore的TokenStore实现。现在可以将令牌持久化到数据库中了,并且可以避免在资源服务器和授权服务器之间使用直接调用来验证令牌。但是让授权服务器和资源服务器都依赖于同一个数据库是一个缺点。在大量请求的情况下,共享数据库可能成为一个瓶颈,并影响系统性能。那么就有了可以让redis存储令牌让响应速度快一点,但是这种方案治标不治本,那么有其他实现选项吗?答案是肯定的:在JWT中使用签名令牌,这个我们后面会讲到。
最后的最后,让大家思考一点,在对资源服务器去作相关配置的时候,我说了为了让资源服务器和授权服务器使用相同的tokenStore(共享数据库),所以需要在资源服务器配置和授权服务器同样的tokenStore,这样的做法真的好吗,真的合适吗?说的绝一点,有时候我们需要对TokenStore重写,其中关于用户详细信息的内容涉及到UserDetails,那在授权服务器这个项目重写配置后,你总不能把同样的UserDetails类又放到资源服务器项目上去,然后再重写一个相同的TokenStore,代码太耦合了,这样的做法肯定是不合适的。
再结合一下如果授权服务器和资源服务器如果在同一个项目可以访问相同的bean,而不需要在资源服务器额外配置tokenStore,只需要在授权服务器配置这个点,大家可以去思考下有没有更好地解决方式呢?这个我将在下一章通过redis重写TokenStore中提一提我的解决方案也是我在看了一些oauth项目解决方案初步总结出的。