5、Sentinel 控制台使用和源码
通过sentinel 的控制台,我们可以对规则进行查询和修改,也可以查看到实时监控,机器列表等信息,所以我们需要对 sentinel 的控制台做个完整的了解。
启动控制台
从github上下载源码后,启动sentinel-dashboard模块。默认地址是8080。用户名和密码配置到了application.properties中,可以自行修改,默认用户名和密码都是 sentinel。
可以看到当前控制台中没有任何的应用,因为还没有应用接入。
接入控制台
要想在控制台中操作我们的应用,除了需要部署一个控制台的服务外,还需要将我们的应用接入到控制台中去。
<dependency>
    <groupId>com.alibaba.cloud</groupId>
    <artifactId>spring-cloud-starter-alibaba-sentinel</artifactId>
</dependency>
增加配置参数:控制台地址。
spring:
  cloud:
    sentinel:
      transport:
        dashboard: localhost:8080
控制台使用懒加载,在第一次访问的时候才会开始进行初始化,并向控制台发送心跳和客户端规则等信息。
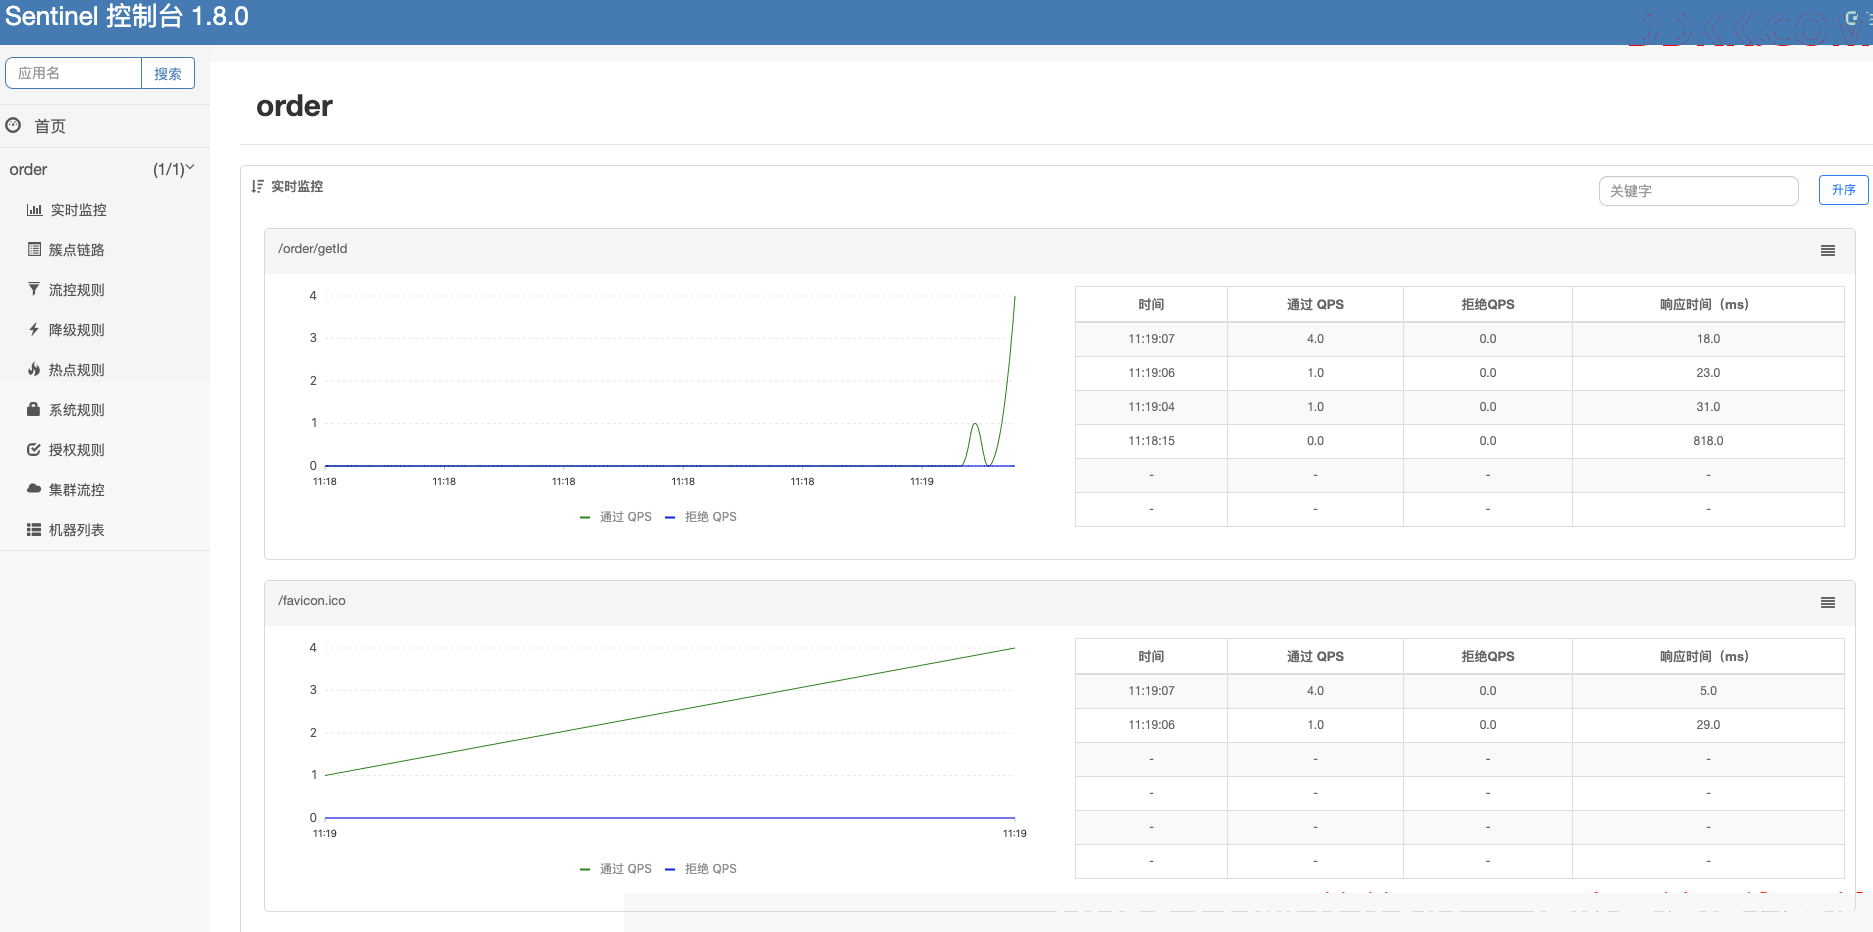
下面让我们对控制台的功能做具体的介绍。
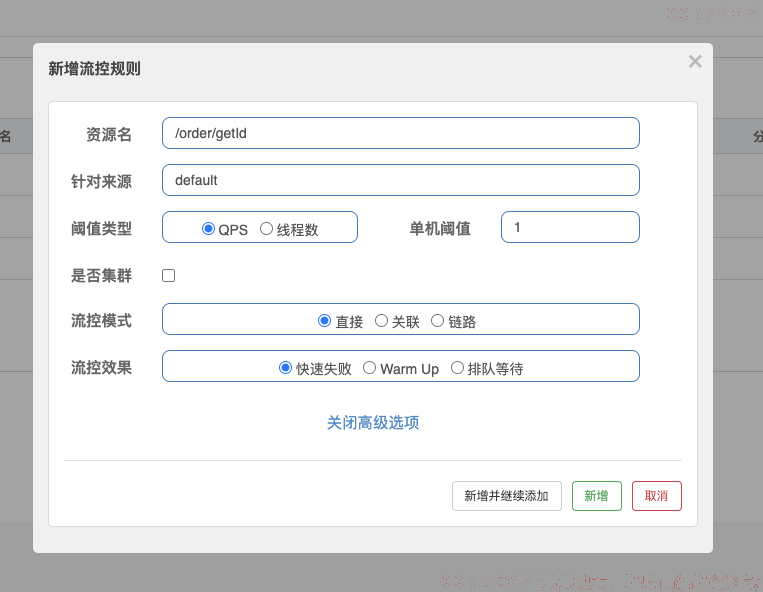
流控规则
在簇点链路中可以配置流控规则,我们看下每个选项的含义。
-
资源名:默认使用请求路径,也可以修改成其他名称。
-
针对来源:可以对服务的调用来源进行限流。default为默认,会限流所有来源,也可以设置成其他服务名。
-
阀值类型:分为QPS和线程数,指的是到达限流的判断条件。
-
是否集群:设置单机还是集群限流,这个之后再讲解。
-
流控模式:
-
直接:指的是限流的目标就是当前的资源。
-
关联:需要填写关联资源。当关联资源的访问达到限流阀值,就会限制当前资源的访问。这是对关联资源的一种保护策略。
-
链路:这个是对来源更细粒度的配置。需要配置入口资源,也就是说从某个请求URL的入口进入才会进行流控判断。比如:/test-a 和 /test-b 都调用 /common这个资源。如果入口资源配置成 /test-a,那么 /test-b 不会进行流量控制。
-
流控效果:
-
快速失败:如果流控就抛出异常。
-
Warm Up:先进行预热,根据codeFactor(默认是3)的值,从阀值/codeFactor,经过预热时长(秒)才到达设置的QPS阀值。
-
排队等待:匀速排队,让请求以均匀的速度通过,阀值类型必须设置成QPS,否则无效。需要设置超时时间,如果超出超时时间,请求才会被丢弃。
源码解析
流控是用FlowSlot进行的判断。它也是责任链上的其中一个节点。我们知道这些节点的统一处理入口都是 entry方法。
FlowSlot#entry
public void entry(Context context, ResourceWrapper resourceWrapper, DefaultNode node, int count,
                  boolean prioritized, Object... args) throws Throwable {


    checkFlow(resourceWrapper, context, node, count, prioritized);

    fireEntry(context, resourceWrapper, node, count, prioritized, args);
}

void checkFlow(ResourceWrapper resource, Context context, DefaultNode node, int count, boolean prioritized)
    throws BlockException {


    checker.checkFlow(ruleProvider, resource, context, node, count, prioritized);
}
FlowSlot在实例化的时候会实例化一个FlowRuleChecker实例作为checker。在checkFlow方法里面会继续调用FlowRuleChecker的checkFlow方法,其中ruleProvider实例是用来根据根据resource来从flowRules中获取相应的FlowRule。
我们进入到FlowRuleChecker的checkFlow方法中
FlowRuleChecker#checkFlow
public void checkFlow(Function<String, Collection<FlowRule>> ruleProvider, ResourceWrapper resource,
                      Context context, DefaultNode node, int count, boolean prioritized) throws BlockException {


    if (ruleProvider == null || resource == null) {


        return;
    }
    //返回FlowRuleManager里面注册的所有规则
    Collection<FlowRule> rules = ruleProvider.apply(resource.getName());
    if (rules != null) {


        for (FlowRule rule : rules) {


            //如果当前的请求不能通过,那么就抛出FlowException异常
            if (!canPassCheck(rule, context, node, count, prioritized)) {


                throw new FlowException(rule.getLimitApp(), rule);
            }
        }
    }
}
这里是调用ruleProvider来获取所有FlowRule,然后遍历rule集合通过canPassCheck方法来进行过滤,如果不符合条件则会抛出FlowException异常。
我们跟进去直接来到passLocalCheck方法:
private static boolean passLocalCheck(FlowRule rule, Context context, DefaultNode node, int acquireCount,
                                      boolean prioritized) {


    //节点选择
    Node selectedNode = selectNodeByRequesterAndStrategy(rule, context, node);
    if (selectedNode == null) {


        return true;
    }
    //根据设置的规则来拦截
    return rule.getRater().canPass(selectedNode, acquireCount, prioritized);
}
这个方法里面会选择好相应的节点后调用rater的canPass方法来判断是否需要阻塞。
Rater有四个,分别是:DefaultController、RateLimiterController、WarmUpController、WarmUpRateLimiterController。它们是什么时候创建的呢?主要是调用了下面的这个方法。
FlowRuleUtil#generateRater
private static TrafficShapingController generateRater(/*@Valid*/ FlowRule rule) {


    if (rule.getGrade() == RuleConstant.FLOW_GRADE_QPS) {


        switch (rule.getControlBehavior()) {


            case RuleConstant.CONTROL_BEHAVIOR_WARM_UP:
                //warmUpPeriodSec默认是10
                return new WarmUpController(rule.getCount(), rule.getWarmUpPeriodSec(),
                    ColdFactorProperty.coldFactor);
            case RuleConstant.CONTROL_BEHAVIOR_RATE_LIMITER:
                //rule.getMaxQueueingTimeMs()默认是500
                return new RateLimiterController(rule.getMaxQueueingTimeMs(), rule.getCount());
            case RuleConstant.CONTROL_BEHAVIOR_WARM_UP_RATE_LIMITER:
                return new WarmUpRateLimiterController(rule.getCount(), rule.getWarmUpPeriodSec(),
                    rule.getMaxQueueingTimeMs(), ColdFactorProperty.coldFactor);
            case RuleConstant.CONTROL_BEHAVIOR_DEFAULT:
            default:
                // Default mode or unknown mode: default traffic shaping controller (fast-reject).
        }
    }
    return new DefaultController(rule.getCount(), rule.getGrade());
}
这个方法里面如果设置的是按QPS的方式来限流的话,可以设置一个ControlBehavior属性,用来做流量控制分别是:直接拒绝、Warm Up、匀速排队。
RateLimiterController匀速排队
它的中心思想是,以固定的间隔时间让请求通过。当请求到来的时候,如果当前请求距离上个通过的请求通过的时间间隔不小于预设值,则让当前请求通过;否则,计算当前请求的预期通过时间,如果该请求的预期通过时间小于规则预设的 timeout 时间,则该请求会等待直到预设时间到来通过(排队等待处理);若预期的通过时间超出最大排队时长,则直接拒接这个请求。
这种方式适合用于请求以突刺状来到,这个时候我们不希望一下子把所有的请求都通过,这样可能会把系统压垮;同时我们也期待系统以稳定的速度,逐步处理这些请求,以起到“削峰填谷”的效果,而不是拒绝所有请求。
要想使用这个策略需要在实例化FlowRule的时候设置rule1.setControlBehavior(RuleConstant.CONTROL_BEHAVIOR_RATE_LIMITER)这样的一句代码。
在实例化Rater的时候会调用FlowRuleUtil#generateRater创建一个实例:
new RateLimiterController(rule.getMaxQueueingTimeMs(), rule.getCount());
MaxQueueingTimeMs默认是500 ,Count在我们这个例子中传入的是20。
我们看一下具体的canPass方法是怎么实现限流的:
public boolean canPass(Node node, int acquireCount, boolean prioritized) {


    // Pass when acquire count is less or equal than 0.
    if (acquireCount <= 0) {


        return true;
    }
    // Reject when count is less or equal than 0.
    // Otherwise,the costTime will be max of long and waitTime will overflow in some cases.
    if (count <= 0) {


        return false;
    }

    long currentTime = TimeUtil.currentTimeMillis();
    //两个请求预期通过的时间,也就是说把请求平均分配到1秒上
    // Calculate the interval between every two requests.
    long costTime = Math.round(1.0 * (acquireCount) / count * 1000);

    //latestPassedTime代表的是上一次调用请求的时间
    // Expected pass time of this request.
    long expectedTime = costTime + latestPassedTime.get();
    //如果预期通过的时间加上上次的请求时间小于当前时间,则通过
    if (expectedTime <= currentTime) {


        // Contention may exist here, but it's okay.
        latestPassedTime.set(currentTime);
        return true;
    } else {


        //默认是maxQueueingTimeMs
        // Calculate the time to wait.
        long waitTime = costTime + latestPassedTime.get() - TimeUtil.currentTimeMillis();

        //如果预提时间比当前时间大maxQueueingTimeMs那么多,那么就阻塞
        if (waitTime > maxQueueingTimeMs) {


            return false;
        } else {


            //将上次时间加上这次请求要耗费的时间
            long oldTime = latestPassedTime.addAndGet(costTime);
            try {


                waitTime = oldTime - TimeUtil.currentTimeMillis();
                //再次判断一下是否超过maxQueueingTimeMs设置的时间
                if (waitTime > maxQueueingTimeMs) {


                    //如果是的话就阻塞,并重置上次通过时间
                    latestPassedTime.addAndGet(-costTime);
                    return false;
                }
                //如果需要等待的时间大于零,那么就sleep
                // in race condition waitTime may <= 0
                if (waitTime > 0) {


                    Thread.sleep(waitTime);
                }
                return true;
            } catch (InterruptedException e) {


            }
        }
    }
    return false;
}
这个方法一开始会计算一下costTime这个值,将请求平均分配到一秒中。例如:当 count 设为 10 的时候,则代表一秒匀速的通过 10 个请求,也就是每个请求平均间隔恒定为 1000 / 10 = 100 ms。
但是这里有个小bug,如果count设置的比较大,比如设置成10000,那么costTime永远都会等于0,整个QPS限流将会失效。
然后会将costTime和上次的请求时间相加,如果大于当前时间就表明请求的太频繁了,会将latestPassedTime这个属性加上这次请求的costTime,并调用sleep方法让这个线程先睡眠一会再请求。
这里有个细节,如果多个请求同时一起过来,那么每个请求在设置oldTime的时候都会通过addAndGet这个原子性的方法将latestPassedTime依次相加,并赋值给oldTime,这样每个线程的sleep的时间都不会相同,线程也不会同时醒来。
WarmUpController限流 冷启动
当系统长期处于低水位的情况下,当流量突然增加时,直接把系统拉升到高水位可能瞬间把系统压垮。通过"冷启动",让通过的流量缓慢增加,在一定时间内逐渐增加到阈值上限,给冷系统一个预热的时间,避免冷系统被压垮。
//默认为3
private int coldFactor;
//转折点的令牌数
protected int warningToken = 0;
//最大的令牌数
private int maxToken;
//斜线斜率
protected double slope;
//累积的令牌数
protected AtomicLong storedTokens = new AtomicLong(0);
//最后更新令牌的时间
protected AtomicLong lastFilledTime = new AtomicLong(0);

public WarmUpController(double count, int warmUpPeriodInSec, int coldFactor) {


    construct(count, warmUpPeriodInSec, coldFactor);
}

private void construct(double count, int warmUpPeriodInSec, int coldFactor) {


    if (coldFactor <= 1) {


        throw new IllegalArgumentException("Cold factor should be larger than 1");
    }

    this.count = count;
    //默认是3
    this.coldFactor = coldFactor;

    // thresholdPermits = 0.5 * warmupPeriod / stableInterval.
    // 10*20/2 = 100
    // warningToken = 100;
    warningToken = (int) (warmUpPeriodInSec * count) / (coldFactor - 1);
    // / maxPermits = thresholdPermits + 2 * warmupPeriod /
    // (stableInterval + coldInterval)
    // maxToken = 200
    maxToken = warningToken + (int) (2 * warmUpPeriodInSec * count / (1.0 + coldFactor));

    // slope
    // slope = (coldIntervalMicros - stableIntervalMicros) / (maxPermits
    // - thresholdPermits);
    slope = (coldFactor - 1.0) / count / (maxToken - warningToken);
}
我们接下来看看WarmUpController的canpass方法:
WarmUpController#canpass
public boolean canPass(Node node, int acquireCount, boolean prioritized) {


    //获取当前时间窗口的流量大小
    long passQps = (long) node.passQps();
    //获取上一个窗口的流量大小
    long previousQps = (long) node.previousPassQps();
    //设置 storedTokens 和 lastFilledTime 到正确的值
    syncToken(previousQps);

    // 开始计算它的斜率
    // 如果进入了警戒线,开始调整他的qps
    long restToken = storedTokens.get();
    if (restToken >= warningToken) {


        //通过计算当前的restToken和警戒线的距离来计算当前的QPS
        //离警戒线越接近,代表这个程序越“热”,从而逐步释放QPS
        long aboveToken = restToken - warningToken;
        //当前状态下能达到的最高 QPS
        // current interval = restToken*slope+1/count
        double warningQps = Math.nextUp(1.0 / (aboveToken * slope + 1.0 / count));

        // 如果不会超过,那么通过,否则不通过
        if (passQps + acquireCount <= warningQps) {


            return true;
        }
    } else {


        // count 是最高能达到的 QPS
        if (passQps + acquireCount <= count) {


            return true;
        }
    }
    return false;
}
这个方法里通过syncToken(previousQps)设置storedTokens的值后,与警戒值做判断,如果没有达到警戒值,那么通过计算和警戒值的距离再加上slope计算出一个当前的QPS值,storedTokens越大当前的QPS越小。
如果当前的storedTokens已经小于警戒值了,说明已经预热完毕了,直接用count判断就好了。
WarmUpController#syncToken
protected void syncToken(long passQps) {


    long currentTime = TimeUtil.currentTimeMillis();
    //去掉毫秒的时间
    currentTime = currentTime - currentTime % 1000;
    long oldLastFillTime = lastFilledTime.get();
    if (currentTime <= oldLastFillTime) {


        return;
    }

    // 令牌数量的旧值
    long oldValue = storedTokens.get();
    // 计算新的令牌数量,往下看
    long newValue = coolDownTokens(currentTime, passQps);

    if (storedTokens.compareAndSet(oldValue, newValue)) {


        // 令牌数量上,减去上一分钟的 QPS,然后设置新值
        long currentValue = storedTokens.addAndGet(0 - passQps);
        if (currentValue < 0) {


            storedTokens.set(0L);
        }
        lastFilledTime.set(currentTime);
    }
}
这个方法通过coolDownTokens方法来获取一个新的value,然后通过CAS设置到storedTokens中,然后将storedTokens减去上一个窗口的QPS值,并为lastFilledTime设置一个新的值。
private long coolDownTokens(long currentTime, long passQps) {


    long oldValue = storedTokens.get();
    long newValue = oldValue;

    // 添加令牌的判断前提条件:
    // 当令牌的消耗程度远远低于警戒线的时候
    if (oldValue < warningToken) {


        // 根据count数每秒加上令牌
        newValue = (long) (oldValue + (currentTime - lastFilledTime.get()) * count / 1000);
    } else if (oldValue > warningToken) {


        //如果还在冷启动阶段
        // 如果当前通过的 QPS 大于 count/coldFactor,说明系统消耗令牌的速度,大于冷却速度
        //    那么不需要添加令牌,否则需要添加令牌
        if (passQps < (int) count / coldFactor) {


            newValue = (long) (oldValue + (currentTime - lastFilledTime.get()) * count / 1000);
        }
    }
    return Math.min(newValue, maxToken);
}
这个方法主要是用来做添加令牌的操作,如果是流量比较小或者是已经预热完毕了,那么就需要根据count数每秒加上令牌,如果是在预热阶段那么就不进行令牌添加。
WarmUpRateLimiterController就是结合了冷启动和匀速排队,代码非常的简单。就不做分析了。
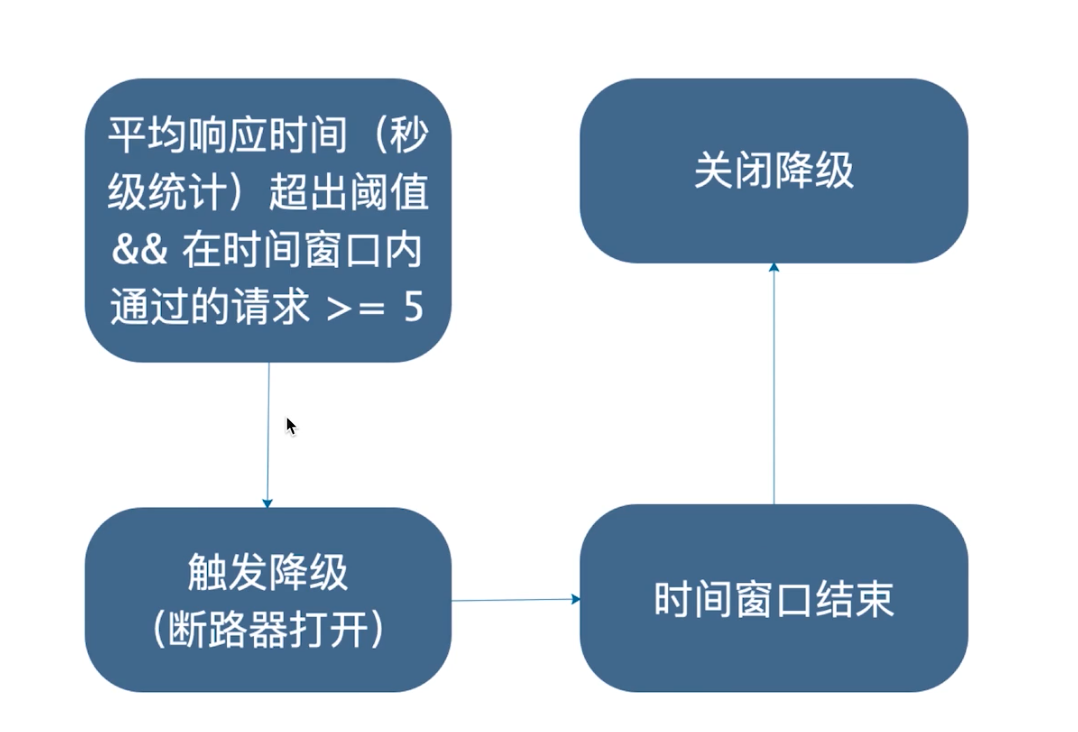
降级规则
当达到降级规则时,会触发断路器打开,进行降级。需要注意的是,sentinel断路器没有半开的功能。
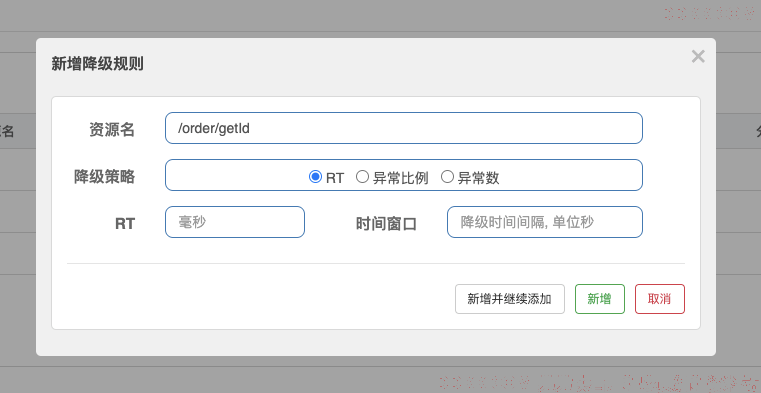
- RT
RT指的是平均响应时长。
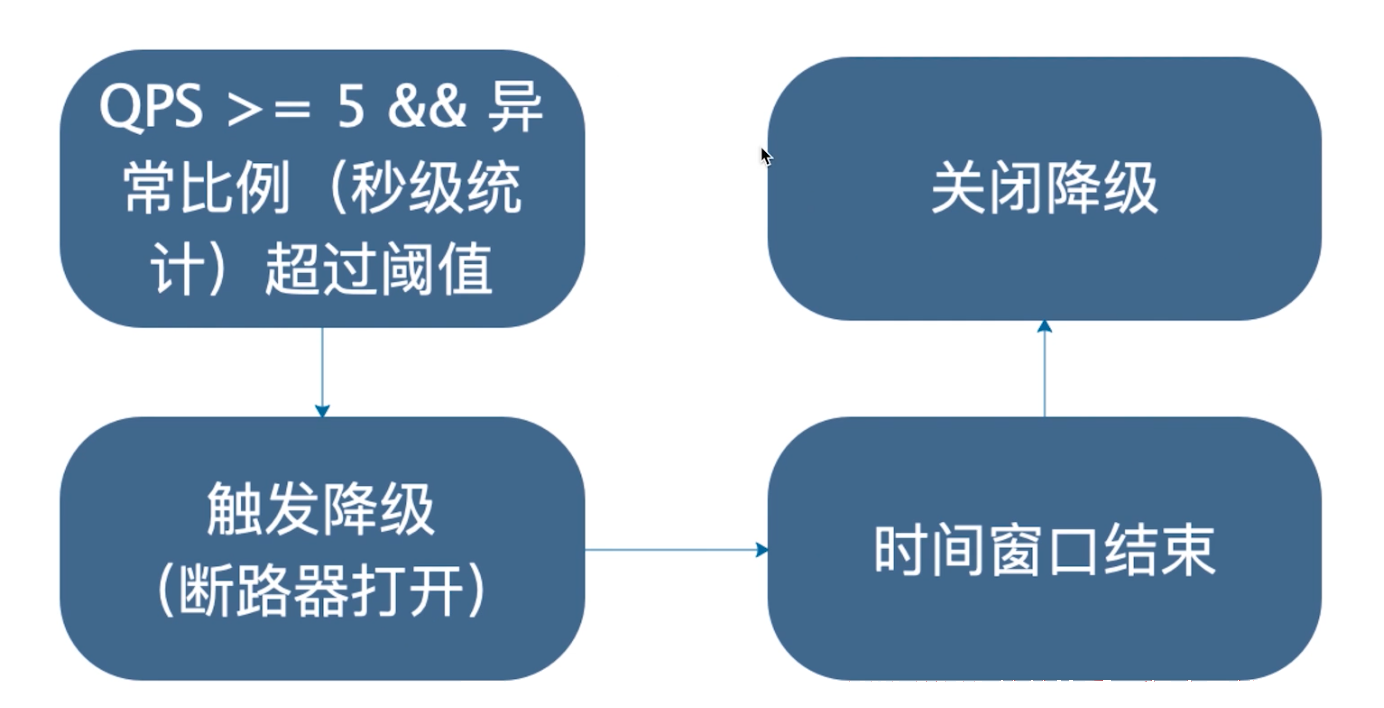
异常比例
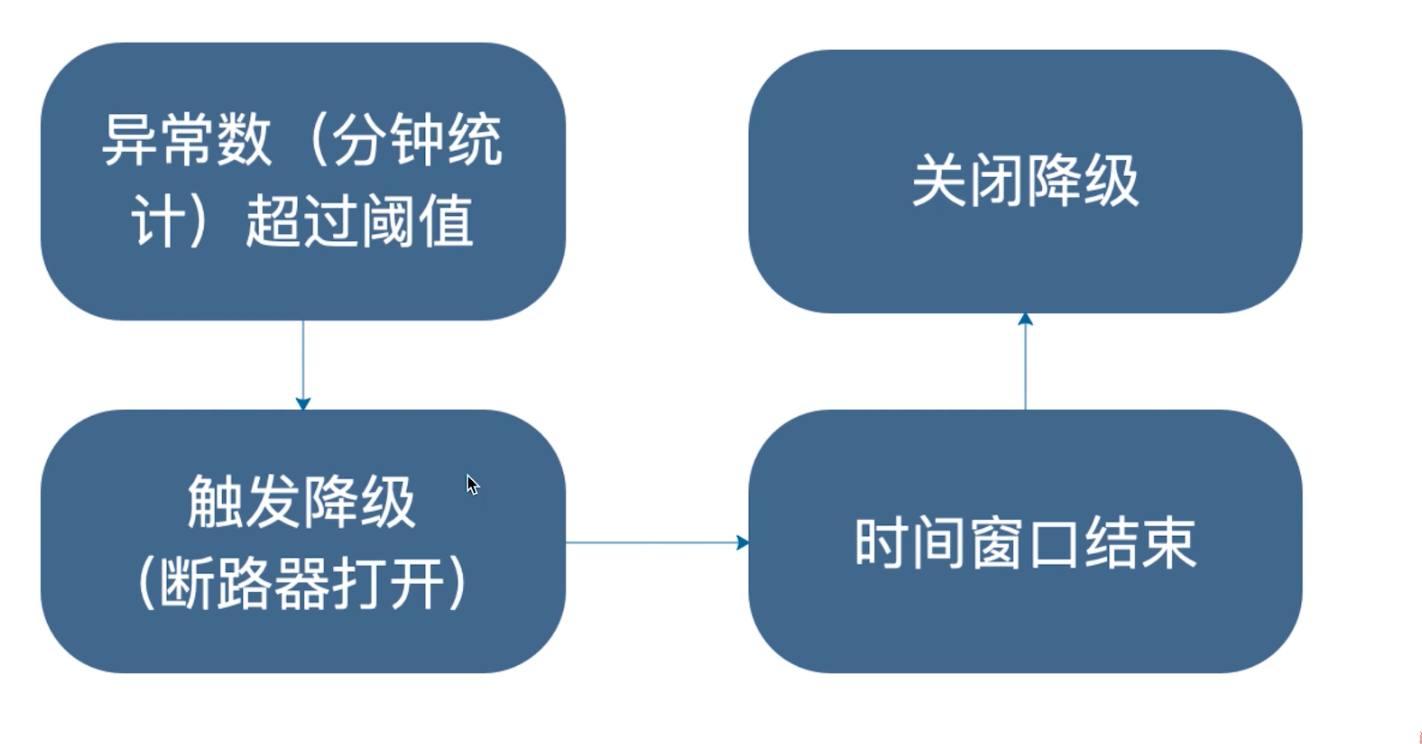
异常数
需要注意异常数是分钟基本的,所以时间窗口最好 > 60秒。
源码解析
Sentinel的降级策略全部都是在DegradeSlot中进行操作的。
DegradeSlot
public class DegradeSlot extends AbstractLinkedProcessorSlot<DefaultNode> {


    @Override
    public void entry(Context context, ResourceWrapper resourceWrapper, DefaultNode node, int count, boolean prioritized, Object... args)
        throws Throwable {


        DegradeRuleManager.checkDegrade(resourceWrapper, context, node, count);
        fireEntry(context, resourceWrapper, node, count, prioritized, args);
    }
}
DegradeSlot会直接调用DegradeRuleManager进行降级的操作,我们直接进入到DegradeRuleManager.checkDegrade方法中。
DegradeRuleManager#checkDegrade
public static void checkDegrade(ResourceWrapper resource, Context context, DefaultNode node, int count)
    throws BlockException {


    //根据resource来获取降级策略
    Set<DegradeRule> rules = degradeRules.get(resource.getName());
    if (rules == null) {


        return;
    }

    for (DegradeRule rule : rules) {


        if (!rule.passCheck(context, node, count)) {


            throw new DegradeException(rule.getLimitApp(), rule);
        }
    }
}
这个方法逻辑也是非常的清晰,首先是根据资源名获取到注册过的降级规则,然后遍历规则集合调用规则的passCheck,如果返回false那么就抛出异常进行降级。
DegradeRule#passCheck
public boolean passCheck(Context context, DefaultNode node, int acquireCount, Object... args) {


    //返回false直接进行降级
    if (cut.get()) {


        return false;
    }
    //降级是根据资源的全局节点来进行判断降级策略的
    ClusterNode clusterNode = ClusterBuilderSlot.getClusterNode(this.getResource());
    if (clusterNode == null) {


        return true;
    }
    //根据响应时间降级策略
    if (grade == RuleConstant.DEGRADE_GRADE_RT) {


        //获取节点的平均响应时间
        double rt = clusterNode.avgRt();
        if (rt < this.count) {


            passCount.set(0);
            return true;
        }
        //rtSlowRequestAmount默认是5
        // Sentinel will degrade the service only if count exceeds.
        if (passCount.incrementAndGet() < rtSlowRequestAmount) {


            return true;
        }
        //    根据异常比例降级
    } else if (grade == RuleConstant.DEGRADE_GRADE_EXCEPTION_RATIO) {


        double exception = clusterNode.exceptionQps();
        double success = clusterNode.successQps();
        double total = clusterNode.totalQps();
        // If total amount is less than minRequestAmount, the request will pass.
        if (total < minRequestAmount) {


            return true;
        }

        // In the same aligned statistic time window,
        // "success" (aka. completed count) = exception count + non-exception count (realSuccess)
        double realSuccess = success - exception;
        if (realSuccess <= 0 && exception < minRequestAmount) {


            return true;
        }

        if (exception / success < count) {


            return true;
        }
        //    根据异常数降级
    } else if (grade == RuleConstant.DEGRADE_GRADE_EXCEPTION_COUNT) {


        double exception = clusterNode.totalException();
        if (exception < count) {


            return true;
        }
    }
    //根据设置的时间窗口进行重置
    if (cut.compareAndSet(false, true)) {


        ResetTask resetTask = new ResetTask(this);
        pool.schedule(resetTask, timeWindow, TimeUnit.SECONDS);
    }

    return false;
}
这个方法首先会去获取cut的值,如果是true那么就直接进行限流操作。然后会根据resource获取ClusterNode全局节点。往下分别根据三种不同的策略来进行降级。
DEGRADE_GRADE_RT根据响应时间进行降级
if (grade == RuleConstant.DEGRADE_GRADE_RT) {


    //获取节点的平均响应时间
    double rt = clusterNode.avgRt();
    if (rt < this.count) {


        passCount.set(0);
        return true;
    }
    //rtSlowRequestAmount默认是5
    // Sentinel will degrade the service only if count exceeds.
    if (passCount.incrementAndGet() < rtSlowRequestAmount) {


        return true;
    }
}
如果是根据响应时间进行降级,那么会获取clusterNode的平均响应时间,如果平均响应时间大于所设定的count(默认是毫秒),那么就调用passCount加1,如果passCount大于5,那么直接降级。
所以看到这里我们应该知道根据平均响应时间降级前几个请求即使响应过长也不会立马降级,而是要等到第六个请求到来才会进行降级。
我们进入到clusterNode的avgRt方法中看一下是如何获取到clusterNode的平均响应时间的。
clusterNode是StatisticNode的实例
StatisticNode#avgRt
public double avgRt() {


    //获取当前时间窗口内调用成功的次数
    long successCount = rollingCounterInSecond.success();
    if (successCount == 0) {


        return 0;
    }
    //获取窗口内的响应时间
    return rollingCounterInSecond.rt() * 1.0 / successCount;
}
这个方法主要是调用rollingCounterInSecond获取成功次数,然后再获取窗口内的响应时间,用总响应时间除以次数得到平均每次成功调用的响应时间。
我们再回到DegradeRule的passCheck方法中的响应时间降级策略中:
if (grade == RuleConstant.DEGRADE_GRADE_RT) {


    //获取节点的平均响应时间
    double rt = clusterNode.avgRt();
    if (rt < this.count) {


        passCount.set(0);
        return true;
    }
    //rtSlowRequestAmount默认是5
    // Sentinel will degrade the service only if count exceeds.
    if (passCount.incrementAndGet() < rtSlowRequestAmount) {


        return true;
    }
    //    根据异常比例降级
}
//省略
return false;
如果求得的平均响应时间小于设置的count时间,那么就重置passCount并返回true,表示不抛出异常;如果有连续5次的响应时间都超过了count,那么就返回false抛出异常进行降级。
DEGRADE_GRADE_EXCEPTION_RATIO根据异常比例降级
if (grade == RuleConstant.DEGRADE_GRADE_EXCEPTION_RATIO) {


    //获取每秒异常的次数
    double exception = clusterNode.exceptionQps();
    //获取每秒成功的次数
    double success = clusterNode.successQps();
    //获取每秒总调用次数
    double total = clusterNode.totalQps();
    // If total amount is less than minRequestAmount, the request will pass.
    // 如果总调用次数少于5,那么不进行降级
    if (total < minRequestAmount) {


        return true;
    }

    // In the same aligned statistic time window,
    // "success" (aka. completed count) = exception count + non-exception count (realSuccess)
    double realSuccess = success - exception;
    if (realSuccess <= 0 && exception < minRequestAmount) {


        return true;
    }

    if (exception / success < count) {


        return true;
    }
}
。。。
return false;
这个方法中获取成功调用的Qps和异常调用的Qps,验证后,然后求一下比率,如果没有大于count,那么就返回true,否则返回false抛出异常。
我们再进入到exceptionQps方法中看一下:
StatisticNode#exceptionQps
public double exceptionQps() {


    return rollingCounterInSecond.exception() / rollingCounterInSecond.getWindowIntervalInSec();
}
rollingCounterInSecond.getWindowIntervalInSec方法是表示窗口的时间长度,用秒来表示。这里返回的是1。
ArrayMetric#exception
public long exception() {


    data.currentWindow();
    long exception = 0;
    List<MetricBucket> list = data.values();
    for (MetricBucket window : list) {


        exception += window.exception();
    }
    return exception;
}
这个方法和我上面分析的差不多,大家看看就好了。
根据异常数降级DEGRADE_GRADE_EXCEPTION_COUNT
if (grade == RuleConstant.DEGRADE_GRADE_EXCEPTION_COUNT) {


    double exception = clusterNode.totalException();
    if (exception < count) {


        return true;
    }
}
根据异常数降级是非常的直接的,直接根据统计的异常总次数判断是否超过count。
热点规则
比如我们想要对一段时间内频繁访问的用户 ID 进行限制,又或者我们想统计一段时间内最常购买的商品 ID 并针对商品 ID 进行限制。那这里的用户 ID 和商品 ID 都是可变的资源,通过原先的固定资源已经无法满足我们的需求了,这时我们就可以通过 Sentinel 为我们提供的 热点参数限流 来达到这样的效果。
热点规则的配置,需要根据接口参数进行匹配规则。
    @GetMapping("/testHot")
    @SentinelResource("hot")
    public String testHot(@RequestParam(required = false) String a,
                          @RequestParam(required = false) String b) {


        return a + "" + b;
    }
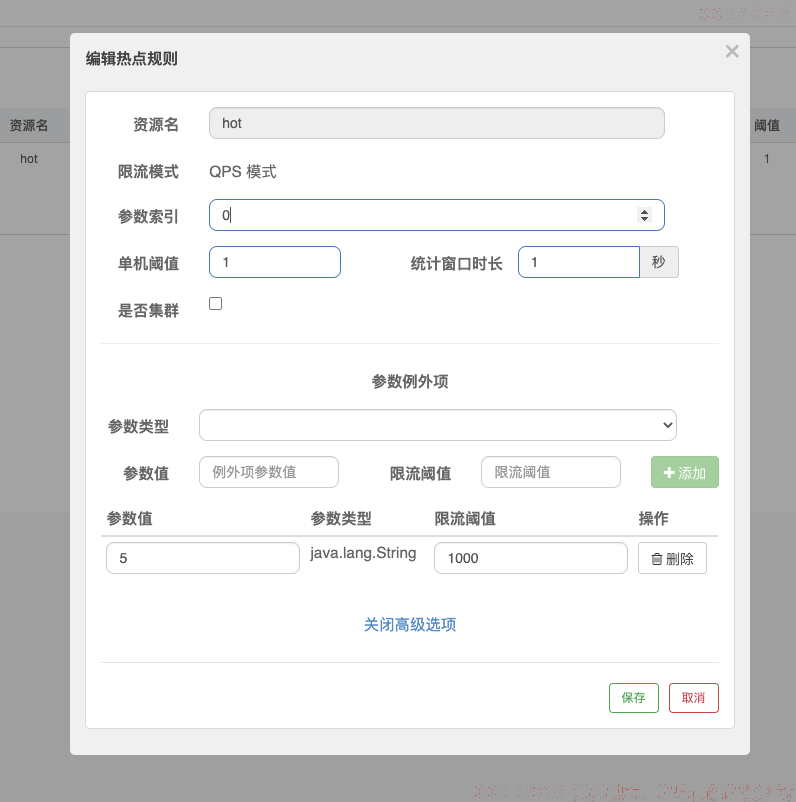
- 参数索引:0代表接口参数的第一个,1代表接口参数的第二个。
- 单机阀值:代表单个接口的阀值。
- 参数例外项:可以对参数的特殊值单独配置。
源码解析
热点参数拦截需要sentinel-extension这个项目。它会帮你在责任链中增加com.alibaba.csp.sentinel.slots.block.flow.param.ParamFlowSlot。进行对热点资源的限流。暂时不做分析。
系统规则
- Load(系统负载)
当系统load1(1分钟的load)超过阀值,且并发线程数超过系统容量时触发,建议设置为CPU核心数*2.5。(仅对Linux/Unix-like 机器生效)。
- RT
所有入口流量的平均RT达到阀值触发。 - 线程数
所有入口流量的并发线程数达到阀值触发。 - 入口QPS
所有入口流量的QPS达到阀值触发。
源码解析
系统限流是在SystemSlot中处理的。
SystemSlot#entry
public void entry(Context context, ResourceWrapper resourceWrapper, DefaultNode node, int count,
                  boolean prioritized, Object... args) throws Throwable {

//检查一下是否符合限流条件,符合则进行限流
SystemRuleManager.checkSystem(resourceWrapper);
fireEntry(context, resourceWrapper, node, count, prioritized, args);
}
SystemRuleManager#checkSystem
public static void checkSystem(ResourceWrapper resourceWrapper) throws BlockException {


    // Ensure the checking switch is on.
    if (!checkSystemStatus.get()) {


        return;
    }
    //如果不是入口流量,那么直接返回
    // for inbound traffic only
    if (resourceWrapper.getType() != EntryType.IN) {


        return;
    }

    // total qps
    double currentQps = Constants.ENTRY_NODE == null ? 0.0 : Constants.ENTRY_NODE.successQps();
    if (currentQps > qps) {


        throw new SystemBlockException(resourceWrapper.getName(), "qps");
    }

    // total thread
    int currentThread = Constants.ENTRY_NODE == null ? 0 : Constants.ENTRY_NODE.curThreadNum();
    if (currentThread > maxThread) {


        throw new SystemBlockException(resourceWrapper.getName(), "thread");
    }

    double rt = Constants.ENTRY_NODE == null ? 0 : Constants.ENTRY_NODE.avgRt();
    if (rt > maxRt) {


        throw new SystemBlockException(resourceWrapper.getName(), "rt");
    }

    // load. BBR algorithm.
    if (highestSystemLoadIsSet && getCurrentSystemAvgLoad() > highestSystemLoad) {


        if (!checkBbr(currentThread)) {


            throw new SystemBlockException(resourceWrapper.getName(), "load");
        }
    }

    // cpu usage
    if (highestCpuUsageIsSet && getCurrentCpuUsage() > highestCpuUsage) {


        if (!checkBbr(currentThread)) {


            throw new SystemBlockException(resourceWrapper.getName(), "cpu");
        }
    }
}
这个方法首先会校验一下checkSystemStatus状态和EntryType是不是IN,如果不是则直接返回。
然后对Constants.ENTRY_NODE进行操作。这个对象是一个final static 修饰的变量,代表是全局对象。
public final static ClusterNode ENTRY_NODE = new ClusterNode();
所以这里的限流操作都是对全局其作用的,而不是对资源起作用。ClusterNode还是继承自StatisticNode,所以最后都是调用StatisticNode的successQps、curThreadNum、avgRt,这几个方法前面已经介绍过了。
在下面调用getCurrentSystemAvgLoad方法和getCurrentCpuUsage方法调用到SystemStatusListener设置的全局变量currentLoad和currentCpuUsage。这两个参数是SystemRuleManager的定时任务定时收集的。
在做load判断和cpu usage判断的时候会还会调用checkBbr方法来判断:
private static boolean checkBbr(int currentThread) {


    if (currentThread > 1 &&
        currentThread > Constants.ENTRY_NODE.maxSuccessQps() * Constants.ENTRY_NODE.minRt() / 1000) {


        return false;
    }
    return true;
}
也就是说:当系统 load1 超过阈值,且系统当前的并发线程数超过系统容量时才会触发系统保护。系统容量由系统的 maxQps * minRt 计算得出。
StatisticNode#maxSuccessQps
public double maxSuccessQps() {


    return rollingCounterInSecond.maxSuccess() * rollingCounterInSecond.getSampleCount();
}
maxSuccessQps方法是用窗口内的最大成功调用数和窗口数量相乘rollingCounterInSecond的窗口1秒的窗口数量是2,最大成功调用数如下得出:
ArrayMetric#maxSuccess
public long maxSuccess() {


    data.currentWindow();
    long success = 0;

    List<MetricBucket> list = data.values();
    for (MetricBucket window : list) {


        if (window.success() > success) {


            success = window.success();
        }
    }
    return Math.max(success, 1);
}
最大成功调用数是通过整个遍历整个窗口,获取所有窗口里面最大的调用数。所以这样的最大的并发量是一个预估值,不是真实值。
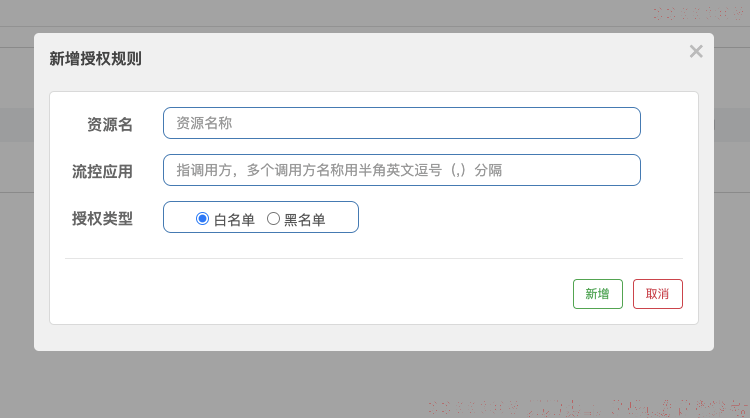
授权规则
授权规则是指定资源访问的权限控制规则。流控应用指的是方法当前资源的服务。白名单指可以进行访问,黑名单是不可以进行访问。
源码解析
AuthorizationSlot则根据黑白名单,来做黑白名单控制;
如果该resource配置了AuthorityRule,则根据策略判断该资源请求的请求来源(origin)是否在配置规则LimitApp中((,)隔开)和策略判断,是否检查通过。
- 如果是白名单
判断origin是否在limitApp中,如果在,则返回true,否则返回false - 如果为黑名单
判断origin是否在limitApp中,如果在,则返回false,否则返回true
public class AuthoritySlot extends AbstractLinkedProcessorSlot<DefaultNode> {


    @Override
    public void entry(Context context, ResourceWrapper resourceWrapper, DefaultNode node, int count, boolean prioritized, Object... args)
        throws Throwable {


        //检查黑白名单
        checkBlackWhiteAuthority(resourceWrapper, context);
        fireEntry(context, resourceWrapper, node, count, prioritized, args);
    }

    @Override
    public void exit(Context context, ResourceWrapper resourceWrapper, int count, Object... args) {


        fireExit(context, resourceWrapper, count, args);
    }

    void checkBlackWhiteAuthority(ResourceWrapper resource, Context context) throws AuthorityException {


        //获取认证的规则
        Map<String, List<AuthorityRule>> authorityRules = AuthorityRuleManager.getAuthorityRules();
        if (authorityRules == null) {


            return;
        }
        //根据resourceName获取该资源下对应的规则
        List<AuthorityRule> rules = authorityRules.get(resource.getName());
        if (rules == null) {


            return;
        }
        for (AuthorityRule rule : rules) {


            //认证检查
            if (!AuthorityRuleChecker.passCheck(rule, context)) {


                throw new AuthorityException(context.getOrigin(), rule);
            }
        }
    }
}
检查逻辑在AuthorityRuleChecker:
final class AuthorityRuleChecker {

    static boolean passCheck(AuthorityRule rule, Context context) {

        String requester = context.getOrigin();
        // 获取orgin请求来源,如果为请求来源为null或者limitApp为null则直接返回通过
        if (StringUtil.isEmpty(requester) || StringUtil.isEmpty(rule.getLimitApp())) {


            return true;
        }

        //判断limitApp是否含有origin
        int pos = rule.getLimitApp().indexOf(requester);
        boolean contain = pos > -1;
        if (contain) {


            boolean exactlyMatch = false;
            String[] appArray = rule.getLimitApp().split(",");
            for (String app : appArray) {


                if (requester.equals(app)) {


                    exactlyMatch = true;
                    break;
                }
            }

            contain = exactlyMatch;
        }
        //根据策略处理是否包含,判断是否通过
        int strategy = rule.getStrategy();
        if (strategy == RuleConstant.AUTHORITY_BLACK && contain) {


            return false;
        }

        if (strategy == RuleConstant.AUTHORITY_WHITE && !contain) {


            return false;
        }
        return true;
    }

    private AuthorityRuleChecker() {

     }
}
AuthorityRule的配置更新和SystemSlot一样,更新依赖于AuthorityRuleManager的loadRules方法。