07、Spring Cloud Config 配置管理
本篇博客主要搬运自开课吧提供的课堂笔记,目的是方便自身复习查找,如有不当之处,请联系博主
Spring Cloud Config 简介
配置文件想必大家都不陌生。在Spring Boot项目中,默认会提供一个application.properties或者application.yml文件,我们可以把一些全局性的配置或者需要动态维护的配置写入改文件,不如数据库连接,功能开关,限流阈值,服务地址等。为了解决不同环境下服务连接配置等信息的差异,Spring Boot还提供了基于spring.profiles.active={profile}的机制来实现不同的环境的切换。
随着单体架构向微服务架构的演进,各个应用自己独立维护本地配置文件的方式开始显露出它的不足之处。主要有下面几点。
- 配置的动态更新:在实际应用会有动态更新位置的需求,比如修改服务连接地址、限流配置等。在传统模式下,需要手动修改配置文件并且重启应用才能生效,这种方式效率太低,重启也会导致服务暂时不可用。
- 配置多节点维护:在微服务架构中某些核心服务为了保证高性能会部署上百个节点,如果在每个节点中都维护一个配置文件,一旦配置文件中的某个属性需要修改,可想而知,工作量是巨大的。
- 不同部署环境下配置的管理:前面提到通过profile机制来管理不同环境下的配置,这种方式对于日常维护来说也比较繁琐。
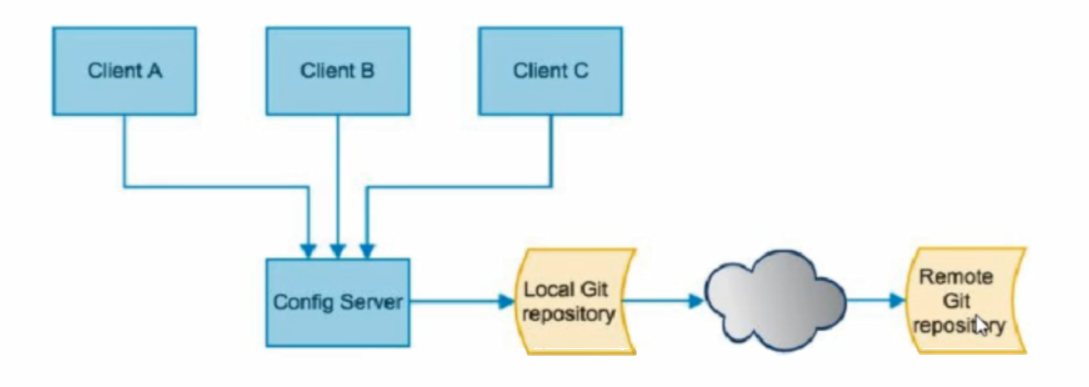
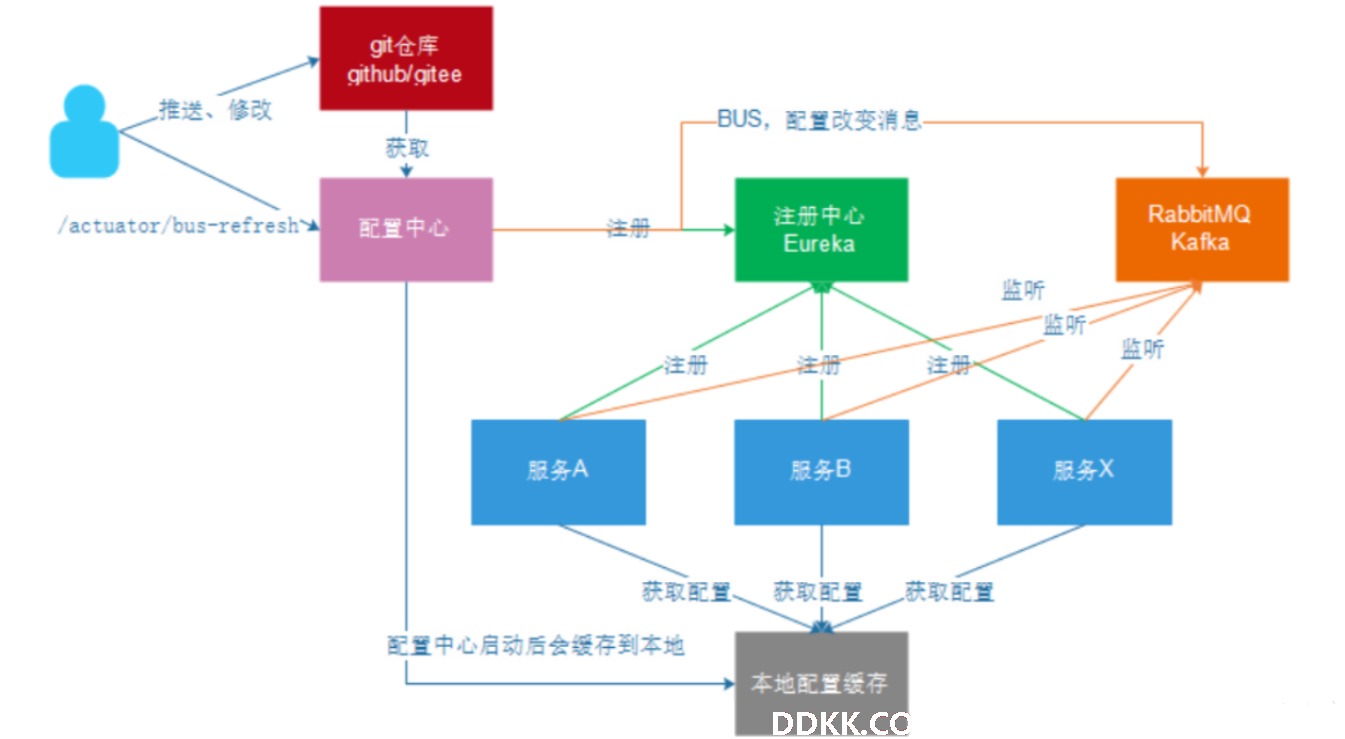
统一配置管理就是弥补上述不足的方法,简单说,最近本的方法是把各个应用系统中的某些配置放在一个第三方中间件上进行统一维护。然后,对于统一配置中心上的数据的变更需要推送到相应的服务节点实现动态跟新,所以微服务架构中,配置中心也是一个核心组件,而Spring Cloud Config就是一个配置中心组件,并且可以Git,SVN,本地文件等作为存储。如图所示。
Spring Cloud Config 实践
配置中心服务端
添加依赖
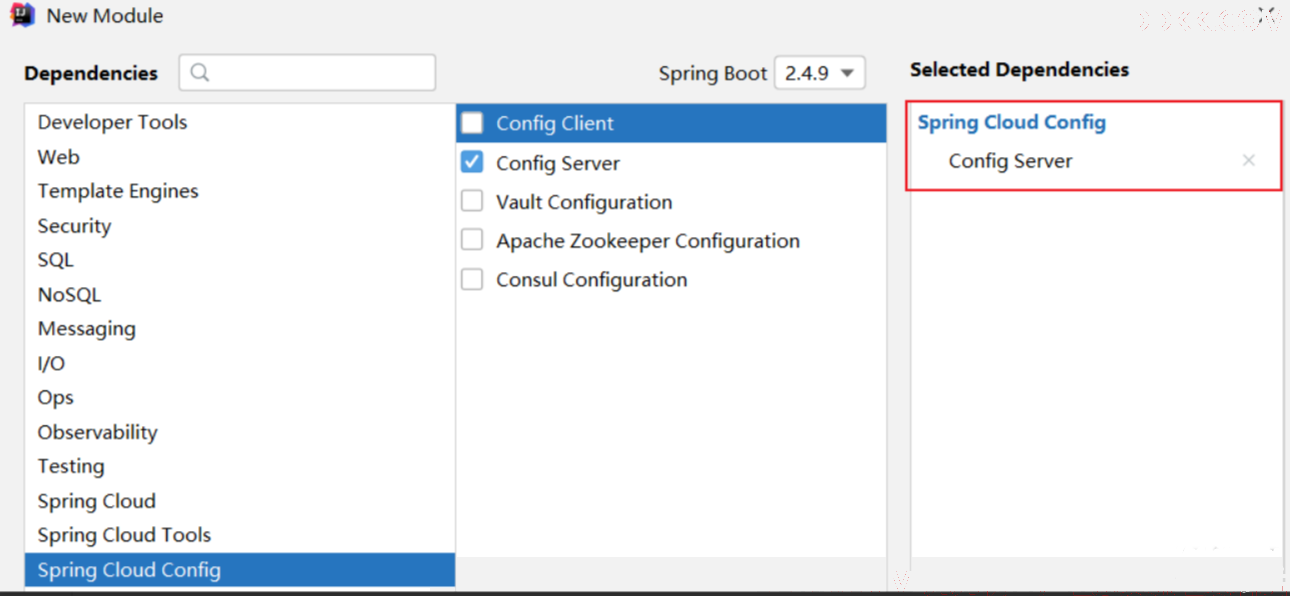
使用Spring Initializr创建cloud_config配置中心服务端工程,添加依赖Config Server
启动器配置
在启动器中使用@EnableConfigServer启用ConfigServer
@SpringBootApplication
@EnableConfigServer
public class ConfigApplication {

    public static void main(String[] args) {

        SpringApplication.run(ConfigApplication.class, args);
    }

}
配置文件
server:
  port: 9006
spring:
  application:
    name: cloud-config
  cloud:
    config:
      server:
        git:
          uri: https://gitee.com/cavewang/spring-boot-configurations.git配置文件所在的git仓库
          search-paths: configs配置文件所在目录
          default-label: master配置文件分支

eureka:
  client:
    service-url:
      defaultZone: http://127.0.0.1:9004/eureka服务注册地址
配置仓库
在git仓库https://gitee.com/cavewang/spring-boot-configurations.git中,创建configs目录,在config目录中创建application.yml配置文件,代码如下。
key1: v1
key2: v2
key3: v3
启动并测试
Spring Cloud Config 有它的一套访问规则,我们通过这套规则在浏览器上直接访问就可以。
/{application}-{profile}.yml
/{label}/{application}-{profile}.yml
- 对应到配置文件上来,就是配置文件的名称部分,例如我上面创建的配置文件。
- {profile} 就是配置文件的版本,我们的项目有开发版本、测试环境版本、生产环境版本,对应到配置文件上来就是以
- application-{profile}.yml 加以区分,例如application-dev.yml、application-test.yml、application-prod.yml。
- {label} 表示 git 分支,默认是 master 分支,如果项目是以分支做区分也是可以的,那就可以通过不同的 label 来控制访问不同的配置文件了。
- git仓库配置文件缓存本地目录c:\Users\Administrator\AppData\Local\Temp\config-repo-4882682414831344447,可以通过basedir属性改变。
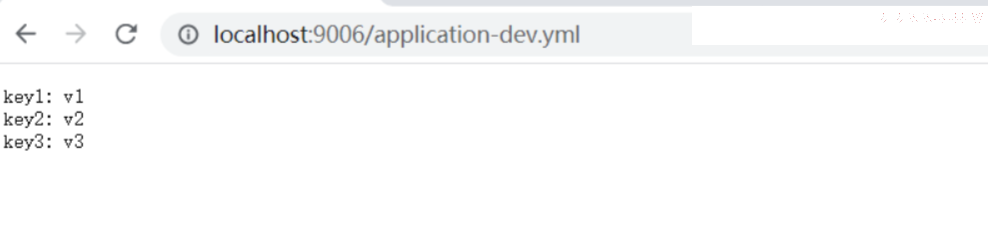
浏览器访问http://localhost:9006/application-dev.yml,效果如图所示。
配置中心客户端
改造支付微服务工程,作为配置中心客户端,从上述Config Server中获取application.yml的配置。
添加依赖
<dependency>
    <groupId>org.springframework.cloud</groupId>
    <artifactId>spring-cloud-starter-config</artifactId>
</dependency>
配置仓库
在configs目录下创建cloud-payment-service.yml和cloud-payment-service-default.yml,加上刚才创建的application.yml文件,现在该目录中包含三个配置文件
cloud-payment-service.yml代码如下所示。
key2: value2
cloud-payment-service-default.yml代码如下所示。
key3: value3
配置文件
spring:
  application:
    name: cloud-payment-service
  cloud:
    config:
      uri: http://localhost:9006Config Server地址
      profile: default为git配置文件的后缀
      label: master访问git的分支
  config:
    import: optional:configserver:http://localhost:9006指定Spring Cloud项目从Config Server导入配置
案例中的配置服务名为cloud-payment-service(spring.application.name=cloud-payment-service),那么我们访问的就是https://gitee.com/lxsong77/my-config.git这个git仓库下config目录下的application.yml(所有服务重用)、cloud-payment-service.yml、cloud-payment-service-default.yml,这三个配置文件的内容,在这三个文件具有相同配置的情况下,后面的配置会覆盖前面的配置。
此时启动Config Server访问http://localhost:9006/cloud-payment-service-default.yml,根据上面的分析,得到的结果是application.yml、cloud-payment-service.yml、cloud-payment-service-default.yml,这三个文件的内容的整合,如果有相同的配置项,后面的文件覆盖前面的文件,效果如图所示。

输出获取的配置信息
在相应微服务工程的controller中添加以下信息
@RequestMapping("/payment")
@Slf4j
public class PaymentController {

    @Value("${server.port}")
    private String serverPort;

    @Value("${key1}")
    private String key1;

    @Value("${key2}")
    private String key2;

    @Value("${key3}")
    private String key3;

    @RequestMapping("/{id}")
    public ResponseEntity<Payment> payment(@PathVariable("id") Integer id) {

        log.info("key1={}, key2={}, key3={}", key1, key2, key3);
        Payment payment = new Payment(id, "支付成功,服务端口=" + serverPort);
        return ResponseEntity.ok(payment);
    }

}
测试
分别启动Erueka,Config Server和支付服务,访问http://localhost:9000/payment/123,控制台打印配置项内容key1=v1, key2=value2, key3=value3

本地存储配置数据
虽然git存储配置数据非常方便,但是在项目开发阶段,使用git存储还是很不方便,Spring Cloud Config支持多种配置存储方式,比如默认的git,还有本地文件存储,JDBC,Redis等存储方式,这里只对本地文件存储做下简单介绍。
配置文件
在Config Server配置文件application.yml中,配置如下。
spring:
  profiles:
    active: native表示使用本地配置存储
  cloud:
    config:
      server:
        native:
          search-locations: classpath:/config_repo指定配置文件所在路径,可以使用相对路径比如classpath
本地配置文件
在项目classpath下添加配置文件结构如图所示。
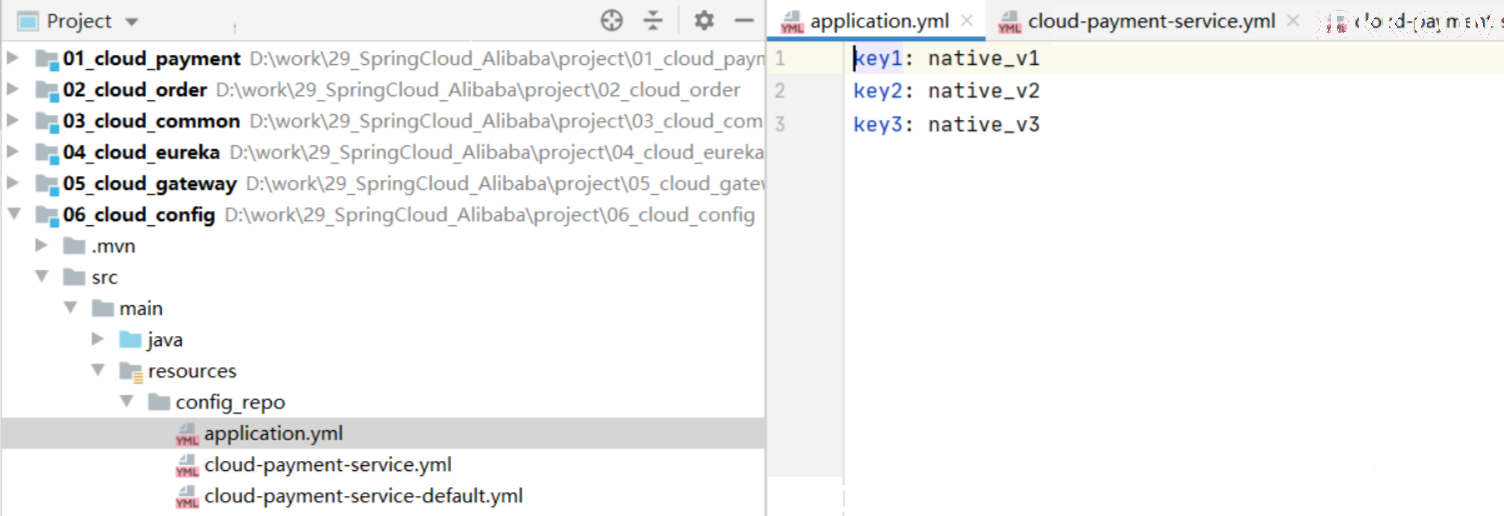
分别启动Erueka,Config Server和支付服务,访问http://localhost:9000/payment/123,控制台打印配置项内容为本地配置文件的内容。
配置自动刷新
Spring Cloud Config在项目启动时自动加载配置内容这一机制,导致了他的一个缺陷,配置不能自动刷新,在上述案例中,修改git仓库中的key1的值"key1=v11",发现支付服务得到的配置项key1的值还是旧的配置内容,新的内容不会自动刷新过来,在微服务架构中,动辄上百个节点如果都需要重启,这个问题非常麻烦。
我们可以使用Spring Cloud Bus和Spring Boot Actuator实现自动刷新,实现原理如图所示。
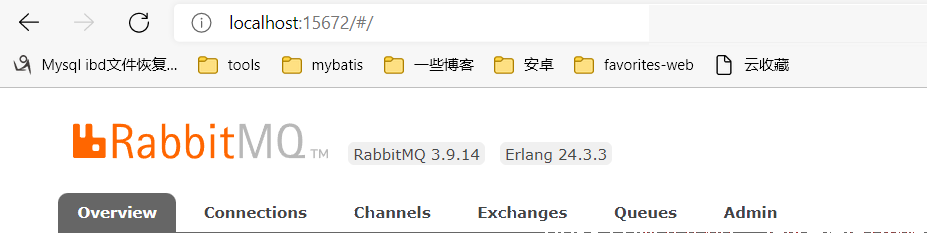
启动RabbitMQ
Spring Cloud Bus需要发送消息给消息队列,支持Kafka和RabbitMQ,这里我们使用RabbitMQ,启动我们之前准备好的RabbitMQ,如图所示。
配置中心服务端
添加依赖
添加spring-cloud-starter-bus-amqp和spring-boot-starter-actuator依赖
<dependency>
    <groupId>org.springframework.cloud</groupId>
    <artifactId>spring-cloud-starter-bus-amqp</artifactId>
</dependency>

<dependency>
    <groupId>org.springframework.boot</groupId>
    <artifactId>spring-boot-starter-actuator</artifactId>
</dependency>
配置文件
在application.yml中配置连接RabbitMQ,同时配置暴露/actuator/bus-refresh端点,代码如下。
spring:
  rabbitmq:
    host: localhost
    port: 5672
    username: guest
    password: guest
management:
  endpoints:
    web:
      exposure:
        include: bus-refresh
  endpoint:
    bus-refresh:
      enabled: true
配置中心客户端
添加依赖
<dependency>
    <groupId>org.springframework.cloud</groupId>
    <artifactId>spring-cloud-starter-bus-amqp</artifactId>
</dependency>
配置文件
spring:
  application:
    name: cloud-payment-service
  rabbitmq:
    host: localhost
    port: 5672
    username: guest
    password: guest
添加注解
使用@RefreshScope注解刷新更改的配置
@RequestMapping("/payment")
@Slf4j
@RefreshScope
public class PaymentController {

}
测试
启动Eureka、Config Server、支付微服务(Config Client),修改git仓库中的配置项内容后,使用Postman发送POST请求给/actuator/busrefresh(注意是是POST类型),再次访问支付服务,发现配置项已经自动刷新。
版权声明:「DDKK.COM 弟弟快看,程序员编程资料站」本站文章,版权归原作者所有