04、Solr4.8.0源码分析(4)之Eclipse Solr调试环境搭建
由于公司里的Solr调试都是用远程jpda进行的,但是家里只有一台电脑所以不能jpda进行调试,这是因为jpda的端口冲突。所以只能在Eclipse 搭建Solr的环境,折腾了一小时终于完成了。
JDPA远程调试
搭建换完成Solr环境后,对${TOMCAT_HOME}/bin/startup.sh 最后一行进行修改,如下所示:
set JPDA_ADDRESS=7070
exec "$PRGDIR"/"$EXECUTABLE" jpda  start "$@"
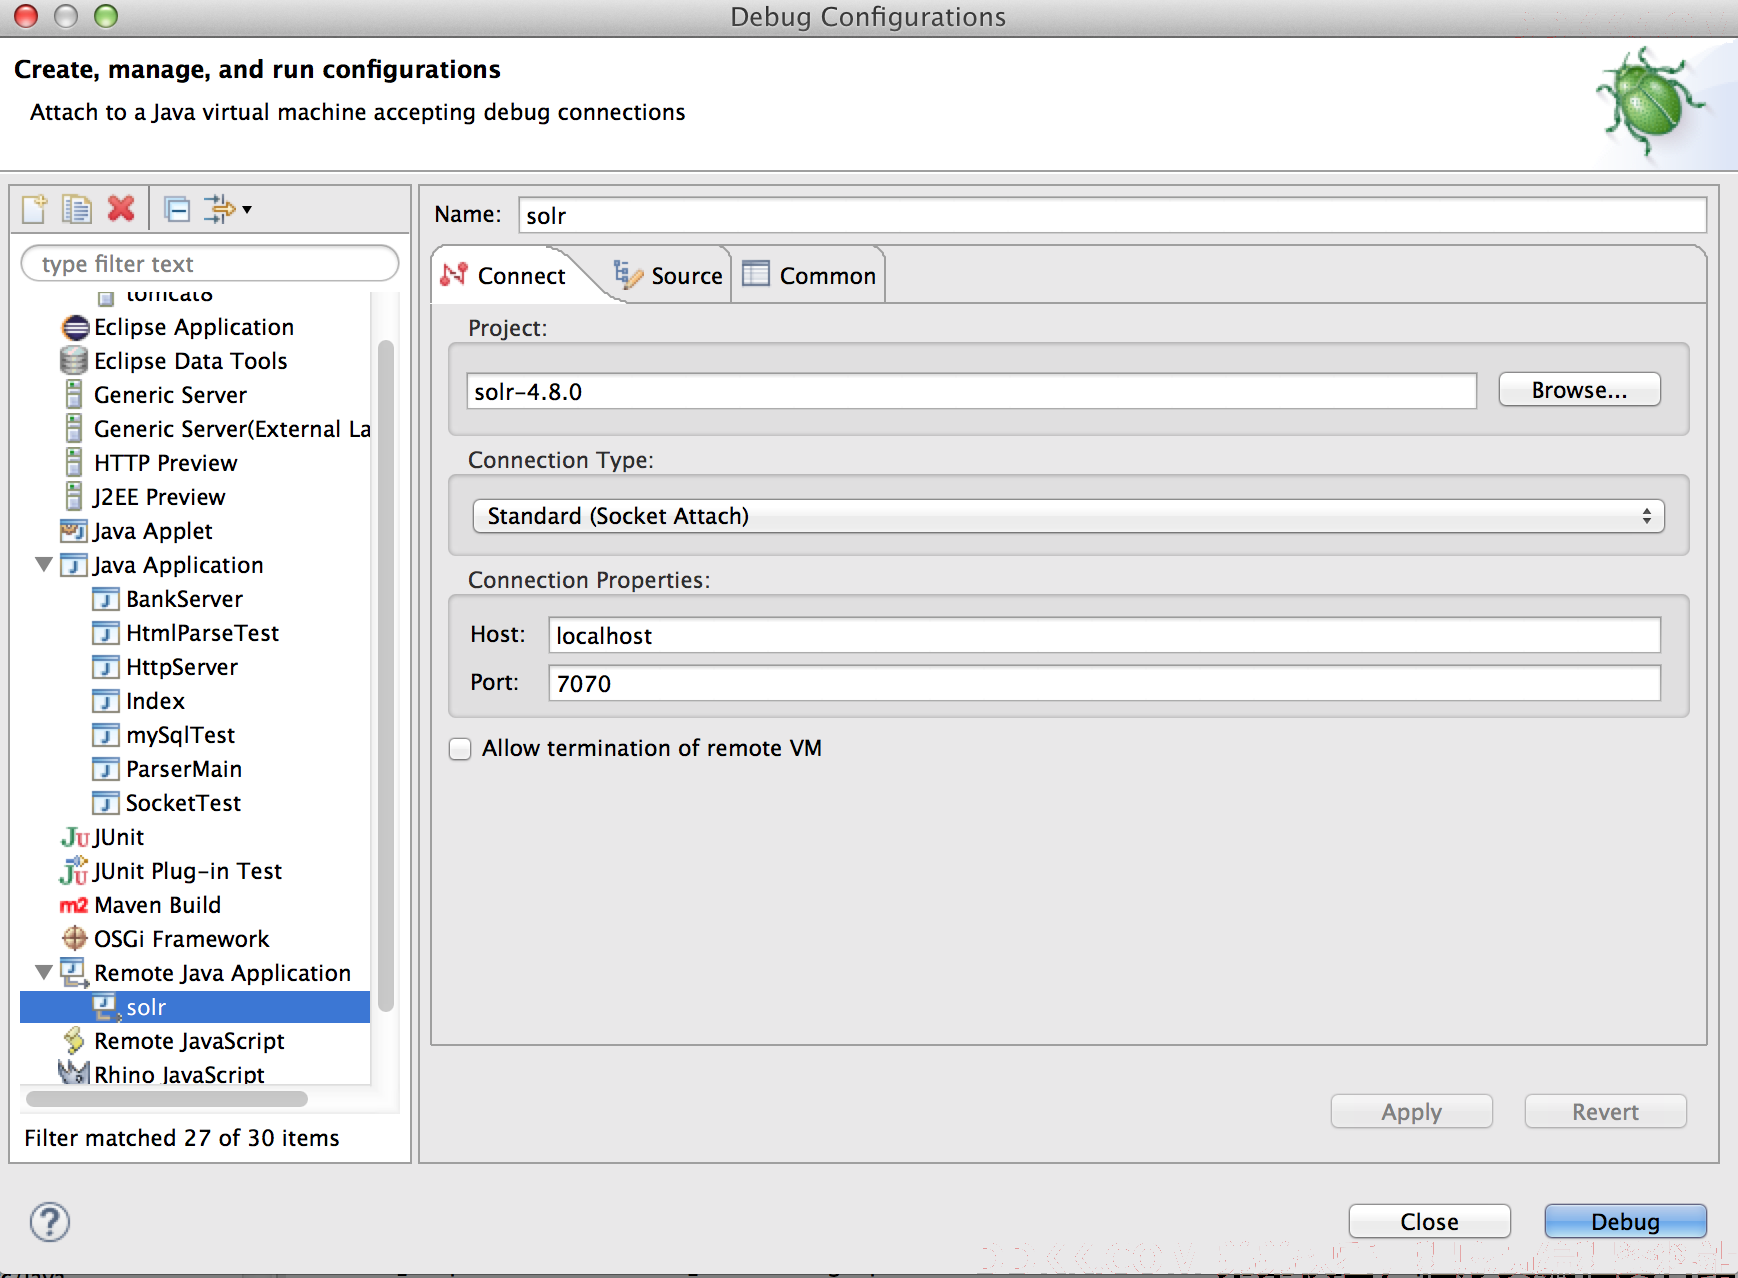
后在eclipse新建debug配置,这样就可以远程调试solr了,要注意服务器端Solr.war包的代码与eclipse的Solr代码一致。
Eclipse 的Solr环境搭建
2.1 Solr的编译
进入solr的目录,运行ant:
192:solr-4.8.0 rcf$ ant
Buildfile: /Users/rcf/workspace/java/solr/solr-4.8.0/build.xml

-projecthelp:
        [-] Buildfile: /Users/rcf/workspace/java/solr/solr-4.8.0/build.xml

Main targets:

 check-svn-working-copy       Checks the status of the SVN working copy
 clean                        Clean Lucene and Solr build dirs
 clean-eclipse                Removes all Eclipse configuration files
 clean-idea                   Removes all IntelliJ IDEA configuration files
 clean-jars                   Remove all JAR files from lib folders in the checkout
 clean-maven-build            Clean up Maven POMs in working copy
 clean-netbeans               Removes all Netbeans configuration files
 compile                      Compile Lucene and Solr
 compile-test                 Compile Lucene and Solr tests and test-frameworks
 documentation                Generate Lucene and Solr Documentation
 documentation-lint           Validates the generated documentation (HTML errors, broken links,...)
 eclipse                      Setup Eclipse configuration
 generate-maven-artifacts     Generate Maven Artifacts for Lucene and Solr
 get-maven-poms               Copy Maven POMs from dev-tools/maven/ to maven-build/
 idea                         Setup IntelliJ IDEA configuration
 ivy-bootstrap                Download and install Ivy in the users ant lib dir
 jar                          Build Lucene and Solr Jar files
 jar-checksums                Recompute SHA1 checksums for all JAR files.
 jar-src                      Build Lucene and Solr Source Jar files
 netbeans                     Setup Netbeans configuration
 nightly-smoke                Builds an unsigned release and smoke tests it
 pitest                       Run PITest on both Lucene and Solr
 precommit                    Run basic checks before committing
 rat-sources                  Runs rat across all sources and tests
 regenerate                   Runs all code regenerators
 remove-maven-artifacts       Removes all Lucene/Solr Maven artifacts from the local repository
 resolve                      Resolves all dependencies
 run-clover                   Runs all tests to measure coverage and generates report (pass "ANT_OPTS=-Xmx1536M" as environment)
 run-maven-build              Runs the Maven build using automatically generated POMs
 test                         Test both Lucene and Solr
 test-help                    Test runner help
 test-with-heapdumps          Runs tests with heap dumps on OOM enabled (if VM supports this)
 validate                     Validate dependencies, licenses, etc.
 validate-maven-dependencies  Validates maven dependencies, licenses, etc.
Default target: -projecthelp

BUILD SUCCESSFUL
Total time: 0 seconds
运行ant eclipse就可以对solr源码进行编译成eclipse工程。在编译ant eclipse时候可能会失败,这是可以运行 ant ivy-bootstrap
2.2 将eclipse工程转换成WEB工程
将编译好的solr工程导入eclipse,后右键点击Properties,选中Project Facets,如图所示
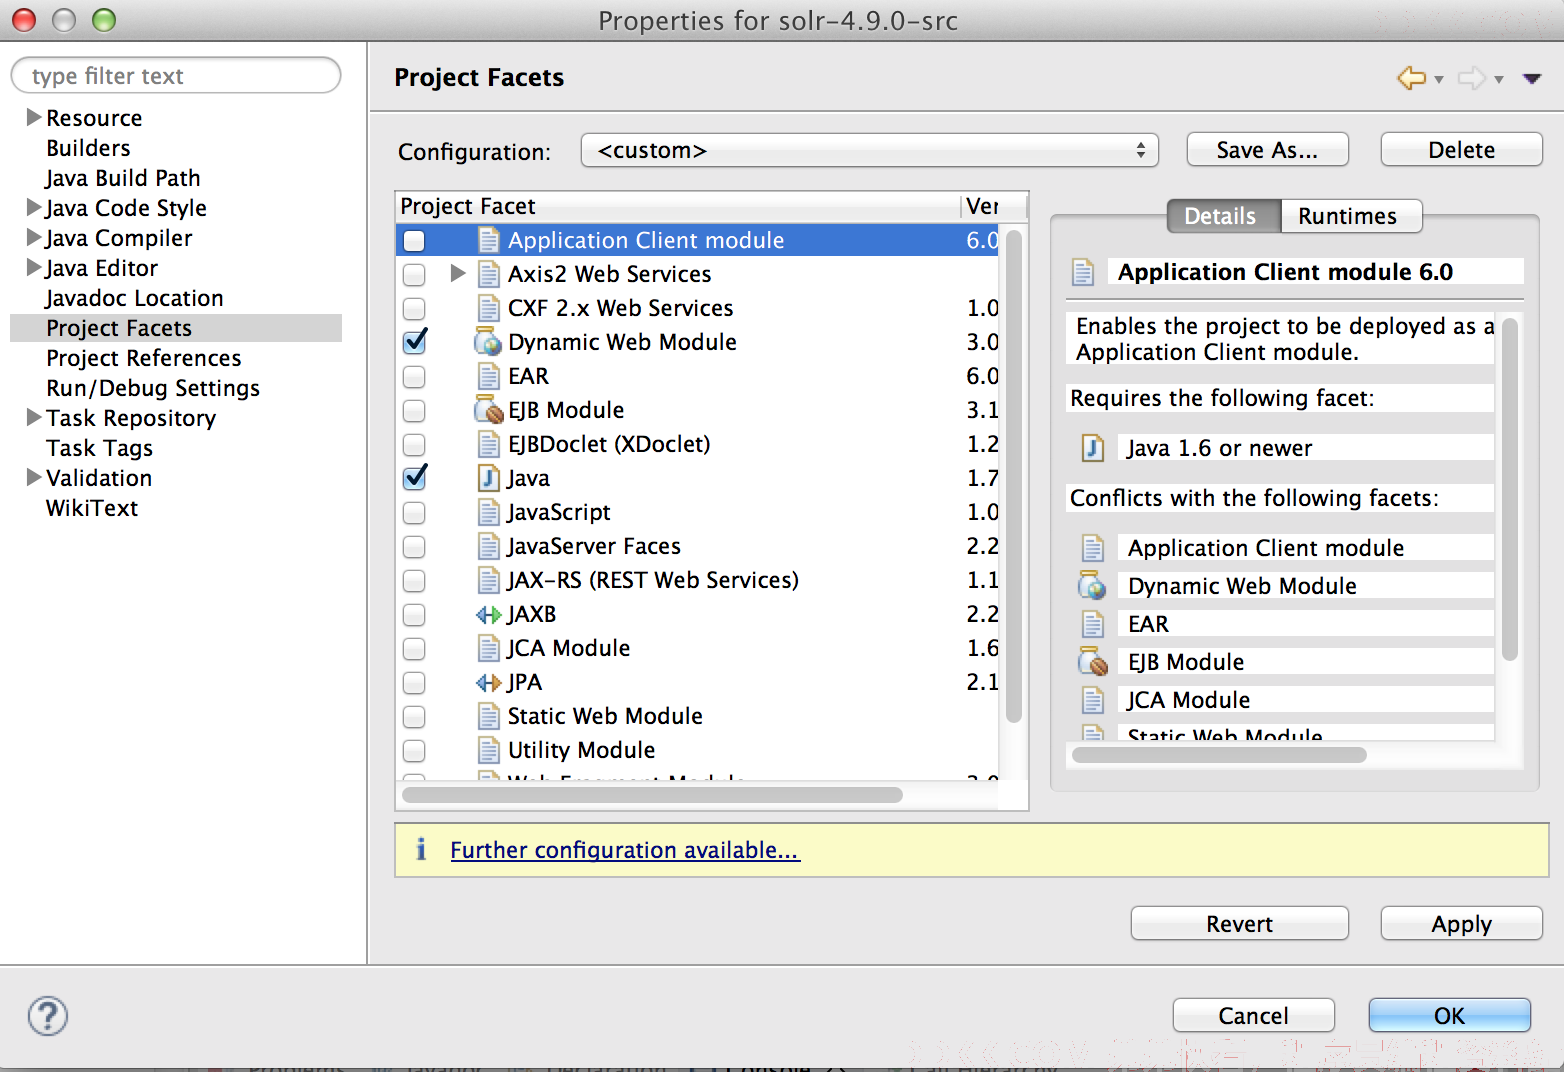
选择OK后,就转换Solr的WEB工程了,这是有些xml文件会出现错误的红叉叉,不用管它。
2.3 solr.war包生成
进入solr/solr目录,运行ant dist,如下图所示
192:~ rcf$ cd /Users/rcf/workspace/java/solr/solr-4.8.0/solr
192:solr rcf$ ls
CHANGES.txt        README.txt        build.xml        contrib            docs            package            solrj
LICENSE.txt        SYSTEM_REQUIREMENTS.txt    cloud-dev        core            example            scripts            test-framework
NOTICE.txt        build            common-build.xml    dist            licenses        site            webapp
192:solr rcf$ ant dist
Buildfile: /Users/rcf/workspace/java/solr/solr-4.8.0/solr/build.xml
     [echo] Building solr...

init-dist:

dist-solrj:
     [echo] Building solr-solrj...

check-lucene-core-uptodate:

jar-lucene-core:
编译完成后会再dist目录下生产solr.war包
2.4 solr配置
1、 将solr.warcopy到solr/WebContent目录下并进行解压;
2、 在WebRoot/META-INF目下创建context.xml文件,配置solr/home;
<?xml version='1.0' encoding='utf-8'?>
<Context>
         <Environment name="solr/home" type="java.lang.String" value="/Users/rcf/workspace/java/solr/Solr" override="true" />
</Context>
3、 创建solr/home,在里面放入solr.xml;
<?xml version="1.0" encoding="UTF-8" ?>
<solr>
    <solrcloud>
        <str name="host">${host:}</str>
        <int name="hostPort">${jetty.port:8983}</int>
        <str name="hostContext">${hostContext:solr}</str>
        <int name="zkClientTimeout">${zkClientTimeout:30000}</int>
        <bool name="genericCoreNodeNames">${genericCoreNodeNames:true}</bool>
    </solrcloud>
    <shardHandlerFactory name="shardHandlerFactory" class="HttpShardHandlerFactory">
        <int name="socketTimeout">${socketTimeout:0}</int>
        <int name="connTimeout">${connTimeout:0}</int>
    </shardHandlerFactory>
</solr>
4、 这样就可以进行调试solr了;
Solr环境搭建
真实的solr环境搭建,跟eclipse的环境搭建类似,主要分为以下几步:
1、 对solr源码进行编译,antdist生成solr.war;
2、 下载tomcat并进行安装(tomcat的配置并不需要修改);
3、 将solr.war复制到${TOMCAT_HOME}/wepapps目录下并将solr.war包解压成solr目录;
4、 将solr/dist目录下的jar包全部拷贝到${TOMCAT_HOME}/wepapps/solr/lib目录下;
5、 在${TOMCAT_HOME}/conf/Catalina/localhost/创建solr.xml,里面设置了solr/home;
1 <Context docBase="/Users/rcf/workspace/java/tomcat/apache-tomcat-8.0.9/webapps/solr.war" debug="0" crossContext="true" >
2      <Environment name="solr/home" type="java.lang.String" value="/Users/rcf/workspace/java/solr/Solr" override="true" />
3 </Context>
6、 创建solr/home,也创建solr.xml;
<?xml version="1.0" encoding="UTF-8" ?>
 <solr>
     <solrcloud>
         <str name="host">${host:}</str>
         <int name="hostPort">${jetty.port:8983}</int>
         <str name="hostContext">${hostContext:solr}</str>
         <int name="zkClientTimeout">${zkClientTimeout:30000}</int>
         <bool name="genericCoreNodeNames">${genericCoreNodeNames:true}</bool>
     </solrcloud>
     <shardHandlerFactory name="shardHandlerFactory" class="HttpShardHandlerFactory">
         <int name="socketTimeout">${socketTimeout:0}</int>
         <int name="connTimeout">${connTimeout:0}</int>
     </shardHandlerFactory>
</solr>
7、 在将solr源码包里的log4j.properties拷贝到${TOMCAT_HOME}/lib目录下,并修改log文件路径;
 Logging level
solr.log=/Users/rcf/workspace/java/tomcat/apache-tomcat-8.0.9/logs
log4j.rootLogger=INFO, file, CONSOLE

log4j.appender.CONSOLE=org.apache.log4j.ConsoleAppender

log4j.appender.CONSOLE.layout=org.apache.log4j.PatternLayout
log4j.appender.CONSOLE.layout.ConversionPattern=%-4r [%t] %-5p %c %x \u2013 %m%n

 size rotation with log cleanup.
log4j.appender.file=org.apache.log4j.RollingFileAppender
log4j.appender.file.MaxFileSize=4MB
log4j.appender.file.MaxBackupIndex=9

 File to log to and log format
log4j.appender.file.File=${solr.log}/solr.log
log4j.appender.file.layout=org.apache.log4j.PatternLayout
log4j.appender.file.layout.ConversionPattern=%-5p - %d{yyyy-MM-dd HH:mm:ss.SSS}; %C; %m\n

log4j.logger.org.apache.zookeeper=WARN
log4j.logger.org.apache.hadoop=WARN

set to INFO to enable infostream log messages
log4j.logger.org.apache.solr.update.LoggingInfoStream=OFF