04、SkyWalking Linux服务端集群部署
一、版本要求
- SkyWalking5.0.0-GA
- ElasticSearch-5.x
注意6.X版本不支持;新版本的skywalking使用ES作为存储,所以先安装es。
- JDK8+ (SkyWalking collector和WebUI部署在jdk8及以上版本)
- JDK6+(被监控的应用程序运行在jdk6及以上版本)
- 其他
二、地址
- apache官网下载地址
http://skywalking.apache.org/downloads/
- gitlib部署文档
https://github.com/apache/incubator-skywalking/blob/v5.0.0-alpha/docs/README_ZH.md
- 项目地址
https://github.com/OpenSkywalking/skywalking-netcore
三、部署过程
【参考】
https://github.com/apache/incubator-skywalking/blob/5.x/docs/cn/Deploy-backend-in-cluster-mode-CN.md
1、Elasticsearch
参考文档:2、2-SkyWalking部署文档-Linux.docx
2、SW-collector
2.1 端口要求
确保端口10800,11800,12800不被占用
2.2 存储要求
collector配置ElasticSearch作为运行存储介质
2.3 时间设置要求
被监控应用的宿主服务器系统时间(包含时区)与collectors,UIs部署的宿主服务器时间设置正确且相同
2.4 配置
2、 4.1位置;
..\config\application.yml
2、 4.2配置项解释;
【官方解释】
下面是关于collector连接配置的5种类型方式
<1>、naming :agent使用HTTP协议连接collectors
<2>、agent_gRPC :agent使用gRPC协议连接collectors
<3>、remote :Collector使用gRPC协议连接collector
<4>、ui :使用HTTP协议连接collector,(大多数情况不需要修改)
<5>、agent_jetty:agent使用HTTP协议连接collectors(可选连接)
2、 4.3配置内容-参考1;
参考文档:2、2-SkyWalking部署文档-Linux.docx
2、 4.4配置内容-参考2-节点1;
##########节点1:ip=192.168.0.3
#cluster:
zookeeper:
hostPort: 192.168.0.101:2181, 192.168.0.102:2181,192.168.103.10
# zookeeper集群的主机IP地址及端口,使用逗号分隔
sessionTimeout: 100000
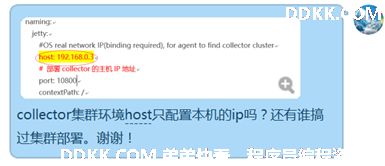
naming:
jetty:
#OS real network IP(binding required), for agent to find collector cluster
host: 192.168.0.3
# 部署collector的主机IP地址,即当前节点的ip地址
port: 10800
contextPath: /
cache:
# guava:
caffeine:
remote:
gRPC:
# OS real network IP(binding required), for collector nodes communicate with each other in cluster. collectorN --(gRPC) --> collectorM
host: 192.168.0.3
# 部署collector的主机IP地址,即当前节点的ip地址
port: 11800
agent_gRPC:
gRPC:
#OS real network IP(binding required), for agent to uplink data(trace/metrics) to collector. agent--(gRPC)--> collector
host: 192.168.0.3
# 部署collector的主机IP地址,即当前节点的ip地址
port: 11800
# Set these two setting to open ssl
#sslCertChainFile: $path
#sslPrivateKeyFile: $path
# Set your own token to active auth
#authentication: xxxxxx
agent_jetty:
jetty:
# OS real network IP(binding required), for agent to uplink data(trace/metrics) to collector through HTTP. agent--(HTTP)--> collector
# SkyWalking native Java/.Net/node.js agents don't use this.
# Open this for other implementor.
host: 192.168.0.3
# 部署collector的主机IP地址,即当前节点的ip地址
port: 12800
contextPath: /
analysis_register:
default:
analysis_jvm:
default:
analysis_segment_parser:
default:
bufferFilePath: ../buffer/
bufferOffsetMaxFileSize: 10M
bufferSegmentMaxFileSize: 500M
bufferFileCleanWhenRestart: true
ui:
jetty:
# Stay in \localhost\ if UI starts up in default mode.
# Change it to OS real network IP(binding required), if deploy collector in different machine.
host: 192.168.0.3
# 部署collector的主机IP地址,即当前节点的ip地址
port: 12800
contextPath: /
storage:
elasticsearch:
clusterName: eqx-jz-test
# Elasticsearch的cluster.name值
clusterTransportSniffer: true
clusterNodes: 192.168.0.17:9303
# Elasticsearch的ip和端口
indexShardsNumber: 2
indexReplicasNumber: 0
highPerformanceMode: true
# Batch process setting, refer to https://www.elastic.co/guide/en/elasticsearch/client/java-api/5.5/java-docs-bulk-processor.html
bulkActions: 2000 # Execute the bulk every 2000 requests
bulkSize: 20 # flush the bulk every 20mb
flushInterval: 10 # flush the bulk every 10 seconds whatever the number of requests
concurrentRequests: 2 # the number of concurrent requests
# Set a timeout on metric data. After the timeout has expired, the metric data will automatically be deleted.
traceDataTTL: 90 # Unit is minute
minuteMetricDataTTL: 90 # Unit is minute
hourMetricDataTTL: 36 # Unit is hour
dayMetricDataTTL: 45 # Unit is day
monthMetricDataTTL: 18 # Unit is month
#storage:
# h2:
# url: jdbc:h2:~/memorydb
# userName: sa
configuration:
default:
#namespace: xxxxx
# alarm threshold
applicationApdexThreshold: 2000
serviceErrorRateThreshold: 10.00
serviceAverageResponseTimeThreshold: 2000
instanceErrorRateThreshold: 10.00
instanceAverageResponseTimeThreshold: 2000
applicationErrorRateThreshold: 10.00
applicationAverageResponseTimeThreshold: 2000
# thermodynamic
thermodynamicResponseTimeStep: 50
thermodynamicCountOfResponseTimeSteps: 40
# max collection's size of worker cache collection, setting it smaller when collector OutOfMemory crashed.
workerCacheMaxSize: 10000
#receiver_zipkin:
# default:
# host: localhost
# port: 9411
# contextPath: /
2、 4.4配置内容-参考2-节点2;
##########节点1:ip=192.168.0.4
#cluster:
zookeeper:
hostPort: 192.168.0.101:2181, 192.168.0.102:2181,192.168.103.10
# zookeeper集群的主机IP地址及端口,使用逗号分隔
sessionTimeout: 100000
naming:
jetty:
#OS real network IP(binding required), for agent to find collector cluster
host: 192.168.0.4
# 部署collector的主机IP地址,即当前节点的ip地址
port: 10800
contextPath: /
cache:
# guava:
caffeine:
remote:
gRPC:
# OS real network IP(binding required), for collector nodes communicate with each other in cluster. collectorN --(gRPC) --> collectorM
host: 192.168.0.4
# 部署collector的主机IP地址,即当前节点的ip地址
port: 11800
agent_gRPC:
gRPC:
#OS real network IP(binding required), for agent to uplink data(trace/metrics) to collector. agent--(gRPC)--> collector
host: 192.168.0.4
# 部署collector的主机IP地址,即当前节点的ip地址
port: 11800
# Set these two setting to open ssl
#sslCertChainFile: $path
#sslPrivateKeyFile: $path
# Set your own token to active auth
#authentication: xxxxxx
agent_jetty:
jetty:
# OS real network IP(binding required), for agent to uplink data(trace/metrics) to collector through HTTP. agent--(HTTP)--> collector
# SkyWalking native Java/.Net/node.js agents don't use this.
# Open this for other implementor.
host: 192.168.0.4
# 部署collector的主机IP地址,即当前节点的ip地址
port: 12800
contextPath: /
analysis_register:
default:
analysis_jvm:
default:
analysis_segment_parser:
default:
bufferFilePath: ../buffer/
bufferOffsetMaxFileSize: 10M
bufferSegmentMaxFileSize: 500M
bufferFileCleanWhenRestart: true
ui:
jetty:
# Stay in \localhost\ if UI starts up in default mode.
# Change it to OS real network IP(binding required), if deploy collector in different machine.
host: 192.168.0.4
# 部署collector的主机IP地址,即当前节点的ip地址
port: 12800
contextPath: /
storage:
elasticsearch:
clusterName: eqx-jz-test
# Elasticsearch的cluster.name值
clusterTransportSniffer: true
clusterNodes: 192.168.0.17:9303
# Elasticsearch的ip和端口
indexShardsNumber: 2
indexReplicasNumber: 0
highPerformanceMode: true
# Batch process setting, refer to https://www.elastic.co/guide/en/elasticsearch/client/java-api/5.5/java-docs-bulk-processor.html
bulkActions: 2000 # Execute the bulk every 2000 requests
bulkSize: 20 # flush the bulk every 20mb
flushInterval: 10 # flush the bulk every 10 seconds whatever the number of requests
concurrentRequests: 2 # the number of concurrent requests
# Set a timeout on metric data. After the timeout has expired, the metric data will automatically be deleted.
traceDataTTL: 90 # Unit is minute
minuteMetricDataTTL: 90 # Unit is minute
hourMetricDataTTL: 36 # Unit is hour
dayMetricDataTTL: 45 # Unit is day
monthMetricDataTTL: 18 # Unit is month
#storage:
# h2:
# url: jdbc:h2:~/memorydb
# userName: sa
configuration:
default:
#namespace: xxxxx
# alarm threshold
applicationApdexThreshold: 2000
serviceErrorRateThreshold: 10.00
serviceAverageResponseTimeThreshold: 2000
instanceErrorRateThreshold: 10.00
instanceAverageResponseTimeThreshold: 2000
applicationErrorRateThreshold: 10.00
applicationAverageResponseTimeThreshold: 2000
# thermodynamic
thermodynamicResponseTimeStep: 50
thermodynamicCountOfResponseTimeSteps: 40
# max collection's size of worker cache collection, setting it smaller when collector OutOfMemory crashed.
workerCacheMaxSize: 10000
#receiver_zipkin:
# default:
# host: localhost
# port: 9411
# contextPath: /
2.5 启动
参考文档:2、2-SkyWalking部署文档-Linux.docx
【注】请分别启动各个节点的collectorService.sh脚本,然后再分别启动步骤3.2.3中的脚本webappService.sh
2.6 验证
参考文档:2、2-SkyWalking部署文档-Linux.docx
3、SW-Web UI
3.1 位置
WebUI的配置项保存在**\webapp\webapp.yml中
3.2 配置
其他配置参考文档:2、2-SkyWalking部署文档-Linux.docx
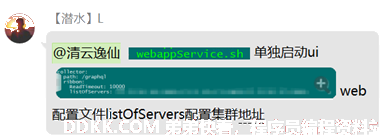
3、 2.1、节点1;
server:
port: 8091
collector:
path: /graphql
ribbon:
ReadTimeout: 10000
listOfServers: 192.168.0.3:10800,192.168.0.4:10800
security:
user:
admin:
password: admin
3、 2.2、节点2;
server:
port: 8091
collector:
path: /graphql
ribbon:
ReadTimeout: 10000
listOfServers: 192.168.0.3:10800,192.168.0.4:10800
security:
user:
admin:
password: admin
3.2.3 启动
分别启动集群每个节点脚本 bin/webappService.sh,
3.2.4 验证
参考文档:2、2-SkyWalking部署文档-Linux.docx
4、SW-Agent
参考文档:2、4-SkyWalking部署文档-Docker-Agent客户端集群.docx
- 启动顺序
1、ElasticSearch
启动elasticsearch.sh
2、SkyWalking
【注】集群环境,首先在各个节点分别启动脚本collectorService.sh,然后在各个节点分别启动脚本webappService.sh
3、启动被监控的程序
参考文档:2、2-SkyWalking部署文档-Linux.docx
六、参考资源
1、collector集群配置文件

2、collector集群和web ui关系
问题:

答案: