13、SpringCloud+Security+Oauth2授权 - 服务之间授权
Oauth2的授权流程是客户端向认证服务器提交认证获取Token,认证服务器颁发JWT格式的Token客户端进行Token的存储,接着客户端带着Token请求资源服务器,资源服务器校验Token并对资源授权,授权成功返回资源
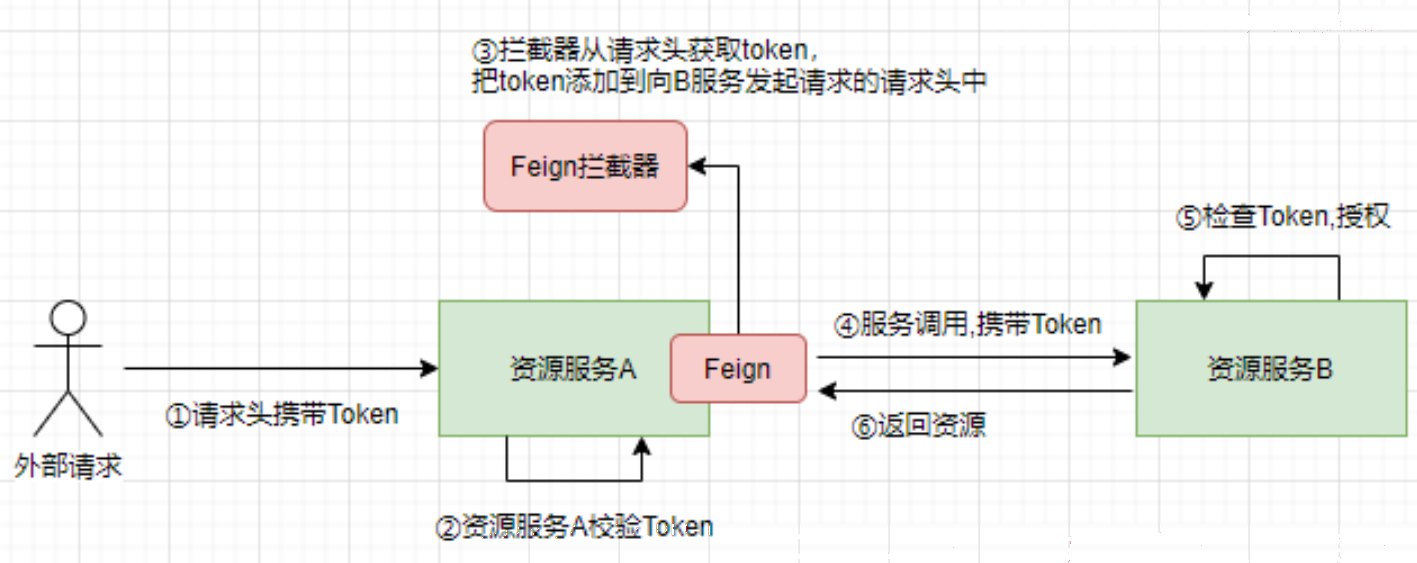
有这么一种情况,就是客户端的请求可能需要多个资源服务器共同完成,即:一个请求过来到达资源服务器A,资源服务器A需要调用资源服务器B才能完成请求,如果资源服务器B也需要做授权,那我们的请求可能会失败,因为我们的Token通过请求到达了资源服务器A,默认情况下资源服务A调用资源服务器B并不能把Token转发过去,所以资源服务器B可能会授权失败 , 所以我们要做服务之间的授权
1.服务之间授权方案
原理其实很简单,我们的调用关系是客户端(浏览器)调用资源服务器A通过请求头传递Token,资源服务器A通过Feign调用资源服务器B请求是没有Token的,我们只需要编写一个Feign的拦截器,将客户端请求A的请求头中的Token设置到资源服务器A调用资源服务器B的Feign的请求头中即可
2.搭建第二个资源服务器
这里需要搭建第二个资源服务器来演示服务器之间的授权,只需要把security-resource-server 复制一份命名为 security-resource2-server 即可,当然security-resource-server 需要集成Feign去调用security-resource2-server ,这里就省略了,没有思路??您可以参照 《负载均衡Feign》
这里还要注意一个问题,就是用户如果要能访问到资源服务器A和资源服务器B,那么它应该同时拥有资源服务器A和资源服务器B的访问权限(permisson),所以不要忘记给用户把需要的权限都配置上
3.Feign的拦截器
为了通用,我们可以搭建一个公共的模块编写Feign的拦截器,谁需要转发Token就只需要依赖它即可 , 搭建模块 “security-resource-common” ,
3.1.导入依赖
<dependencies>
    <dependency>
        <groupId>org.springframework.cloud</groupId>
        <artifactId>spring-cloud-starter-openfeign</artifactId>
    </dependency>
    <dependency>
        <groupId>org.springframework.boot</groupId>
        <artifactId>spring-boot-starter-web</artifactId>
    </dependency>
</dependencies>
3.2.定义Feign的拦截器
RequestInterceptor 是Feign的拦截器接口,提供了apply方法让我们可以通过RequestTemplate 对请求进行自定义,注意:该拦截器类需要给Spirng扫描到
@Component
@Slf4j
public class OAuth2FeignRequestInterceptor implements RequestInterceptor {


    //请求头中的token
    private final String AUTHORIZATION_HEADER = "Authorization";

    @Override
    public void apply(RequestTemplate requestTemplate) {


        //requestTemplate:feign底层用来发封装请求的对象

        //1.获取请求对象
        ServletRequestAttributes requestAttributes = (ServletRequestAttributes) RequestContextHolder.getRequestAttributes();

        //2.获取请求头中的Token
        String token = requestAttributes.getRequest().getHeader(AUTHORIZATION_HEADER);
        log.info("Feign拦截器添加请求头:{}",token);

        //3.添加到Feign的请求头
        requestTemplate.header(AUTHORIZATION_HEADER,token);
    }
}
代码挺简单的,通过RequestContextHolder得到请求对象,获取请求头中的Token设置到RequestTemplate 的header中即可
4.修改Hystrix并发策略
4.1.问题描述
理论上来说做了如上配置即可完成Token的转发了,但如果我们集成了Hystrix那么在Feign的拦截器中是没办法获取到请求对象的,这是因为Hystrix默认的隔离策略是线程池,每个请都会被分配到一个新的线程执行,导致请对象无法获取,不知道如何降级?见《Feign开启Hystrix》
4.2.解决方案
解决方案有两种,一是使用信号量隔离,在配置文件中加入如下配置:“hystrix.command.default.execution.isolation.strategy=SEMAPHORE”,解决方案二是修改Hystrix的隔离策略,我们这里使用第二种方式,因为使用信号量隔离会让请求变成单线程执行,官方也不推荐。
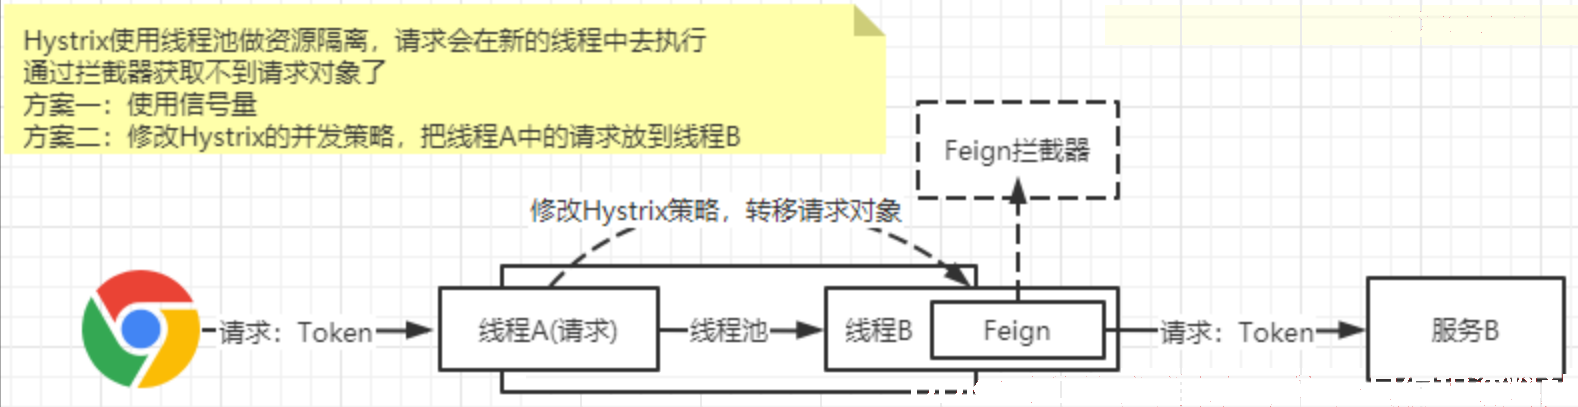
如何修改Hystrix的隔离策略呢?原理就是把调用线程A中的请求通过RequestContextHolder获取到,放到新的线程B中的RequestContextHolder中即可 。
4.3.定义Hystrix并发策略配置
@Configuration
public class FeignHystrixConcurrencyStrategy extends HystrixConcurrencyStrategy {


    private HystrixConcurrencyStrategy hystrixConcurrencyStrategy;

    public FeignHystrixConcurrencyStrategy() {


        try {


            this.hystrixConcurrencyStrategy = HystrixPlugins.getInstance().getConcurrencyStrategy();
            if (this.hystrixConcurrencyStrategy instanceof FeignHystrixConcurrencyStrategy) {


                return;
            }
            HystrixCommandExecutionHook commandExecutionHook =
                    HystrixPlugins.getInstance().getCommandExecutionHook();
            HystrixEventNotifier eventNotifier = HystrixPlugins.getInstance().getEventNotifier();
            HystrixMetricsPublisher metricsPublisher = HystrixPlugins.getInstance().getMetricsPublisher();
            HystrixPropertiesStrategy propertiesStrategy =
                    HystrixPlugins.getInstance().getPropertiesStrategy();

            HystrixPlugins.reset();
            HystrixPlugins instance = HystrixPlugins.getInstance();
            instance.registerConcurrencyStrategy(this);
            instance.registerCommandExecutionHook(commandExecutionHook);
            instance.registerEventNotifier(eventNotifier);
            instance.registerMetricsPublisher(metricsPublisher);
            instance.registerPropertiesStrategy(propertiesStrategy);
        } catch (Exception e) {


            System.out.println("策略注册失败");
        }
    }

    @Override
    public <T> Callable<T> wrapCallable(Callable<T> callable) {


        //线程A获取请求对象
        RequestAttributes requestAttributes = RequestContextHolder.getRequestAttributes();
        //把请求对象放到新的线程中
        return new WrappedCallable<>(callable, requestAttributes);
    }

    @Override
    public ThreadPoolExecutor getThreadPool(HystrixThreadPoolKey threadPoolKey,
                                            HystrixProperty<Integer> corePoolSize,
                                            HystrixProperty<Integer> maximumPoolSize,
                                            HystrixProperty<Integer> keepAliveTime,
                                            TimeUnit unit, BlockingQueue<Runnable> workQueue) {


        return this.hystrixConcurrencyStrategy.getThreadPool(threadPoolKey, corePoolSize, maximumPoolSize, keepAliveTime,
                unit, workQueue);
    }

    @Override
    public ThreadPoolExecutor getThreadPool(HystrixThreadPoolKey threadPoolKey,
                                            HystrixThreadPoolProperties threadPoolProperties) {


        return this.hystrixConcurrencyStrategy.getThreadPool(threadPoolKey, threadPoolProperties);
    }

    @Override
    public BlockingQueue<Runnable> getBlockingQueue(int maxQueueSize) {


        return this.hystrixConcurrencyStrategy.getBlockingQueue(maxQueueSize);
    }

    @Override
    public <T> HystrixRequestVariable<T> getRequestVariable(HystrixRequestVariableLifecycle<T> rv) {


        return this.hystrixConcurrencyStrategy.getRequestVariable(rv);
    }

    static class WrappedCallable<T> implements Callable<T> {


        private final Callable<T> target;
        private final RequestAttributes requestAttributes;

        public WrappedCallable(Callable<T> target, RequestAttributes requestAttributes) {


            this.target = target;
            this.requestAttributes = requestAttributes;
        }

        @Override
        public T call() throws Exception {


            try {


                //把A线程传入过来的请求对象,设置到B线程的RequestContextHolder
                RequestContextHolder.setRequestAttributes(requestAttributes);
                return target.call();
            } finally {


                RequestContextHolder.resetRequestAttributes();
            }
        }
    }
}
到这里拦截器模块就搭建结束了,你还需要把这个模块依赖到资源服务器中,即给“security-resource-server” 导入依赖 “security-resource-common”,然后启动服务测试。
5.服务之间授权-客户端模式
5.1.问题描述
上面服务之间授权的场景是用户发起的请求需求多个服务完成,然后有了服务之间的授权,有一种场景就是服务之间的调用可能和用户上下文无关。
比如有这样一个场景,由于项目设计的问题,在做微服务重构时导致认证中心AuthServer在做认证时需要调用另外一个微服务SystemServer来加载用来的权限列表,即:用户认证表和用户权限表不在同一个数据库中,当然解决方案也有很多,比如强行把权限和认证表放在一个库,这个不是今天讨论的重点。
现在的问题是SystemServer是做了权限控制的,也就是说客户端向AuthServer提交认证请求获取Token,而AuthServer需要调用SystemServer加载用户的权限才能生成Token,而加载权限又需要先得有一个Token才行,这不就矛盾了么?
这里我要说的解决方案就是给AuthServer添加一个Feign的拦截器,在拦截器中采用客户端模式生成一个临时的Token向SystemServer发起请求加载权限列表然后再为客户端颁发正式的Token
为什么采用客户端模式?因为服务之间是绝对信任的,而且只是需要颁发一个临时的Token而已,和用户上下文无关,这个Token并不是为用户生成的Token,只是服务之间调用需要的临时Token
5.2.Feign的拦截器
这次的拦截器和上一篇文章的拦截器的定义方式一样,只不过上一次是转发用户的Token,而这一次是自己生成一个临时的Token,代码如下:
@Component
@Slf4j
public class OAuth2FeignRequestInterceptor implements RequestInterceptor {


    private static String TEMPTOKENURL = "http://localhost:3000/oauth/token?client_id=%s&client_secret=%s&grant_type=client_credentials";

    //请求头中的token
    private final String AUTHORIZATION_HEADER = "Authorization";

    @Override
    public void apply(RequestTemplate requestTemplate) {


        //requestTemplate:feign底层用来发请求的http客户端
        //1.使用客户端模式生成一个临时的Token
        Map<String, String> tokenMap = HttpUtil.sendPost(String.format(TEMPTOKENURL, "temp", "123"));
        ValidUtils.assertNotNull(tokenMap,"服务调用失败[临时Token获取失败]");

        log.info("Feign拦截器添加临时Token到请求头:{}",tokenMap);

        //2.添加到Feign的请求头
        requestTemplate.header(AUTHORIZATION_HEADER,"Bearer "+tokenMap.get("access_token"));
    }
}
5.4.Http工具类
http工具用到了httpclient包
 <dependencies>
     <dependency>
         <groupId>org.apache.httpcomponents</groupId>
         <artifactId>httpclient</artifactId>
         <version>4.5.5</version>
     </dependency>
   <dependency>
         <groupId>com.alibaba</groupId>
         <artifactId>fastjson</artifactId>
         <version>1.2.59</version>
     </dependency>
 </dependencies>
工具类
public class HttpUtil {


    //发送Post请求,注意:参数使用?方式带着URL后面
    public static Map<String,String> sendPost(String url) {


        // 获得Http客户端(可以理解为:你得先有一个浏览器;注意:实际上HttpClient与浏览器是不一样的)
        CloseableHttpClient httpClient = HttpClientBuilder.create().build();
        // 创建Post请求
        HttpPost httpPost = new HttpPost(url);
        // 响应模型
        CloseableHttpResponse response = null;
        try {


            // 由客户端执行(发送)Post请求
            response = httpClient.execute(httpPost);
            // 从响应模型中获取响应实体
            HttpEntity responseEntity = response.getEntity();
            if (responseEntity != null) {


                return JSON.parseObject(EntityUtils.toString(responseEntity),Map.class);
            }
        } catch (Exception e) {


            e.printStackTrace();
        } finally {


            try {


                // 释放资源
                if (httpClient != null) {


                    httpClient.close();
                }
                if (response != null) {


                    response.close();
                }
            } catch (IOException e) {


                e.printStackTrace();
            }
        }
        return null;
    }
}
总结
到这里就结束了,文章介绍了两种微服务之间的授权方式,一种是和用户上下文有关的请求,通过Feign的拦截器转发用户请求中的Token的给下游微服务,二种是微服务之间调用可能和当前用户上下文无关,我们采用在拦截器中采用客户端模式生成一个Token转发给下游服务的方式,希望对你有所帮助