05、Spring Security 实战 - 自定义表单登录和注销登录认证
1. 回顾 SecurityAutoConfiguration 自动配置原理
①SecurityAutoConfiguration 安全认证配置类:
@Configuration(proxyBeanMethods = false)
@ConditionalOnClass(DefaultAuthenticationEventPublisher.class)
@EnableConfigurationProperties(SecurityProperties.class)
@Import({

      SpringBootWebSecurityConfiguration.class, WebSecurityEnablerConfiguration.class,
      SecurityDataConfiguration.class, ErrorPageSecurityFilterConfiguration.class })
public class SecurityAutoConfiguration {


   @Bean
   @ConditionalOnMissingBean(AuthenticationEventPublisher.class)
   public DefaultAuthenticationEventPublisher authenticationEventPublisher(ApplicationEventPublisher publisher) {


      return new DefaultAuthenticationEventPublisher(publisher);
   }

}
SecurityAutoConfiguration 类上的注解:
-
@Configuration:指明该类是一个配置类;
-
@ConditionalOnClass:classpath类路径下存在 DefaultAuthenticationEventPublisher 类;
-
@EnableConfigurationProperties:从属性配置文件中读取并配置属性类 SecurityProperties;
-
@Import:用来导入配置类且该注解必须作用于@Configuration定义的类上;
-
4.2 版本之前只可以导入配置类,4.2版本之后也可以导入普通类 ;
-
配置类即带有@Configuration,@Component 注解的类;
-
用注解的方式将一个对象交给Spring来管理,有三种做法:
-
@Bean
-
@Componet(@Service、@Configuration等归为一类)
-
@Import
②@Import 注解将 SpringBootWebSecurityConfiguration实例交给Spring容器管理,SpringBootWebSecurityConfiguration 必须是一个配置类,即带有@Configuration注解:
@Configuration(proxyBeanMethods = false)
@ConditionalOnDefaultWebSecurity
@ConditionalOnWebApplication(type = Type.SERVLET)
class SpringBootWebSecurityConfiguration {


    @Bean
    @Order(SecurityProperties.BASIC_AUTH_ORDER)
    SecurityFilterChain defaultSecurityFilterChain(HttpSecurity http) throws Exception {


        http.authorizeRequests()
            .anyRequest().authenticated()
            .and()
            .formLogin()
            .and()
            .httpBasic();
        return http.build();
    }
}
这个配置类生效的条件:
- @ConditionalOnWebApplication:本项目是一个Servlet类,SpringBoot项目内置tomcat本身就是一个Servlet项目,条件满足;
- @ConditionalOnDefaultWebSecurity 条件成立;
进入ConditionalOnDefaultWebSecurity 注解:
@Target({

      ElementType.TYPE, ElementType.METHOD })
@Retention(RetentionPolicy.RUNTIME)
@Documented
@Conditional(DefaultWebSecurityCondition.class)
public @interface ConditionalOnDefaultWebSecurity {


}
class DefaultWebSecurityCondition extends AllNestedConditions {


    DefaultWebSecurityCondition() {


        super(ConfigurationPhase.REGISTER_BEAN);
    }

    // classpath类路径下存在SecurityFilterChain,HttpSecurity类,条件成立
    @ConditionalOnClass({

      SecurityFilterChain.class, HttpSecurity.class })
    static class Classes {


    }
    // Spring容器中不存在WebSecurityConfigurerAdapter,SecurityFilterChain实例,条件成立
    @ConditionalOnMissingBean({

      WebSecurityConfigurerAdapter.class, SecurityFilterChain.class })
    static class Beans {


    }
}
③综上分析:
Spring容器将会解析和注册SpringBootWebSecurityConfiguration实例,并扫描该配置类中加了@Bean注解的方法,执行加了@Bean注解的方法逻辑,并将方法返回的实例交给Spring容器管理;
如果我们在项目中没有自定义WebSecurityConfigurerAdapter实例,那么默认使用的资源权限管理:
@Configuration(proxyBeanMethods = false)
@ConditionalOnDefaultWebSecurity
@ConditionalOnWebApplication(type = Type.SERVLET)
class SpringBootWebSecurityConfiguration {


    @Bean
    @Order(SecurityProperties.BASIC_AUTH_ORDER)
    SecurityFilterChain defaultSecurityFilterChain(HttpSecurity http) throws Exception {


        // 开启请求的权限管理
        http.authorizeRequests()
            // 所有资源的请求都需要认证
            .anyRequest().authenticated()
            .and()
            // 认证方式为表单认证
            .formLogin()
            .and()
            // 认证方式为basic认证
            .httpBasic();
        return http.build();
    }
}
2. 自定义资源权限规则
- /index 公共资源
- /hello … 受保护资源 权限管理
在项目中实现WebSecurityConfigurerAdapter实例,将会覆盖原有的资源认证:
@Configuration
public class WebSecurityConfigurer extends WebSecurityConfigurerAdapter {


    @Override
    protected void configure(HttpSecurity http) throws Exception {


        // 开启请求的权限管理
        http.authorizeRequests()
                // 放行 /index 请求
                .mvcMatchers("/index").permitAll()
                // 其他所有的请求都需要去认证
                // 放行的请求资源需要写在 anyRequest() 前面
                .anyRequest().authenticated()
                .and()
                // 认证方式为表单认证
                .formLogin();
    }
}
- permitAll() 代表放行该资源,该资源为公共资源 无需认证和授权可以直接访问;
- anyRequest().authenticated() 代表所有请求,必须认证之后才能访问;
- formLogin() 代表开启表单认证。
- 放行资源必须放在所有认证请求之前;
测试:访问localhost:8080/index不需要认证,访问localhost:8080/hello需要认证登录后才可访问
@RestController
public class IndexController {


    @RequestMapping("/index")
    public String index() {


        System.out.println("hello index");
        return "hello index";
    }
}
@RestController
public class HelloController {


    @RequestMapping("/hello")
    public String hello() {


        System.out.println("hello security");
        return "hello security";
    }
}
3. 自定义登录页面
①引入thymeleaf目标依赖
<!--thymeleaf-->
<dependency>
    <groupId>org.springframework.boot</groupId>
    <artifactId>spring-boot-starter-thymeleaf</artifactId>
</dependency>
②在resources/templates 目录下定义登录界面
<!DOCTYPE html>
<html lang="en" xmlns:th="http://www.thymeleaf.org">
<head>
    <meta charset="UTF-8">
    <title>用户登录</title>
</head>
<body>
<h1>用户登录</h1>
<h2>
    <div th:text="${session.SPRING_SECURITY_LAST_EXCEPTION}"></div>
</h2>
<form method="post" th:action="@{/doLogin}">
    用户名: <input name="uname" type="text"> <br>
    密码: <input name="passwd" type="text"> <br>
    <input type="submit" value="登录">
</form>
</body>
</html>
- 登录表单 method 必须为 post ,action 的请求路径为 /doLogin;
- 用户名的 name 属性为 uname;
- 密码的 name 属性为 passwd;
③定义登录⻚面 controller
@Controller
public class LoginController {


    @RequestMapping("/login.html")
    public String login() {


        return "login";
    }
}
④配置 Spring Security 配置类
@Configuration
public class WebSecurityConfigurer extends WebSecurityConfigurerAdapter {


    @Override
    protected void configure(HttpSecurity http) throws Exception {


        // 开启请求的权限管理
        http.authorizeRequests()
                // 放行访问登录页面的/login.html请求
                .mvcMatchers("/login.html").permitAll()
                // 放行/index请求
                .mvcMatchers("/index").permitAll()
                // 其他所有的请求都需要去认证
                .anyRequest().authenticated()
                .and()
                // 认证方式为表单认证
                .formLogin()
                    // 指定默认的登录页面
                    .loginPage("/login.html")
                    // 指定登录请求路径
                    .loginProcessingUrl("/doLogin")
                    // 指定表单用户名的 name 属性为 uname
                    .usernameParameter("uname")
                    // 指定表单密码的 name 属性为 passwd
                    .passwordParameter("passwd")
                .and()
                // 禁止csrf跨站请求保护
                .csrf().disable();
    }
}
访问:localhost:8080/hello,跳转到自定义登录页面,认证成功后即可访问资源
4. 指定登录成功后的跳转路径
1. 认证成功后redirect跳转:defaultSuccessUrl(String defaultSuccessUrl)
@Configuration
public class WebSecurityConfigurer extends WebSecurityConfigurerAdapter {


    @Override
    protected void configure(HttpSecurity http) throws Exception {


        // 开启请求的权限管理
        http.authorizeRequests()
                // 放行访问登录页面的/login.html请求
                .mvcMatchers("/login.html").permitAll()
                // 放行/index请求
                .mvcMatchers("/index").permitAll()
                // 其他所有的请求都需要去认证
                .anyRequest().authenticated()
                .and()
                // 认证方式为表单认证
                .formLogin()
                    // 指定默认的登录页面
                    .loginPage("/login.html")
                    // 指定登录请求路径
                    .loginProcessingUrl("/doLogin")
                    // 指定表单用户名的 name 属性为 uname
                    .usernameParameter("uname")
                    // 指定表单密码的 name 属性为 passwd
                    .passwordParameter("passwd")
                    // 指定登录成功的跳转路径
                    .defaultSuccessUrl("/index")
                .and()
                // 禁止csrf跨站请求保护
                .csrf().disable();
    }
}
defaultSuccessUrl 表示用户登录成功之后,会自动重定向到登录之前的地址上,如果用户本身就是直接访问的登录页面,则登录成功后就会重定向到defaultSuccessUrl 指定的页面中。
2. 认证成功后forward跳转:successForwardUrl(String forwradUrl)
当用户登录成功后,除了defaultSuccessUrl() 方法可实现登录成功后的跳转之外,successForwardUrl() 方法也可以实现登录成功后的跳转:
@Configuration
public class WebSecurityConfigurer extends WebSecurityConfigurerAdapter {


    @Override
    protected void configure(HttpSecurity http) throws Exception {


        // 开启请求的权限管理
        http.authorizeRequests()
                // 放行访问登录页面的/login.html请求
                .mvcMatchers("/login.html").permitAll()
                // 放行/index请求
                .mvcMatchers("/index").permitAll()
                // 其他所有的请求都需要去认证
                .anyRequest().authenticated()
                .and()
                // 认证方式为表单认证
                .formLogin()
                    // 指定默认的登录页面
                    .loginPage("/login.html")
                    // 指定登录请求路径
                    .loginProcessingUrl("/doLogin")
                    // 指定表单用户名的 name 属性为 uname
                    .usernameParameter("uname")
                    // 指定表单密码的 name 属性为 passwd
                    .passwordParameter("passwd")
                    // 指定登录成功的 redirect 跳转路径,地址栏会变
                    // .defaultSuccessUrl("/index")
                    // 指定登录成功的 forward 跳转路径 ,地址栏不变
                    .successForwardUrl("/index")
                .and()
                // 禁止csrf跨站请求保护
                .csrf().disable();
    }
}
successForwardUrl 不会跳转到用户之前的访问地址,只要用户登录成功,就会通过服务器跳转到 successForwardUrl 所指定的页面。
3. 认证成功后redirect跳转:defaultSuccessUrl(String defaultSuccessUrl,boolean alwaysUse)
defaultSuccessUrl 有一个重载的方法,如果重载方法的第2个参数传true ,则defaultSuccessUrl 的效果与successForwardUrl 类似,即不用考虑用户之前的访问地址,只要登录成功,就重定向到defaultSuccessUrl 所指定的页面。不同之处在于defaultSuccessUrl 是通过重定向实现的跳转,而 successForwardUrl 是通过服务器端跳转实现的。
@Configuration
public class WebSecurityConfigurer extends WebSecurityConfigurerAdapter {


    @Override
    protected void configure(HttpSecurity http) throws Exception {


        // 开启请求的权限管理
        http.authorizeRequests()
                // 放行访问登录页面的/login.html请求
                .mvcMatchers("/login.html").permitAll()
                // 放行/index请求
                .mvcMatchers("/index").permitAll()
                // 其他所有的请求都需要去认证
                .anyRequest().authenticated()
                .and()
                // 认证方式为表单认证
                .formLogin()
                    // 指定默认的登录页面
                    .loginPage("/login.html")
                    // 指定登录请求路径
                    .loginProcessingUrl("/doLogin")
                    // 指定表单用户名的 name 属性为 uname
                    .usernameParameter("uname")
                    // 指定表单密码的 name 属性为 passwd
                    .passwordParameter("passwd")
                    // 指定登录成功的跳转路径
                    .defaultSuccessUrl("/index",true)
                    // 指定登录成功的跳转路径
    				// .successForwardUrl("/index")
                .and()
                // 禁止csrf跨站请求保护
                .csrf().disable();
    }
}
4. 原理
public abstract class AbstractAuthenticationFilterConfigurer<B extends HttpSecurityBuilder<B>, T extends AbstractAuthenticationFilterConfigurer<B, T, F>, F extends AbstractAuthenticationProcessingFilter>
    extends AbstractHttpConfigurer<T, B> {


    // ...

    //  通过handler()方法实现请求的重定向
    public final T defaultSuccessUrl(String defaultSuccessUrl, boolean alwaysUse) {


        SavedRequestAwareAuthenticationSuccessHandler handler
            = new SavedRequestAwareAuthenticationSuccessHandler();
        handler.setDefaultTargetUrl(defaultSuccessUrl);
        handler.setAlwaysUseDefaultTargetUrl(alwaysUse);
        this.defaultSuccessHandler = handler;
        return successHandler(handler);
    }

    // 实现服务端的跳转
    public FormLoginConfigurer<H> successForwardUrl(String forwardUrl) {


        successHandler(new ForwardAuthenticationSuccessHandler(forwardUrl));
        return this;
    }

    // 自定义登录成功的处理逻辑
    public final T successHandler(AuthenticationSuccessHandler successHandler) {


        this.successHandler = successHandler;
        return getSelf();
    }

    // ...
}
successForwardUrl(String forwardUrl) 实现:
public class ForwardAuthenticationSuccessHandler implements AuthenticationSuccessHandler {


   private final String forwardUrl;

   public ForwardAuthenticationSuccessHandler(String forwardUrl) {


      this.forwardUrl = forwardUrl;
   }

   // 服务端转发
   @Override
   public void onAuthenticationSuccess(HttpServletRequest request,
                                       HttpServletResponse response,
            Authentication authentication) throws IOException, ServletException {


      request.getRequestDispatcher(this.forwardUrl).forward(request, response);
   }
}
defaultSuccessUrl(String defaultSuccessUrl, boolean alwaysUse) 实现:
public class SimpleUrlAuthenticationSuccessHandler extends AbstractAuthenticationTargetUrlRequestHandler
      implements AuthenticationSuccessHandler {


   public SimpleUrlAuthenticationSuccessHandler() {


   }

   public SimpleUrlAuthenticationSuccessHandler(String defaultTargetUrl) {


      setDefaultTargetUrl(defaultTargetUrl);
   }

   @Override
   public void onAuthenticationSuccess(HttpServletRequest request,
                                       HttpServletResponse response,
         Authentication authentication) throws IOException, ServletException {


      handle(request, response, authentication);
      clearAuthenticationAttributes(request);
   }

   protected final void clearAuthenticationAttributes(HttpServletRequest request) {


      HttpSession session = request.getSession(false);
      if (session != null) {


         session.removeAttribute(WebAttributes.AUTHENTICATION_EXCEPTION);
      }
   }
}
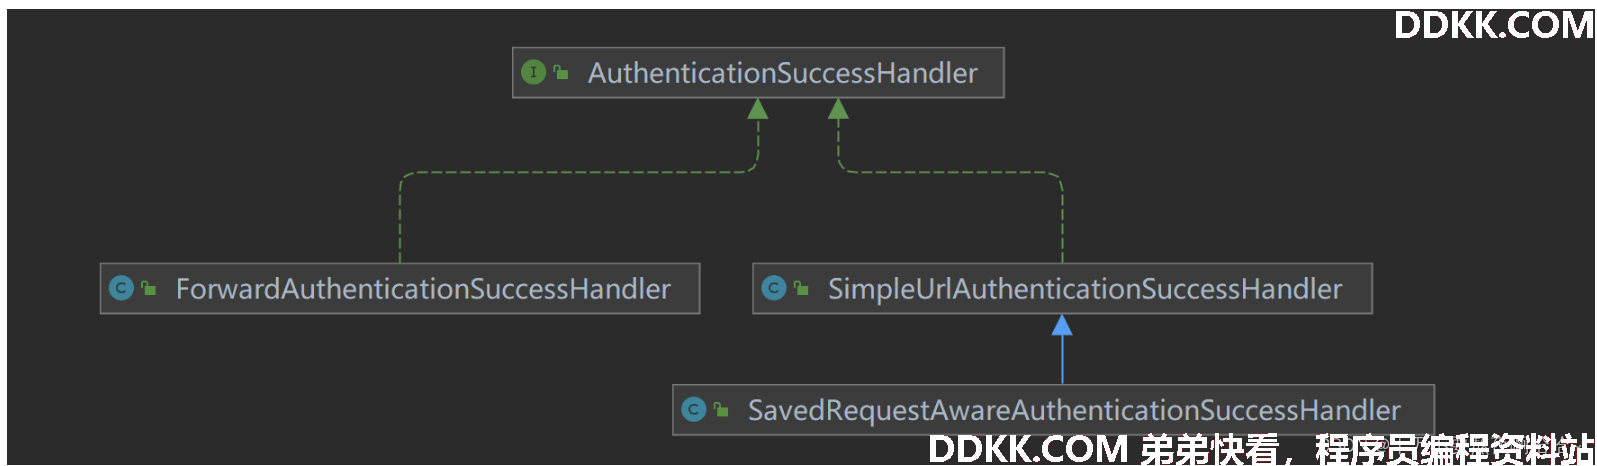
无论是defaultSuccessUrl 还是 successForwardUrl 最终配置的都是 AuthenticationSuccessHandler 接口的实例。SpringSecurity 中专门提供了AuthenticationSuccessHandler 接口用来处理登录成功的事项。
public interface AuthenticationSuccessHandler {


   default void onAuthenticationSuccess(HttpServletRequest request,
                                        HttpServletResponse response,
                                        FilterChain chain,
         Authentication authentication) throws IOException, ServletException {


      onAuthenticationSuccess(request, response, authentication);
      chain.doFilter(request, response);
   }

   void onAuthenticationSuccess(HttpServletRequest request,
                                HttpServletResponse response,
         Authentication authentication) throws IOException, ServletException;
}
5. 自定义登录成功处理(前后端分离开发)
有时候⻚面跳转并不能满足我们,特别是在前后端分离开发中就不需要成功之后跳转⻚面。用户登录成功后,不再需要页面跳转了,只需要给前端返回一个 JSON 数据即可,告诉前端登录成功还是失败,前端收到消息后自行处理。这时候就需要像登录成功后跳转页面一样,自定义登录成功处理类实现AuthenticationSuccessHandler 接口来完成自定义逻辑。
指定登录成功后的自定义处理逻辑:successHandler(AuthenticationSuccessHandler successHandler)
@Configuration
public class WebSecurityConfigurer extends WebSecurityConfigurerAdapter {


    @Override
    protected void configure(HttpSecurity http) throws Exception {


        // 开启请求的权限管理
        http.authorizeRequests()
                // 放行访问登录页面的/login.html请求
                .mvcMatchers("/login.html").permitAll()
                // 放行/index请求
                .mvcMatchers("/index").permitAll()
                // 其他所有的请求都需要去认证
                .anyRequest().authenticated()
                .and()
                // 认证方式为表单认证
                .formLogin()
                    // 指定默认的登录页面
                    .loginPage("/login.html")
                    // 指定登录请求路径
                    .loginProcessingUrl("/doLogin")
                    // 指定表单用户名的 name 属性为 uname
                    .usernameParameter("uname")
                    // 指定表单密码的 name 属性为 passwd
                    .passwordParameter("passwd")
                    // 指定登录成功后的自定义处理逻辑
                    .successHandler(new MyAuthenticationSuccessHandler())
                .and()
                // 禁止csrf跨站请求保护
                .csrf().disable();
    }
}
方法参数 AuthenticationSuccessHandler 接口的实现类:
public class MyAuthenticationSuccessHandler implements AuthenticationSuccessHandler {


    private final ObjectMapper objectMapper = new ObjectMapper() ;

    @Override
    public void onAuthenticationSuccess(HttpServletRequest request, HttpServletResponse response, Authentication authentication) throws IOException, ServletException {


        Map<String,Object> map = new HashMap<>();
        map.put("msg","登录成功");
        map.put("code",200);
        map.put("authentication",authentication);
        response.setContentType("application/json;charset=UTF-8");
        String s = objectMapper.writeValueAsString(map);
        response.getWriter().println(s);
    }
}
启动项目,浏览器访问:localhost:8080/hello,跳转到登录页面,登录成功后页面响应:
{


    "msg": "登录成功",
    "code": 200,
    "authentication": {


        "authorities": [],
        "details": {


            "remoteAddress": "0:0:0:0:0:0:0:1",
            "sessionId": "D6D9B6B12B2D5768FBAC85FF8E447D10"
        },
        "authenticated": true,
        "principal": {


            "password": null,
            "username": "root",
            "authorities": [],
            "accountNonExpired": true,
            "accountNonLocked": true,
            "credentialsNonExpired": true,
            "enabled": true
        },
        "credentials": null,
        "name": "root"
    }
}
6. 显示登录失败信息
为了能更直观在登录⻚面看到异常错误信息,可以在登录⻚面中直接获取异常信息。Spring Security 在登录失败之后会将异常信息存储到 request 、 session 作用域中 key 为 SPRING_SECURITY_LAST_EXCEPTION 命名属性中。
1. 认证失败后forward跳转:failureForwardUrl(String forwardUrl)
@Configuration
public class WebSecurityConfigurer extends WebSecurityConfigurerAdapter {


    @Override
    protected void configure(HttpSecurity http) throws Exception {


        // 开启请求的权限管理
        http.authorizeRequests()
                // 放行访问登录页面的/login.html请求
                .mvcMatchers("/login.html").permitAll()
                // 放行/index请求
                .mvcMatchers("/index").permitAll()
                // 其他所有的请求都需要去认证
                .anyRequest().authenticated()
                .and()
                // 认证方式为表单认证
                .formLogin()
                    // 指定默认的登录页面
                    .loginPage("/login.html")
                    // 指定登录请求路径
                    .loginProcessingUrl("/doLogin")
                    // 指定表单用户名的 name 属性为 uname
                    .usernameParameter("uname")
                    // 指定表单密码的 name 属性为 passwd
                    .passwordParameter("passwd")
                    // 指定登录成功后的自定义处理逻辑
                    .successHandler(new MyAuthenticationSuccessHandler())
                    // 指定认证失败后的forward跳转页面
                    .failureForwardUrl("/login.html")
                .and()
                // 禁止csrf跨站请求保护
                .csrf().disable();
    }
}
failureForwardUrl 是一种服务器跳转,如果登录失败,自动跳转到登录页面后,就可以将错误信息展示出来,那么错误信息如何取出呢?
我们看一下源码:进入 FormLoginConfigurer 的 failureForwardUrl 方法
public final class FormLoginConfigurer<H extends HttpSecurityBuilder<H>> extends
    AbstractAuthenticationFilterConfigurer<H, FormLoginConfigurer<H>, UsernamePasswordAuthenticationFilter> {


    public FormLoginConfigurer<H> failureForwardUrl(String forwardUrl) {


        failureHandler(new ForwardAuthenticationFailureHandler(forwardUrl));
        return this;
    }

    public final T failureHandler(AuthenticationFailureHandler authenticationFailureHandler) {


        this.failureUrl = null;
        this.failureHandler = authenticationFailureHandler;
        return getSelf();
    }
}
ForwardAuthenticationFailureHandler 实现了 AuthenticationFailureHandler 接口:
public class ForwardAuthenticationFailureHandler implements AuthenticationFailureHandler {


    public static final String AUTHENTICATION_EXCEPTION = "SPRING_SECURITY_LAST_EXCEPTION";

    private final String forwardUrl;

    public ForwardAuthenticationFailureHandler(String forwardUrl) {


        this.forwardUrl = forwardUrl;
    }

    @Override
    public void onAuthenticationFailure(HttpServletRequest request,
                                        HttpServletResponse response,
                                        AuthenticationException exception) throws IOException, ServletException {


        // 将异常信息存放到request中,因此需要从request请求中取出异常信息
        // key:SPRING_SECURITY_LAST_EXCEPTION
        request.setAttribute(WebAttributes.AUTHENTICATION_EXCEPTION, exception);
        request.getRequestDispatcher(this.forwardUrl).forward(request, response);
    }
}
在认证失败跳转的登录页面中取出 request 域中的异常信息:
<!DOCTYPE html>
<html lang="en" xmlns:th="http://www.thymeleaf.org">
<head>
    <meta charset="UTF-8">
    <title>用户登录</title>
</head>
<body>

<h1>用户登录</h1>
<h2>
    <!--从请求域request中取出异常信息-->
    <div th:text="${SPRING_SECURITY_LAST_EXCEPTION}"></div>
</h2>
<form method="post" th:action="@{/doLogin}">
    用户名: <input name="uname" type="text"> <br>
    密码: <input name="passwd" type="text"> <br>
    <input type="submit" value="登录">
</form>

</body>
</html>
访问localhost:8080/hello,服务器端转发到登录页面(地址栏不变)并携带异常信息:
2. 认证失败后redirect跳转:failureUrl(String authenticationFailureUrl)
@Configuration
public class WebSecurityConfigurer extends WebSecurityConfigurerAdapter {


    @Override
    protected void configure(HttpSecurity http) throws Exception {


        // 开启请求的权限管理
        http.authorizeRequests()
                // 放行访问登录页面的/login.html请求
                .mvcMatchers("/login.html").permitAll()
                // 放行/index请求
                .mvcMatchers("/index").permitAll()
                // 其他所有的请求都需要去认证
                .anyRequest().authenticated()
                .and()
                // 认证方式为表单认证
                .formLogin()
                    // 指定默认的登录页面
                    .loginPage("/login.html")
                    // 指定登录请求路径
                    .loginProcessingUrl("/doLogin")
                    // 指定表单用户名的 name 属性为 uname
                    .usernameParameter("uname")
                    // 指定表单密码的 name 属性为 passwd
                    .passwordParameter("passwd")
                    // 指定登录成功后的自定义处理逻辑
                    .successHandler(new MyAuthenticationSuccessHandler())
                    // 指定认证失败后的redirect跳转页面
                    .failureUrl("/login.html")
                .and()
                // 禁止csrf跨站请求保护
                .csrf().disable();
    }
}
failureUrl 表示登录失败后重定向到 login.html 页面。重定向是一种客户端跳转,地址栏会变化,那么这是异常信息怎么取出呢?
我们看一下源码:
public abstract class AbstractAuthenticationFilterConfigurer<B extends HttpSecurityBuilder<B>, T extends AbstractAuthenticationFilterConfigurer<B, T, F>, F extends AbstractAuthenticationProcessingFilter>
    extends AbstractHttpConfigurer<T, B> {


    public final T failureUrl(String authenticationFailureUrl) {


        T result = failureHandler(
            new SimpleUrlAuthenticationFailureHandler(authenticationFailureUrl));
        this.failureUrl = authenticationFailureUrl;
        return result;
    }

    public final T failureHandler(AuthenticationFailureHandler authenticationFailureHandler) {


        this.failureUrl = null;
        this.failureHandler = authenticationFailureHandler;
        return getSelf();
    }
}
SimpleUrlAuthenticationFailureHandler 实现了 AuthenticationFailureHandler 接口:
public class SimpleUrlAuthenticationFailureHandler implements AuthenticationFailureHandler {


    private String defaultFailureUrl;

    public static final String AUTHENTICATION_EXCEPTION = "SPRING_SECURITY_LAST_EXCEPTION";

    public SimpleUrlAuthenticationFailureHandler(String defaultFailureUrl) {


        setDefaultFailureUrl(defaultFailureUrl);
    }

    public void setDefaultFailureUrl(String defaultFailureUrl) {


        this.defaultFailureUrl = defaultFailureUrl;
    }

    @Override
    public void onAuthenticationFailure(HttpServletRequest request,
                                        HttpServletResponse response,
                                        AuthenticationException exception) throws IOException, ServletException {


        if (this.defaultFailureUrl == null) {


            response.sendError(HttpStatus.UNAUTHORIZED.value(),
                               HttpStatus.UNAUTHORIZED.getReasonPhrase());
            return;
        }
        // 保存异常信息
        saveException(request, exception);
        if (this.forwardToDestination) {


            this.logger.debug("Forwarding to " + this.defaultFailureUrl);
            request.getRequestDispatcher(this.defaultFailureUrl).forward(request, response);
        } else {


            this.redirectStrategy.sendRedirect(request, response, this.defaultFailureUrl);
        }
    }

    // 保存异常信息
    protected final void saveException(HttpServletRequest request, AuthenticationException exception) {


        // 如果forwardToDestination=true,那么异常信息存在request域中
        // key:SPRING_SECURITY_LAST_EXCEPTION
        if (this.forwardToDestination) {


            request.setAttribute(WebAttributes.AUTHENTICATION_EXCEPTION, exception);
            return;
        }
        // 从session中获取异常信息
        HttpSession session = request.getSession(false);
        if (session != null || this.allowSessionCreation) {


            // 将异常信息存放在session中,因此取出异常信息也需要从session中取出
            request.getSession().setAttribute(WebAttributes.AUTHENTICATION_EXCEPTION, exception);
        }
    }
}
在认证失败跳转的登录页面中取出session域中的异常信息:
<!DOCTYPE html>
<html lang="en" xmlns:th="http://www.thymeleaf.org">
<head>
    <meta charset="UTF-8">
    <title>用户登录</title>
</head>
<body>
<h1>用户登录</h1>
<h2>
    <div th:text="${session.SPRING_SECURITY_LAST_EXCEPTION}"></div>
</h2>
<form method="post" th:action="@{/doLogin}">
    用户名: <input name="uname" type="text"> <br>
    密码: <input name="passwd" type="text"> <br>
    <input type="submit" value="登录">
</form>
</body>
</html>
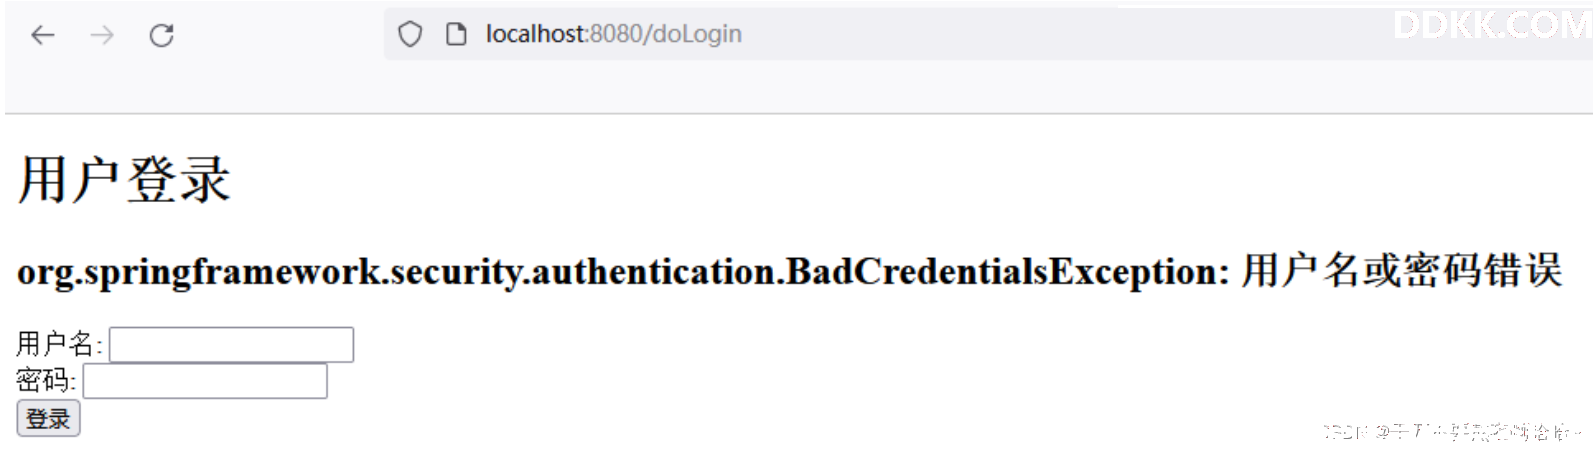
访问localhost:8080/hello,浏览器重定向到登录页面(地址栏变了)并携带异常信息:

failureUrl、failureForwardUrl 关系类似于之前提到的 successForwardUrl 、defaultSuccessUrl 方法:
- failureUrl 失败以后的重定向跳转;
- failureForwardUrl 失败以后的 forward 跳转 ;因此获取 request 中异常信息,这里只能使用failureForwardUrl;
3. 原理
经过上面的分析,无论是 failureForwardUrl 还是 failureUrl最终配置的都是 AuthenticationFailureHandler 接口的实例。SpringSecurity 中专门提供了AuthenticationFailureHandler 接口用来处理登录成功的事项。
public interface AuthenticationFailureHandler {


   void onAuthenticationFailure(HttpServletRequest request,
                                HttpServletResponse response,
         AuthenticationException exception) throws IOException, ServletException;
}

7. 自定义登录失败处理(前后端分离开发)
和自定义登录成功处理一样,Spring Security 同样为前后端分离开发提供了登录失败的处理,这个类就是 AuthenticationFailureHandler。
指定登录失败后的自定义处理逻辑: failureHandler(AuthenticationFailureHandler failureHandler)
@Configuration
public class WebSecurityConfigurer extends WebSecurityConfigurerAdapter {


    @Override
    protected void configure(HttpSecurity http) throws Exception {


        // 开启请求的权限管理
        http.authorizeRequests()
                // 放行访问登录页面的/login.html请求
                .mvcMatchers("/login.html").permitAll()
                // 放行/index请求
                .mvcMatchers("/index").permitAll()
                // 其他所有的请求都需要去认证
                .anyRequest().authenticated()
                .and()
                // 认证方式为表单认证
                .formLogin()
                    // 指定默认的登录页面
                    .loginPage("/login.html")
                    // 指定登录请求路径
                    .loginProcessingUrl("/doLogin")
                    // 指定表单用户名的 name 属性为 uname
                    .usernameParameter("uname")
                    // 指定表单密码的 name 属性为 passwd
                    .passwordParameter("passwd")
                    // 指定登录成功后的自定义处理逻辑
                    .successHandler(new MyAuthenticationSuccessHandler())
                    // 指定登录失败后的自定义处理逻辑
                    .failureHandler(new MyAuthenticationFailureHandler())
                .and()
                // 禁止csrf跨站请求保护
                .csrf().disable();
    }
}
方法参数 AuthenticationFailureHandler 接口的实现类:
public class MyAuthenticationFailureHandler implements AuthenticationFailureHandler {


    private final ObjectMapper objectMapper = new ObjectMapper();

    @Override
    public void onAuthenticationFailure(HttpServletRequest request, HttpServletResponse response, AuthenticationException exception) throws IOException, ServletException {


        Map<String,Object> map = new HashMap<>();
        map.put("msg","登录失败:"+exception.getMessage());
        map.put("code",-1);
        response.setContentType("application/json;charset=UTF-8");
        String s = objectMapper.writeValueAsString(map);
        response.getWriter().println(s);
    }
}
启动项目,浏览器访问:localhost:8080/hello,跳转到登录页面,登录失败后页面响应:
{


    "msg": "登录失败:用户名或密码错误",
    "code": -1
}
8. 注销登录配置
Spring Security 中也提供了默认的注销登录配置,启动项目访问localhost:8080/logout 即可实现注销登录;在开发时也可以按照自己需求对注销进行个性化定制。
@Configuration
public class WebSecurityConfigurer extends WebSecurityConfigurerAdapter {


    @Override
    protected void configure(HttpSecurity http) throws Exception {


        // 开启请求的权限管理
        http.authorizeRequests()
                // 放行访问登录页面的/login.html请求
                .mvcMatchers("/login.html").permitAll()
                // 放行/index请求
                .mvcMatchers("/index").permitAll()
                // 其他所有的请求都需要去认证
                .anyRequest().authenticated()
                .and()
                // 开启认证方式为表单认证
                .formLogin()
                    // 指定默认的登录页面
                    .loginPage("/login.html")
                    // 指定登录请求路径
                    .loginProcessingUrl("/doLogin")
                    // 指定表单用户名的 name 属性为 uname
                    .usernameParameter("uname")
                    // 指定表单密码的 name 属性为 passwd
                    .passwordParameter("passwd")
                    // 指定登录成功后的自定义处理逻辑
                    .successHandler(new MyAuthenticationSuccessHandler())
                    // 指定登录失败后的自定义处理逻辑
                    .failureHandler(new MyAuthenticationFailureHandler())
                .and()
            	// 开启注销登录配置
                .logout()
                    // 默认配置,注销登录url为/logout,默认的请求方式为get方式
                    .logoutUrl("/logout")
                    // 默认配置,使session失效,
                    .invalidateHttpSession(true)
                    // 默认配置,清除认证信息,默认为true
                    .clearAuthentication(true)
                    // 默认配置,注销登录后的跳转地址
                    .logoutSuccessUrl("/login.html")
                .and()
                // 禁止csrf跨站请求保护
                .csrf().disable();
    }
}
启动项目访问:localhost:8080/logout 即可实现退出登录;
9. 自定义注销登录成功处理(前后端分离开发)
如果是前后端分离开发,注销成功之后就不需要⻚面跳转了,只需要将注销成功的信息返回前端即可,此时我们可以通过自定义 LogoutSuccessHandler 实现来返回注销之后信息。
指定注销登录成功后的自定义处理逻辑:logoutSuccessHandler(LogoutSuccessHandler logoutSuccessHandler)
 **/
@Configuration
public class WebSecurityConfigurer extends WebSecurityConfigurerAdapter {


    @Override
    protected void configure(HttpSecurity http) throws Exception {


        // 开启请求的权限管理
        http.authorizeRequests()
                // 放行访问登录页面的/login.html请求
                .mvcMatchers("/login.html").permitAll()
                // 放行/index请求
                .mvcMatchers("/index").permitAll()
                // 其他所有的请求都需要去认证
                .anyRequest().authenticated()
                .and()
                // 认证方式为表单认证
                .formLogin()
                    // 指定默认的登录页面
                    .loginPage("/login.html")
                    // 指定登录请求路径
                    .loginProcessingUrl("/doLogin")
                    // 指定表单用户名的 name 属性为 uname
                    .usernameParameter("uname")
                    // 指定表单密码的 name 属性为 passwd
                    .passwordParameter("passwd")
                    // 指定登录成功后的自定义处理逻辑
                    .successHandler(new MyAuthenticationSuccessHandler())
                    // 指定登录失败后的自定义处理逻辑
                    .failureHandler(new MyAuthenticationFailureHandler())
                .and()
                .logout()
                    // 默认的注销登录url为logout,默认的请求方式为get方式
                    .logoutUrl("/logout")
                    // 表示是否使session失效,默认为true
                    .invalidateHttpSession(true)
                    // 表示是否清除认证信息,默认为true
                    .clearAuthentication(true)
            		// 注销登录成功的自定义处理逻辑
                    .logoutSuccessHandler(new MyLogoutSuccessHandler())
                .and()
                // 禁止csrf跨站请求保护
                .csrf().disable();
    }
}
进入logoutSuccessHandler 方法的源码:
public final class LogoutConfigurer<H extends HttpSecurityBuilder<H>>
    extends AbstractHttpConfigurer<LogoutConfigurer<H>, H> {


    public LogoutConfigurer<H> logoutSuccessHandler(LogoutSuccessHandler logoutSuccessHandler) {


        this.logoutSuccessUrl = null;
        this.customLogoutSuccess = true;
        this.logoutSuccessHandler = logoutSuccessHandler;
        return this;
    }
}
可以看到方法参数是一个LogoutSuccessHandler接口参数:
public interface LogoutSuccessHandler {


   void onLogoutSuccess(HttpServletRequest request,
                        HttpServletResponse response, Authentication authentication)
         throws IOException, ServletException;
}
如果想自定义注销登录成功后的处理逻辑,可以定义一个类 MyLogoutSuccessHandler 实现该接口:
public class MyLogoutSuccessHandler implements LogoutSuccessHandler {


    private final ObjectMapper objectMapper = new ObjectMapper();

    @Override
    public void onLogoutSuccess(HttpServletRequest request, HttpServletResponse response, Authentication authentication) throws IOException, ServletException {


        Map<String,Object> map = new HashMap<>();
        map.put("msg","注销登录");
        map.put("code",200);
        map.put("authentication",authentication);
        response.setContentType("application/json;charset=UTF-8");
        String s = objectMapper.writeValueAsString(map);
        response.getWriter().println(s);
    }
}
启动项目浏览器访问 localhost:8080/hello,登录成功后,访问 localhost:8080/logout:
{


    "msg": "注销登录",
    "code": 200,
    "authentication": {


        "authorities": [],
        "details": {


            "remoteAddress": "127.0.0.1",
            "sessionId": "E05D06CBA4BD78CC204258B50DBA93AC"
        },
        "authenticated": true,
        "principal": {


            "password": null,
            "username": "root",
            "authorities": [],
            "accountNonExpired": true,
            "accountNonLocked": true,
            "credentialsNonExpired": true,
            "enabled": true
        },
        "credentials": null,
        "name": "root"
    }
}