23、MyBatis速成 - spring整合
Spring是一个开放源代码的设计层面框架,他解决的是业务逻辑层和其他各层的松耦合问题,因此它将面向接口的编程思想贯穿整个系统应用。Spring是于2003 年兴起的一个轻量级的Java 开发框架,由Rod Johnson创建。简单来说,Spring是一个分层的JavaSE/EEfull-stack(一站式) 轻量级开源框架。
本篇还是以示例的形式介绍一下spring是如何整合mybatis。
1.使用maven构建web项目
pom.xml文件配置
<project xmlns="http://maven.apache.org/POM/4.0.0" xmlns:xsi="http://www.w3.org/2001/XMLSchema-instance"
  xsi:schemaLocation="http://maven.apache.org/POM/4.0.0 http://maven.apache.org/xsd/maven-4.0.0.xsd">
  <modelVersion>4.0.0</modelVersion>

  <groupId>org.mybatis</groupId>
  <artifactId>mybatis-study-02</artifactId>
  <version>0.0.1-SNAPSHOT</version>
  <packaging>jar</packaging>

  <name>mybatis-study-02</name>
  <url>http://maven.apache.org</url>

  <properties>
    <project.build.sourceEncoding>UTF-8</project.build.sourceEncoding>
    <spring4.version>4.2.4.RELEASE</spring4.version>
  </properties>

  <dependencies>
    <!-- junit测试包 -->
    <dependency>
      <groupId>junit</groupId>
      <artifactId>junit</artifactId>
      <version>4.12</version>
    </dependency>

    <!-- mybatis核心包 -->
    <dependency>
        <groupId>org.mybatis</groupId>
        <artifactId>mybatis</artifactId>
        <version>3.2.1</version>
    </dependency>

    <!-- mybatis整合Ehcache适配器 -->
    <dependency>
      <groupId>org.mybatis</groupId>
      <artifactId>mybatis-ehcache</artifactId>
      <version>1.0.0</version>
    </dependency>

    <!-- mybatis整合spring适配器 -->
    <dependency>
        <groupId>org.mybatis</groupId>
        <artifactId>mybatis-spring</artifactId>
        <version>1.2.0</version>
    </dependency>

    <!-- 配置ehcache-->
    <dependency>
        <groupId>net.sf.ehcache</groupId>
        <artifactId>ehcache-core</artifactId>
        <version>2.6.10</version>
    </dependency>

    <!-- 配置spring,使用IOC容器和TX,这些包足够,需要使用其他功能可自行添加,也可将springframework的所有包都添加进去 -->
    <dependency>
        <groupId>org.springframework</groupId>
        <artifactId>spring-beans</artifactId>
        <version>4.2.4.RELEASE</version>
    </dependency>
    <dependency>
        <groupId>org.springframework</groupId>
        <artifactId>spring-context</artifactId>
        <version>4.2.4.RELEASE</version>
    </dependency>
    <dependency>
        <groupId>org.springframework</groupId>
        <artifactId>spring-core</artifactId>
        <version>4.2.4.RELEASE</version>
        <!--spring-core包依赖commons-logging,本次引用了log4j作为日志实现,所以这里让spring-core依赖于log4j,而不是commons-logging包。至于为什么依赖,这个是spring官网说的,不要纠结这个问题-->
        <exclusions>
            <exclusion>
                <groupId>commons-logging</groupId>
                <artifactId>commons-logging</artifactId>
            </exclusion>
        </exclusions>
    </dependency>
    <dependency>
        <groupId>org.springframework</groupId>
        <artifactId>spring-expression</artifactId>
        <version>4.2.4.RELEASE</version>
    </dependency>
    <dependency>
        <groupId>org.springframework</groupId>
        <artifactId>spring-tx</artifactId>
        <version>4.2.4.RELEASE</version>
    </dependency>
    <dependency>
        <groupId>org.springframework</groupId>
        <artifactId>spring-jdbc</artifactId>
        <version>4.2.4.RELEASE</version>
    </dependency>
    <dependency>
        <groupId>org.springframework</groupId>
        <artifactId>spring-web</artifactId>
        <version>4.2.4.RELEASE</version>
    </dependency>

    <!-- 配置springmvc -->
    <dependency>
        <groupId>org.springframework</groupId>
        <artifactId>spring-webmvc</artifactId>
        <version>4.2.4.RELEASE</version>
    </dependency>

    <!-- 配置log4j -->
    <dependency>
        <groupId>org.slf4j</groupId>
        <artifactId>slf4j-api</artifactId>
        <version>1.7.12</version>
    </dependency>
    <dependency>
        <groupId>org.slf4j</groupId>
        <artifactId>slf4j-log4j12</artifactId>
        <version>1.7.6</version>
    </dependency>
    <dependency>
        <groupId>log4j</groupId>
        <artifactId>log4j</artifactId>
        <version>1.2.17</version>
    </dependency>
    <dependency>
        <groupId>commons-logging</groupId>
        <artifactId>commons-logging</artifactId>
        <version>1.2</version>
    </dependency>

    <!-- mysql连接驱动 -->
    <dependency>
        <groupId>mysql</groupId>
        <artifactId>mysql-connector-java</artifactId>
        <version>5.1.35</version>
    </dependency>

    <!-- 配置数据源 -->
    <dependency>
        <groupId>c3p0</groupId>
        <artifactId>c3p0</artifactId>
        <version>0.9.1.1</version>
    </dependency>

    <!-- servlet -->
    <dependency>
        <groupId>javax.servlet</groupId>
        <artifactId>servlet-api</artifactId>
        <version>2.5</version>
    </dependency>
    <dependency>
        <groupId>javax.servlet</groupId>
        <artifactId>jstl</artifactId>
        <version>1.2</version>
    </dependency>

    <!-- <dependency>
        <groupId>cglib</groupId>
        <artifactId>cglib</artifactId>
        <version>3.2.5</version>
    </dependency> -->

    <!-- 工具包 -->
    <!-- <dependency>
        <groupId>org.apache.commons</groupId>
        <artifactId>commons-lang3</artifactId>
        <version>3.1</version>
    </dependency> -->
  </dependencies>
</project>
2.mybatis主配置文件
mybatis-config.xml
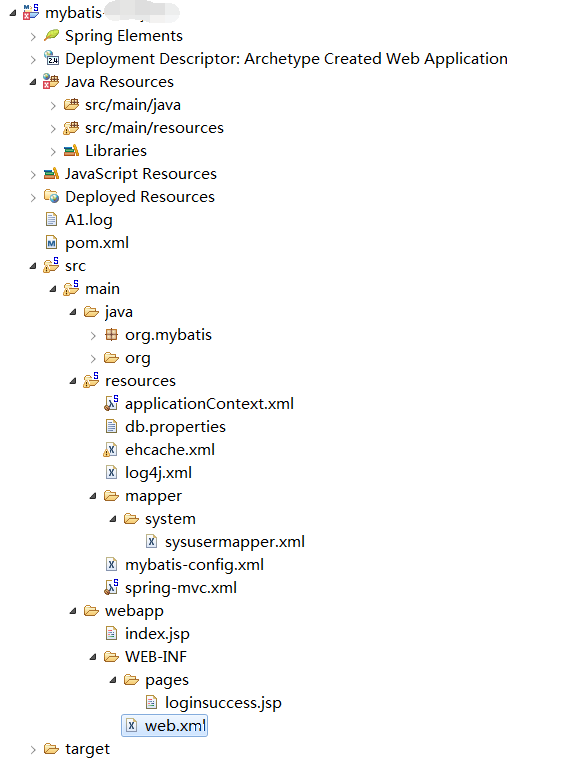
使用了spring之后,mybatis主配置文件配置较少了。具体存放位置看上图的整个工程架构。
<?xml version="1.0" encoding="UTF-8" ?>
<!DOCTYPE configuration
  PUBLIC "-//mybatis.org//DTD Config 3.0//EN"
  "http://mybatis.org/dtd/mybatis-3-config.dtd">
<configuration>

    <!--
        <properties resource="db.properties"></properties>
    -->

    <settings>
        <setting name="mapUnderscoreToCamelCase" value="true"/>
    </settings>

    <!--
    <mappers>
        <mapper resource="mapper/system/sysusermapper.xml"/>
    </mappers>
    -->

</configuration>
3.mybatis映射配置文件
按照业务区分开。具体存放位置看上图的整个工程架构。
这里只展示一个文件的简单配置:
<?xml version="1.0" encoding="UTF-8" ?>
<!DOCTYPE mapper
  PUBLIC "-//mybatis.org//DTD Mapper 3.0//EN"
  "http://mybatis.org/dtd/mybatis-3-mapper.dtd">

<mapper namespace="org.mybatis.dao.SysuserMapper">

    <!-- 查询方法1,传递一个参数 -->
    <select id="getEmployeeById" resultType="org.mybatis.bean.Employee">
        select * from mybatis_employee where id ={id}
    </select>

    <!-- 查询方法2,传递多个参数
        多个参数会被封装成一个map
        key:param1,param2...paramn或者参数的索引
        value:传入的参数值
       {}就是从map中获取指定key的值
     -->
    <!-- <select id="getEmployeeByIdAndLastName" resultType="org.mybatis.crud.Employee">
        select * from mybatis_employee where id ={0} and last_name ={1}
    </select> -->
    <!--
        查询方法2,传递多个参数使用@Param(参数名)
        多个参数会被封装成一个map
        key:@Param指定的值
        value:为传递的参数
     -->
    <select id="getEmployeeByIdAndLastName" resultType="org.mybatis.bean.Employee">
        select * from mybatis_employee where id ={id} and last_name ={lastName}
    </select>
    <select id="getEmployeeByEmployeeField" resultType="org.mybatis.bean.Employee">
        select * from mybatis_employee where id ={id} and last_name ={lastName}
    </select>
    <select id="getEmployeeByMap" resultType="org.mybatis.bean.Employee">
        select * from mybatis_employee where id ={id} and last_name ={lastName}
    </select>

    <!-- 插入方法mysql -->
    <insert id="addEmployee" parameterType="org.mybatis.bean.Employee" useGeneratedKeys="true" keyProperty="id">
        insert into mybatis_employee
        (last_name,email,gender)
        values
        (#{lastName},#{email},#{gender});
    </insert>

    <!-- 插入方法oracle -->
    <insert id="addEmployeeo">
        <!--
        keyProperty=id需要赋值主键的属性,一般都是id
        order=before表示在插入之前执行该查询
        resultType=Integer表示返回值为integer类型
        -->
        <selectKey keyProperty="id" order="BEFORE" resultType="Integer">
            select employees_seq from dual;
        </selectKey>

        insert into mybatis_employee
        (id,last_name,email,gender)
        values
        (#{id},#{lastName},#{email},#{gender});
    </insert>

    <!-- 更新方法 -->
    <update id="updateEmployee">
        update mybatis_employee
        set
        last_name ={lastName},
        email ={email},
        gender ={gender}
        where
        id ={id}
    </update>

    <!-- 删除方法 -->
    <delete id="deleteEmployee">
        delete from mybatis_employee where id ={id}
    </delete>

</mapper>
4.spring配置文件
applicationContext.xml
<?xml version="1.0" encoding="UTF-8"?>
<beans xmlns="http://www.springframework.org/schema/beans"
    xmlns:xsi="http://www.w3.org/2001/XMLSchema-instance"
    xmlns:context="http://www.springframework.org/schema/context"
    xmlns:tx="http://www.springframework.org/schema/tx"
    xmlns:mybatis-spring="http://mybatis.org/schema/mybatis-spring"
    xsi:schemaLocation="http://mybatis.org/schema/mybatis-spring http://mybatis.org/schema/mybatis-spring-1.2.xsd
        http://www.springframework.org/schema/beans http://www.springframework.org/schema/beans/spring-beans.xsd
        http://www.springframework.org/schema/context http://www.springframework.org/schema/context/spring-context-4.2.xsd
        http://www.springframework.org/schema/tx http://www.springframework.org/schema/tx/spring-tx-4.2.xsd">

    <!-- spring管理所有的业务组件,需要跟springmvc区分 -->
    <context:component-scan base-package="org.mybatis">
        <context:exclude-filter type="annotation" expression="org.springframework.stereotype.Controller"/>
    </context:component-scan>

    <!-- spring管理数据源,AOP,事务 -->

    <!-- 引入数据库外部配置文件 -->
    <context:property-placeholder location="classpath:db.properties"/>

    <!-- spring配置数据源 -->
    <bean id="dataSource" class="com.mchange.v2.c3p0.ComboPooledDataSource">
        <property name="jdbcUrl" value="${mysql.url}"></property>
        <property name="driverClass" value="${mysql.driver}"></property>
        <property name="user" value="${mysql.username}"></property>
        <property name="password" value="${mysql.password}"></property>
    </bean>

    <!-- spring配置事务管理器 -->
    <bean id="dataSourceTransactionManager" class="org.springframework.jdbc.datasource.DataSourceTransactionManager">
        <property name="dataSource" ref="dataSource"></property>
    </bean>

    <!-- 配置基于注解的声明式事务 -->
    <tx:annotation-driven transaction-manager="dataSourceTransactionManager"/>

    <!--
        spring整合mybatis
            1.spring管理所有组件,mapper实现类
                @Autowired自动注入mapper
            2.spring管理事务
            org.mybatis.spring.SqlSessionFactoryBean实现了spring的FactoryBean接口
     -->
     <bean id="sqlSessionFactoryBean" class="org.mybatis.spring.SqlSessionFactoryBean">
        <property name="dataSource" ref="dataSource"></property>
        <!-- 指定全局配置文件的位置 -->
        <property name="configLocation" value="classpath:mybatis-config.xml"></property>
        <!-- 指定mapper文件的位置 -->
        <property name="mapperLocations" value="classpath:mapper/*/*.xml"></property>
     </bean>

    <!-- 扫描所有的mapper接口的实现,自动注入 -->
    <mybatis-spring:scan base-package="org.mybatis.dao"/>
    <!-- <bean class="org.mybatis.spring.mapper.MapperScannerConfigurer">
        <property name="basePackage" value="org.mybatis.dao"></property>
    </bean> -->
</beans>
5.spring-mvc配置文件
spring-mvc.xml
视图解析器没什么好解释的,按照固定格式配置就行了。
包扫描,因为spring-mvc只负责v层的页面控制,所以只扫描所有的controller就足够了。
<?xml version="1.0" encoding="UTF-8"?>
<beans xmlns="http://www.springframework.org/schema/beans"
    xmlns:xsi="http://www.w3.org/2001/XMLSchema-instance"
    xmlns:context="http://www.springframework.org/schema/context"
    xmlns:mvc="http://www.springframework.org/schema/mvc"
    xsi:schemaLocation="http://www.springframework.org/schema/beans http://www.springframework.org/schema/beans/spring-beans.xsd
        http://www.springframework.org/schema/context http://www.springframework.org/schema/context/spring-context-4.2.xsd
        http://www.springframework.org/schema/mvc http://www.springframework.org/schema/mvc/spring-mvc-4.2.xsd">

    <!-- springmvc控制所有的页面跳转,不牵涉业务逻辑 -->

    <!-- 只扫描控制器 -->
    <context:component-scan base-package="org.mybatis.controller" use-default-filters="false">
        <context:include-filter type="annotation" expression="org.springframework.stereotype.Controller"/>
    </context:component-scan>

    <!-- 配置视图解析器 -->
    <bean id="viewResolver" class="org.springframework.web.servlet.view.InternalResourceViewResolver">
        <property name="prefix" value="/WEB-INF/pages/"></property>
        <property name="suffix" value=".jsp"></property>
    </bean>

    <mvc:annotation-driven></mvc:annotation-driven>

    <mvc:default-servlet-handler/>

</beans>
6.配置web.xml
引入spring和spring-mvc的配置文件,编码过滤
<?xml version="1.1" encoding="UTF-8"?>
<web-app version="3.0"
    xmlns="http://java.sun.com/xml/ns/javaee"
    xmlns:xsi="http://www.w3.org/2001/XMLSchema-instance"
    xsi:schemaLocation="http://java.sun.com/xml/ns/javaee http://java.sun.com/xml/ns/javaee/web-app_3_0.xsd">

    <display-name>Archetype Created Web Application</display-name>

    <!-- spring监听配置 -->
    <context-param>
        <param-name>contextConfigLocation</param-name>
        <param-value>classpath:applicationContext.xml</param-value>
    </context-param>
    <listener>
        <listener-class>org.springframework.web.context.ContextLoaderListener</listener-class>
    </listener>

    <!-- springmvc Servlet -->
    <servlet>
        <servlet-name>springmvc</servlet-name>
        <servlet-class>org.springframework.web.servlet.DispatcherServlet</servlet-class>
        <init-param>
            <!--
                实际上也可以不通过contextConfigLocation来配置springmvc的配置文件,可以使用默认的配置文件
                默认的配置文件为:/WEB-INF/<servlet-name>-servlet.xml
             -->
            <param-name>contextConfigLocation</param-name>
            <param-value>classpath:spring-mvc.xml</param-value>
        </init-param>
        <load-on-startup>1</load-on-startup>
    </servlet>
    <servlet-mapping>
        <servlet-name>springmvc</servlet-name>
        <url-pattern>/</url-pattern>
    </servlet-mapping>
     <filter>
        <filter-name>encodingFilter</filter-name>
        <filter-class>org.springframework.web.filter.CharacterEncodingFilter</filter-class>
        <init-param>
            <param-name>encoding</param-name>
            <param-value>UTF-8</param-value>
        </init-param>
        <init-param>
            <param-name>forceEncoding</param-name>
            <param-value>true</param-value>
        </init-param>
    </filter>
    <filter-mapping>
        <filter-name>encodingFilter</filter-name>
        <url-pattern>/*</url-pattern>
    </filter-mapping>

</web-app>
7.创建页面
这里使用欢迎页index.jsp,跳转页面WEB-INF/pages/loginsuccess.jsp
<%@ page language="java" contentType="text/html; charset=UTF-8"  pageEncoding="UTF-8"%>
<!DOCTYPE html PUBLIC "-//W3C//DTD HTML 4.01 Transitional//EN" "http://www.w3.org/TR/html4/loose.dtd">
<html>
<head>
<meta http-equiv="Content-Type" content="text/html; charset=UTF-8">
<title>主页</title>
</head>
<body>
    <h1>Index Page</h1>

    <!-- 测试 -->
    <a href="sysuser/login">welcome</a>
    <br><br>

</body>
</html>
<%@ page language="java" contentType="text/html; charset=UTF-8"  pageEncoding="UTF-8"%>
<!DOCTYPE html PUBLIC "-//W3C//DTD HTML 4.01 Transitional//EN" "http://www.w3.org/TR/html4/loose.dtd">
<html>
<head>
<meta http-equiv="Content-Type" content="text/html; charset=UTF-8">
<title>login</title>
</head>
<body>
login success
</body>
</html>
8.创建controller层
package org.mybatis.controller;

import org.mybatis.service.SysuserService;
import org.springframework.beans.factory.annotation.Autowired;
import org.springframework.stereotype.Controller;
import org.springframework.web.bind.annotation.RequestMapping;
import org.springframework.web.bind.annotation.RequestMethod;

@Controller
@RequestMapping("/sysuser")
public class SysUserController {


    @Autowired
    private SysuserService sysuserService;

    @RequestMapping(value="/login",method=RequestMethod.GET)
    private String sysuserlogin(){
        Integer userId = 2;
        String loginStatus = sysuserService.login(userId);
        System.out.println(loginStatus);
        return "loginsuccess";
    }
}
9.创建service层
package org.mybatis.service;

public interface SysuserService {


    public String login(Integer userId);
}
package org.mybatis.service;

import org.mybatis.bean.Employee;
import org.mybatis.dao.SysuserMapper;
import org.springframework.beans.factory.annotation.Autowired;
import org.springframework.stereotype.Service;

@Service("sysuserService")
public class SysuserServiceImpl implements SysuserService{


    @Autowired
    private SysuserMapper sysuserMapper;

    public String login(Integer userId) {
        Employee emp = sysuserMapper.getEmployeeById(userId);
        System.out.println(emp);
        return "loginsuccess";
    }

}
10.创建mapper接口
package org.mybatis.dao;

import java.util.Map;

import org.apache.ibatis.annotations.Param;
import org.mybatis.bean.Employee;
import org.springframework.stereotype.Repository;

@Repository("sysuserMapper")
public interface SysuserMapper {


    public Employee getEmployeeById(int id);

}
11.测试

跳转结果

打印结果
DEBUG - DispatcherServlet with name ‘springmvc’ processing GET request for [/mybatis-study-02/sysuser/login]
DEBUG - Looking up handler method for path /sysuser/login
DEBUG - Returning handler method [private java.lang.String org.mybatis.controller.SysUserController.sysuserlogin()]
DEBUG - Returning cached instance of singleton bean ‘sysUserController’
DEBUG - Last-Modified value for [/mybatis-study-02/sysuser/login] is: -1
DEBUG - Creating a new SqlSession
DEBUG - SqlSession [org.apache.ibatis.session.defaults.DefaultSqlSession@6edbe1dd] was not registered for synchronization because synchronization is not active
DEBUG - Fetching JDBC Connection from DataSource
DEBUG - trace com.mchange.v2.resourcepool.BasicResourcePool@74e22cc5 [managed: 3, unused: 2, excluded: 0] (e.g. com.mchange.v2.c3p0.impl.NewPooledConnection@7f446405)
DEBUG - JDBC Connection [com.mchange.v2.c3p0.impl.NewProxyConnection@66803b47] will not be managed by Spring
DEBUG - ooo Using Connection [com.mchange.v2.c3p0.impl.NewProxyConnection@66803b47]
DEBUG - ==> Preparing: select * from mybatis_employee where id = ?
DEBUG - ==> Parameters: 2(Integer)
DEBUG - Closing non transactional SqlSession [org.apache.ibatis.session.defaults.DefaultSqlSession@6edbe1dd]
DEBUG - Returning JDBC Connection to DataSource
DEBUG - trace com.mchange.v2.resourcepool.BasicResourcePool@74e22cc5 [managed: 3, unused: 2, excluded: 0] (e.g. com.mchange.v2.c3p0.impl.NewPooledConnection@7f446405)
Employee [id=2, lastName=lisi, email=tang_greatman@qq.com, gender=1]
loginsuccess
DEBUG - Invoking afterPropertiesSet() on bean with name ‘loginsuccess’
DEBUG - Rendering view [org.springframework.web.servlet.view.JstlView: name ‘loginsuccess’; URL [/WEB-INF/pages/loginsuccess.jsp]] in DispatcherServlet with name ‘springmvc’
DEBUG - Forwarding to resource [/WEB-INF/pages/loginsuccess.jsp] in InternalResourceView ‘loginsuccess’
DEBUG - Successfully completed request
DEBUG - Returning cached instance of singleton bean ‘sqlSessionFactoryBean’
本文是在前面系列文章的基础之上实现的,如果对mybatis的一些基本使用不会的,建议先参考前面的mybatis详解-(1)到mybatis详解-(22)系列文章。实现都是手把手搭建和测试的。
到此mybatis的使用就介绍完了。
后续还会写一些什么内容呢?敬请期待….