14、Spring Security 源码解析 - OAuth:客户端模式超简单实现
一、关于 OAuth
什么是 OAuth3.0?
- OAuth(开放授权)是一个开放标准,允许用户让第三方应用访问该用户在某一网站上存储的私密的资源(如照片,视频,联系人列表),而无需将用户名和密码提供给第三方应用。OAuth2.0 是 OAuth 协议的延续版本,但不向前兼容 OAuth1.0,即完全废止了 OAuth1.0(文中提到的默认都是 OAuth2.0)。
应用场景
- 第三方应用授权登录:在 APP 或者网页接入一些第三方应用时,很多时候会有一些授权登录按钮,比如 QQ、微博、微信的授权登录。
- 原生 app 授权:app 登录请求后台接口,为了安全认证,所有请求都带Token 信息,再进行登录验证、请求后台数据。
- 前后端分离单页面应用:前后端分离框架,前端请求后台数据,需要进行 OAuth2.0 安全认证,比如使用 vue、react 或者 H5 开发的应用如小程序等。
OAuth 协议中的各种角色及职责
- 服务提供商(Provider):提供授权许可、访问令牌等。
- 资源所有者(Resource Owner):用户名、昵称、头像信息的所有者,即用户,可以同意或者拒绝授权。
- 第三方应用(Client):比如说博客,它要把微信的用户变成自己的用户,就需要微信授权给博客。
- 认证服务器(Authorization Server):属于服务提供商,主要责任是认证用户身份,并且产生令牌。
- 资源服务器(Resource Server):也属于服务提供商,作用一个是保存用户资源,比如上面的用户信息,另一个是验证令牌的有效性。
OAuth3.0 的四种授权模式
- 授权码模式(authorization code):授权码模式是四种模式中功能最完整,流程最严密的授权模式,互联网上能看到的所有的提供商,微博、微信、QQ、百度等都采用的是授权码模式来完成 OAuth 流程的。
- 简化模式(implicit):有些第三方网站没有专门的服务器,这种时候就可以用简化模式,就是从认证服务器返回到第三方应用的时候直接带的就是令牌,不支持刷新令牌,令牌容易因为被拦截窃听而泄露,所以安全性上授权码模式是更高的。
- 密码模式(resource owner password credentials):用户向客户端提供用户名密码,使用用户名、密码作为授权方式发给认证服务器请求令牌,认证服务器确认无误后,向客户端提供访问令牌,一般不支持刷新令牌。
- 客户端模式(client credentials):客户端向认证服务器进行身份认证,并请求一个访问令牌,认证服务器确认无误后,向客户端提供访问令牌。
关于更多 OAuth2.0 知识请参考官方介绍
二、Spring Security OAuth 实战
- Spring Security 对 OAuth 进行了一个实现,可以让开发者更加简易地使用 OAuth,就是本篇主角 Spring Security OAuth。
场景介绍
公司需要对外(一些第三方)提供一些接口资源,但是我们不能直接把资源暴露出去,我们需要保护好资源,就是访问接口时需要校验第三方请求的合法性。
- 首先,初步想法我们可以为这些第三方做一个登录认证,访问接口时校验 Token 的合法性,这种方式当然可以满足我们的需求,但是这样却略显复杂,还需要对第三方的用户信息进行维护,这其实 duck 不必,因为这些信息我们并不关心。
- 其实,这个场景无非就是要判断第三方请求是否合法,完全可以使用 OAuth 客户端模式来快速的完成我们的需求。
- 具体,我们可以给到每个第三方一个 client_id 和 client_secret,第三方拿着它们请求认证服务器的认证接口 /oauth/token 得到 access_token 令牌,再拿着令牌请求我们资源服务器的接口资源,当然资源接口还会对 access_token 进行校验。
- 正好,Spring Security OAuth 已经给我们提供了 OAuth 实现,实现起来也非常简单,一起来看看。
准备工作
- 要实现的是一个认证服务和资源服务,认证服务作用是提供 Token,资源服务是校验 Token 并且提供接口资源。
- 需要提供存储保存为第三方提供的 client_id 和 client_secret,此外还包括:
create table oauth_client_details
(
    id                      bigint auto_increment comment '主键ID'
        primary key,
    client_name             varchar(255)                        not null comment '客户端名称',
    client_id               varchar(255)                        not null comment '客户端标识',
    client_secret           varchar(255)                        null comment '客户端访问密匙',
    resource_ids            varchar(255)                        null comment '客户端所能访问的资源 id 集合,多个资源时用逗号(,)分隔',
    scope                   varchar(255)                        null comment '指定客户端申请的权限范围,可选值包括 read,write,trust;若有多个权限范围用逗号(,)',
    authorized_grant_types  varchar(255)                        null comment '客户端支持的 OAuth 模式,可选值包括 authorization_code,password,refresh_token,implicit,client_credentials, 若支持多个 grant_type 用逗号(,)分隔',
    web_server_redirect_uri varchar(255)                        null comment '客户端的重定向 URI,可为空',
    access_token_validity   int                                 null comment 'access_token 的有效时间值(单位:秒)',
    refresh_token_validity  int                                 null comment 'refresh_token 的有效时间值(单位:秒)',
    authority               varchar(255)                        null comment '当前客户端可访问的权限接口, “请求动词 + 空格 + 接口”格式,多个用逗号隔开',
    create_time             timestamp default CURRENT_TIMESTAMP not null comment '创建时间',
    create_date             timestamp default CURRENT_TIMESTAMP not null comment '创建时间',
    create_user             varchar(32)                         null comment '创建人',
    modify_date             timestamp default CURRENT_TIMESTAMP not null on update CURRENT_TIMESTAMP comment '修改时间',
    modify_user             varchar(32)                         null comment '修改人'
)
    comment '开放平台客户端' charset = utf8mb4;
- 还需要利用 Redis 储存 Token,因为认证服务和资源服务是分布式部署,甚至也可以拆分资源部署不同的资源服务器而共用一个认证服务器。
认证服务配置(OAuthServerConfig)
- OAuth2 认证服务配置(OAuthServerConfig):继承 AuthorizationServerConfigurerAdapter 类,覆盖该类的三个方法(源码篇介绍为何要继承这个类,文章末尾给出源码篇地址)
@Configuration
@EnableAuthorizationServer
public class OAuthServerConfig extends AuthorizationServerConfigurerAdapter{


    @Autowired
    private AuthenticationManager authenticationManager;

    @Autowired
    private OAuthClientDetailsService oAuthClientDetailsService;

    @Autowired
    private TokenStore tokenStore;

    /**
     * accessToken 过期时间
     */
    private int accessExpireTimeInSecond = 2592000;

    /**
     * refreshToken 过期时间
     */
    private int refreshExpireTimeInSecond = 86400;

    /**
     * 生成 token 的处理
     */
    @Primary
    @Bean
    public DefaultTokenServices defaultTokenServices() {


        DefaultTokenServices tokenServices = new DefaultTokenServices();
        tokenServices.setTokenStore(tokenStore);
        // 是否支持 refreshToken
        tokenServices.setSupportRefreshToken(true);
        // 是否复用 refreshToken,不复用的话是每次都会刷新token
        tokenServices.setReuseRefreshToken(true);
        // token 有效期自定义设置,默认12小时
        tokenServices.setAccessTokenValiditySeconds(accessExpireTimeInSecond);
        // 默认 30 天,这里修改
        tokenServices.setRefreshTokenValiditySeconds(refreshExpireTimeInSecond);
        return tokenServices;
    }

    /**
     * 配置 ClientDetailsServiceConfigurer
     *
     * @param clients
     * @throws Exception
     */
    @Override
    public void configure(ClientDetailsServiceConfigurer clients) throws Exception {


        clients.withClientDetails((ClientDetailsService)oAuthClientDetailsService);
    }

    @Override
    public void configure(AuthorizationServerSecurityConfigurer oauthServer) throws Exception {


        // 开启 /oauth/token_key 验证端口无权限访问
        oauthServer.tokenKeyAccess("permitAll()");
        // 开启 /oauth/check_token 验证端口认证权限访问
        oauthServer.checkTokenAccess("permitAll()");
        // 开启后请求需要带上 client_id client_secret
        oauthServer.allowFormAuthenticationForClients();
    }

    @Override
    public void configure(AuthorizationServerEndpointsConfigurer endpoints) throws Exception {


        endpoints
                .tokenStore(tokenStore)
                .authenticationManager(authenticationManager)
                .tokenServices(defaultTokenServices())
                // 获取token支持get方式和post方式
                .allowedTokenEndpointRequestMethods(HttpMethod.GET, HttpMethod.POST);
    }
}
- Bean 声明(BeanConfig)
@Configuration
public class BeanConfig {


    @Autowired
    private RedisConnectionFactory connectionFactory;

    /**
     * 这里使用 Redis 存储 Token
     *
     * @return
     */
    @Bean(name = "tokenStore")
    public TokenStore tokenStore() {


        RedisTokenStore tokenStore = new RedisTokenStore(connectionFactory);
        // 设置存储 Token 信息的前缀
        tokenStore.setPrefix("api:client:token:");
        return tokenStore;
    }

    /**
     * 如果需要使用 Spring Expression 表达式,需要配置这个 Bean(资源服务器校验接口权限需要配置这个)
     *
     * @param applicationContext
     * @return
     */
    @Bean
    public OAuth2WebSecurityExpressionHandler oAuth2WebSecurityExpressionHandler(ApplicationContext applicationContext) {


        OAuth2WebSecurityExpressionHandler expressionHandler = new OAuth2WebSecurityExpressionHandler();
        expressionHandler.setApplicationContext(applicationContext);
        return expressionHandler;
    }

    /**
     * 配置 oAuthClientDetailsService Bean,
     *
     * @return
     */
    @Bean(name = "oAuthClientDetailsService")
    public OAuthClientDetailsService oAuthClientDetailsService() {


        return new OAuthClientDetailsServiceImpl();
    }
}
- OAuth 授权客户端信息服务类(OAuthClientDetailsServiceImpl):实现 ClientDetailsService 和 ClientRegistrationService 以及自定义的 OAuthClientDetailsService 接口,主要提供了按照 client_id 查找客户端方法以及查询当前客户端所拥有接口权限的方法。
@Service
@Slf4j
public class OAuthClientDetailsServiceImpl implements OAuthClientDetailsService, ClientDetailsService, ClientRegistrationService {


    @Override
    public Boolean hasPermission(HttpServletRequest request, Authentication authentication) {


        String clientId = (String) authentication.getPrincipal();

        // TODO 根据 clientId 查询该客户端所拥有的接口权限
        Set<String> urls = new HashSet<>();
        urls.add("GET /hello");

        if (urls.size() > 0) {


            return urls.stream().anyMatch(
                    url -> url.equalsIgnoreCase(request.getMethod() + " " + request.getServletPath()));
        }

        return false;
    }

    @Override
    public ClientDetails loadClientByClientId(String clientId) throws InvalidClientException {


        // TODO 根据 clientId 查询数据库数据,组装出 ClientDetails 返回(注意这里的常量值都应该是数据库查询出来的)
        if ("4099c23e45f64c158065e1b062492357".equalsIgnoreCase(clientId)) {


            BaseClientDetails details = new BaseClientDetails("4099c23e45f64c158065e1b062492357",
                    "security_oauth_demo_resource_id", "read,write",
                    "client_credentials,refresh_token,authorization_code", null,
                    null);
            details.setClientSecret("f5b351eb6df8458382d0303aae8a72d7275a2296ff45488c9f135ca120edebd1");

            return details;
        } else {


            log.error("查询授权客户端异常:e={}", "客户端不存在");
            throw OAuthenticationException.CLIENT_QUERY_FAIL;
        }

    }

    @Override
    public void addClientDetails(ClientDetails clientDetails) throws ClientAlreadyExistsException {


        // ignore...
    }

    @Override
    public void updateClientDetails(ClientDetails clientDetails) throws NoSuchClientException {


        // ignore...
    }

    @Override
    public void updateClientSecret(String clientId, String secret) throws NoSuchClientException {


        // ignore...
    }

    @Override
    public void removeClientDetails(String clientId) throws NoSuchClientException {


        // ignore...
    }

    @Override
    public List<ClientDetails> listClientDetails() {


        // ignore...
        return new ArrayList<>();
    }
}
资源服务配置(OAuthResourceConfig)
- OAuth2.0 资源服务配置(OAuthResourceConfig):继承 ResourceServerConfigurerAdapter 类,主要任务是判断当前请求是否合法,包括校验 Token 的正确性,接口是否有权限等。
@EnableResourceServer
@Configuration
@Slf4j
public class OAuthResourceConfig extends ResourceServerConfigurerAdapter {


    @Autowired
    private TokenStore tokenStore;

    @Autowired
    private OAuth2WebSecurityExpressionHandler oAuth2WebSecurityExpressionHandler;

    /**
     * 资源ID,唯一标识一个资源,oauth_client_details 的 resource_ids 需要有这个才能访问当前资源
     */
    public static final String RESOURCE_ID = "security_oauth_demo_resource_id";

    /**
     * 白名单
     */
    protected String[] permitUrls = new String[]{

       "/ad"};

    @Override
    public void configure(ResourceServerSecurityConfigurer resources)throws Exception{


        resources
                .resourceId(RESOURCE_ID)
                // tokenStore 定义在 OAuthorizationServerConfig
                .tokenStore(tokenStore)
                .expressionHandler(oAuth2WebSecurityExpressionHandler);
    }

    @Override
    public void configure(HttpSecurity http) throws Exception {


        http.authorizeRequests()
                .antMatchers(HttpMethod.OPTIONS).permitAll()
                .antMatchers(permitUrls).permitAll()
                .anyRequest().access("@oAuthClientDetailsService.hasPermission(request, authentication)")
                .and()
                .httpBasic()
                .and().csrf().disable();
    }

}
- 至此,所有代码已完成,是不是很惊讶才这几行就已经完成了认证服务和资源服务,是的没错,就这几个类就完成了 OAuth 客户端模式的应用。
三、效果演示
准备阶段
- 准备接口(/hello、/bye、/ad)
/**
 * 用户登录才可访问
 *
 * @return
 */
@GetMapping("/hello")
public String hello() {


    return "Hello Spring Security!";
}

/**
 * 用户登录才可访问
 *
 * @return
 */
@GetMapping("/bye")
public String bye() {


    return "Bye Spring Security!";
}

/**
 * 广告接口,匿名用户可以访问
 *
 * @return
 */
@GetMapping("/ad")
public String no() {


    return "妈妈再也不用担心我的学习!";
}
- 准备客户端配置,上面代码模拟做了如下数据库配置,便于维护,这些配置都要配到数据库中的,这里直接写死代码中作了简化处理。
// 分配给第三方的 client_id
client_id = 4099c23e45f64c158065e1b062492357
// 分配给第三方的 client_secret
client_secret = f5b351eb6df8458382d0303aae8a72d7275a2296ff45488c9f135ca120edebd1
// 能访问的资源服务器
resourceIds = security_oauth_demo_resource_id
// 当前客户端拥有的作用域
scopes = read,write
// 当前客户端可使用的模式
grantTypes = client_credentials,refresh_token,authorization_code
// 当前客户端能访问的接口(也作了简化处理,写死在代码中)
urls = GET /hello
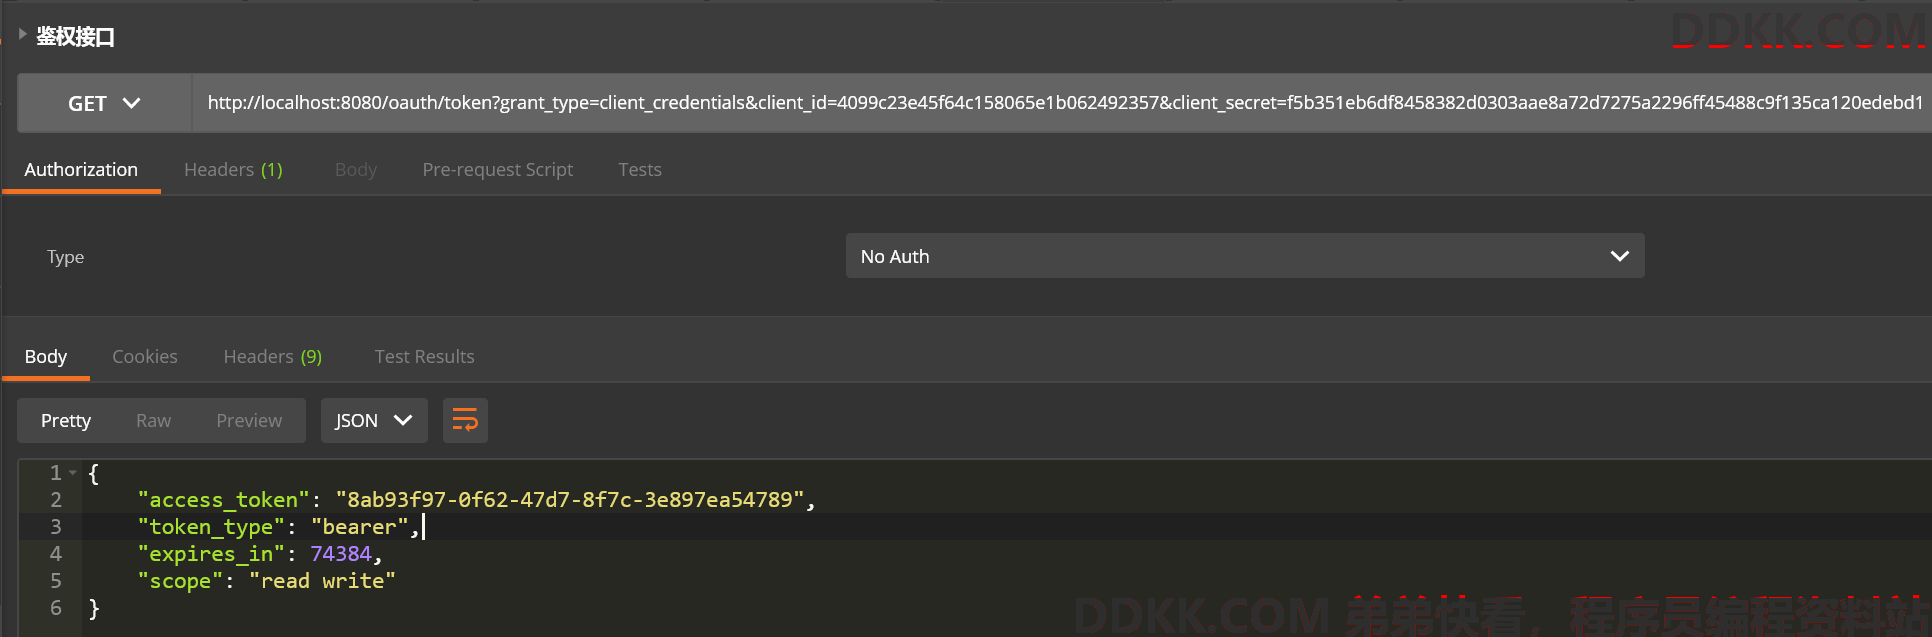
获取 Token
- 根据分配的 client_id 和 client_secret,以及指定 grant_type 为客户端模式,访问 /oauth/token 接口获取 access_token。
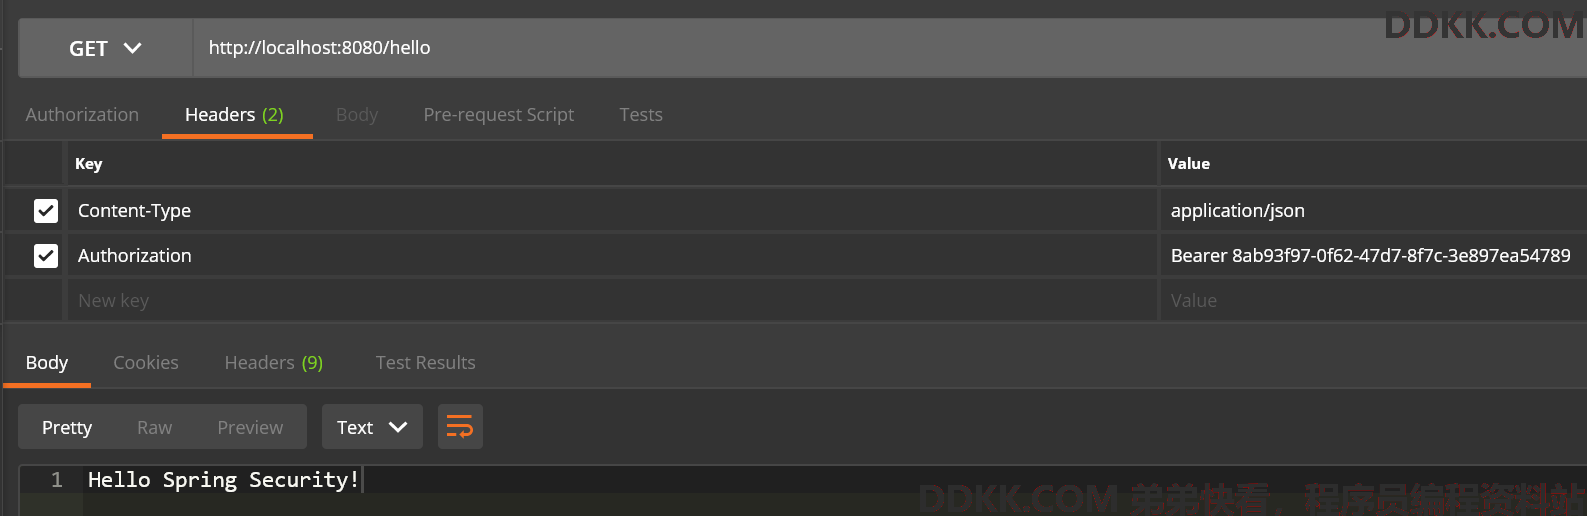
访问资源
- 成功演示,请求头带上 access_token,访问 /hello 接口,注意一定要 Bearer 开头,空格隔开再拼接 access_token,具体为何要这样,请看文末源码篇。
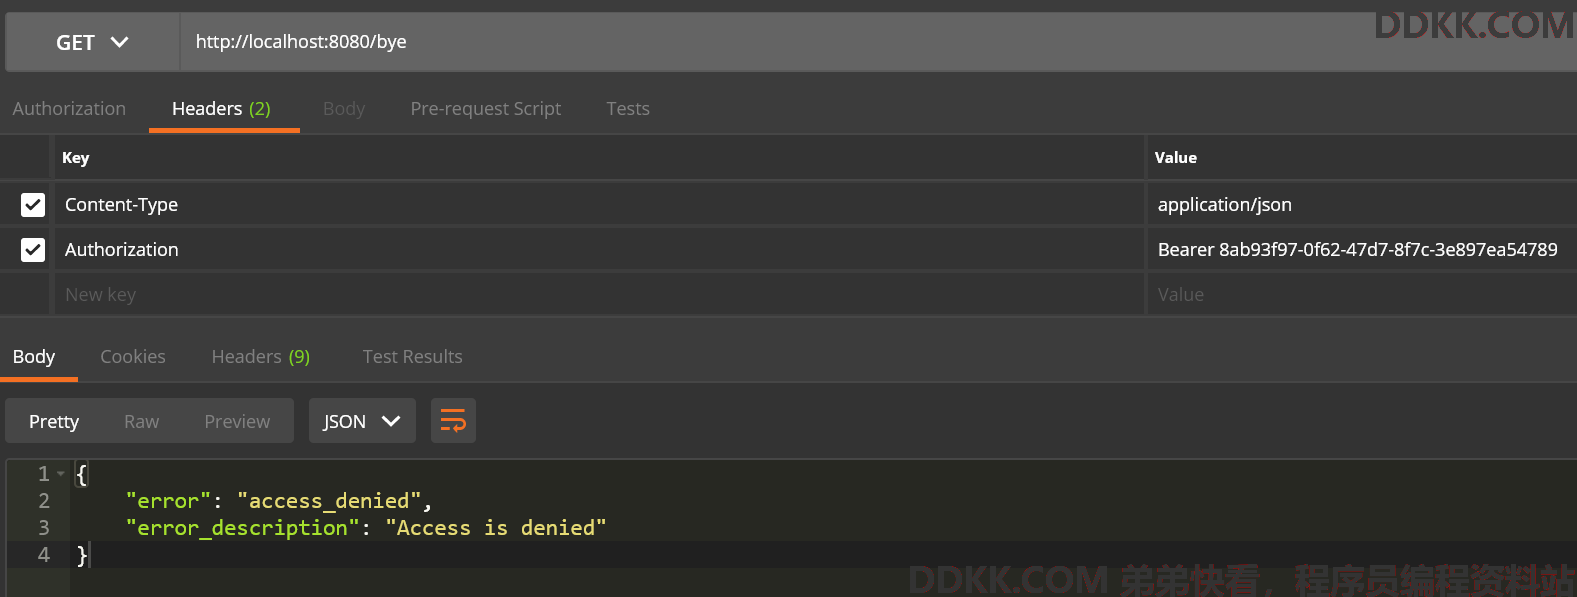
- 失败演示,访问 /bye 接口,报无权限访问
- 失败演示,不带上令牌

四、总结
- OAuth(开放授权)是一个开放标准,Spring Security OAuth 给我们提供了一个 OAuth 的实现,本篇演示了如何使用 Spring Security OAuth 作为客户端模式的应用。
- 主要工作在于要实现认证服务器和资源服务器,认证服务器继承 AuthorizationServerConfigurerAdapter 类,资源服务器继承 ResourceServerConfigurerAdapter 类。
- 本案例认证服务和资源服务部署在了同一个模块,按照规范来说认证服务和资源服务应该是需要分开部署的,这里都做了简易处理。
- 全篇都在强行告知要怎么做,却并未告知为什么这么做,关于为什么,请参考源码篇。
- 源码奉上:Github 项目地址:spring-security-demo,要注意启动之前注释掉 WebSecurityConfig 类上的注解。